Working with the Ext. Cash Receipt Journal
This chapter describes the functionality differences between the OPplus Ext. Cash Receipt Journal and the journal of the BC standard application.
Additional Columns
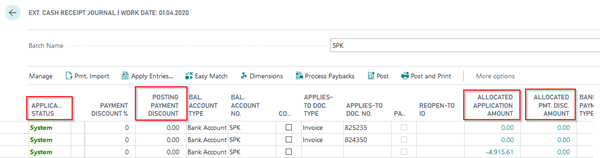
Application Status
This field is filled by the system for each line
- System: the system has applied one or more entries
- Accounted: the system has performed accounting without any applications
- To Complete: Entries were found during application, but the application amount does not match the payment amount. The user should decide how to handle the difference in the Extended Application window
- Open: the system has found no hits during the import
Posting Payment Discount
If the current journal line applies exactly one document (which means that the Applies-to Doc. Type and Applies-to Doc. No. fields are filled), the payment discount amount actually posted will be shown here.
The contents of this field can be modified manually. If you change this field, the change difference amount will be automatically subtracted from the amount.
Example:
| Situation | Amount | Posting Pmt. Disc. Amount |
|---|---|---|
| Before Change | -98,00 | -2,00 |
| Change | -3,00 | |
| After Change | -97,00 | -3,00 |
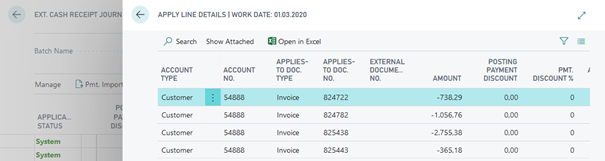
Allocated Application Amount, Allocated Pmt. Disc. Amount
If the current journal line applies more than one document (which means that the Applies-to Doc. Type and Applies-to Doc. No. fields are not filled), you can display (by using the drilldown function in these fields) the exact payment amount on each open entry as well as the total payment discount amount:
The “Payback” and “Reopen-to ID” columns are available enabling the Payback feature. For more information, please refer to chapter ‘Payback‘ feature during Pmt. Imports into Gen. Journals.
Action Ribbon
direct access

Pmt. Import:
Here you have the possibility to import an import register into the ext. cash receipt journal.
Apply Entries [SHIFT+F11]: The Extended Application window opens which is required when applying several invoices with one payment.
Easy Match:
Due to the complexity of the Easy Match window, please refers to chapter Easy Match window for a detailed description.
Dimensions:
In this window you see the dimension set entries of the respective line.
Process Paybacks:
This menu item is part of the Payback / Return Debit Notes feature. For more information, please refer to chapter ‘Payback‘ feature during Pmt. Imports into Gen. Journals.
Post and Post and print:
These are the standard posting functions.
Action Submenu, Pmt. Import
Show Pmt. Import Line [Ctrl+F3]:
By selecting this menu item, the user can open the associated payment import line.
Block Bank Account for Import:
If you do not want the bank account in this line to be used for future account assignments, you can block the bank account for import here.
Action Submenu, Entries
Search Ledger Entries:
If the Customer account type (or Customer balance account type) is selected in the journal line, you can open the list of all customer entries. If you leave this view by clicking the OK button, the respective customer number will be copied into the Account No. field (or into the Bal. Account No. field). The same applies for the Vendor account type (or Vendor balance account type). The cursor will be automatically positioned into the Amount field.
Ledger Entry Comments:
This menu item is only available if you have licensed the OPplus Ext. Lists and Reports module. By selecting this menu item, you can open the ledger entry comments of the currently selected entry. This is included in the posting and can also be viewed in the posted entries.
Action Submenu, Posting
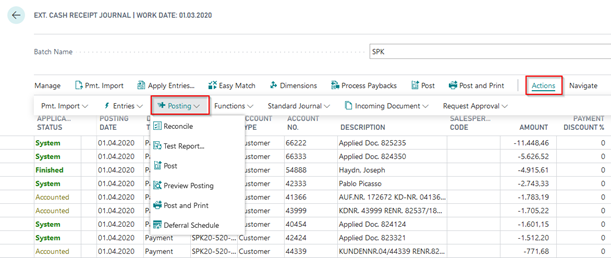
Here you can use the standard functions, as they are also used in BC standard journals.
Action Submenu, Functions
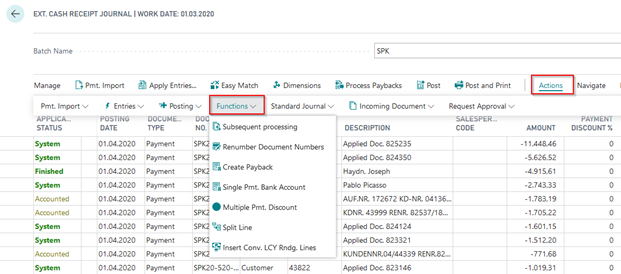
Subsequent Processing:
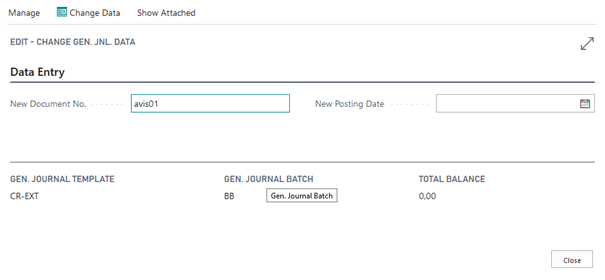
Using this function, you can assign a new document number or a new posting date to the lines in the journal.
Only the values that are actually filled are changed. For example, if only the document number is reassigned and the posting date remains empty, the posting date is not changed. Accordingly, the system behaves the same the other way round. When opening the window, the corresponding fields are not preassigned, but empty.
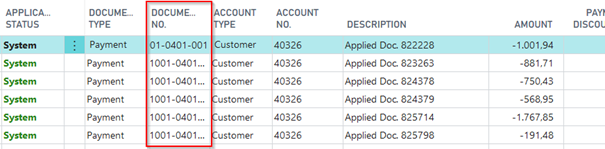
This could be useful for importing payment advices. Here it is better to use only one document number for the split posting.
After the import of a payment advice, the ext. cash receipt journal looks like this, for example:
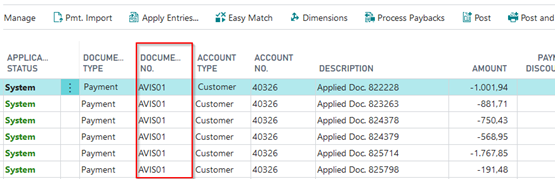
If the user now prefers to post the entire posting with a uniform document number, enter the new document number in the "Subsequent Processing" window and select the "Change Data" menu item:
Here, it is required to select the “Change Data“ button. If you click OK without selecting the change button, the window will be closed and the changes will not be applied.
Confirm the following dialog box by clicking “Yes“ in order to change and to update the data in the journal.
Renumber Document Numbers:
This is the standard function that allows you to renumber the lines on the journal based on a no. series.
Create Payback:
You use this function to enter a payback to a customer/vendor. If the customer pays a payment twice by mistake, you can enter a payback here, which can be processed in subsequent steps using payment export in payment transactions. The system proposes the bank account with which the incoming payment was made.
Single Pmt. Bank Account:
Here you can enter a bank account. These are only valid for this entry and are independent of the bank accounts entered in the data record.
Multiple Pmt. Discount:
If the journal is also used for entering documents, you could view the entries for multiple payment discounts here (if the corresponding module is licensed and the customer has a payment term code with multiple payment discounts).
Split Line:
By using this function, you can split a line into several lines that is assigned to a G/L account. In the opening Allocation - Bankimp window, you can execute the required allocations.
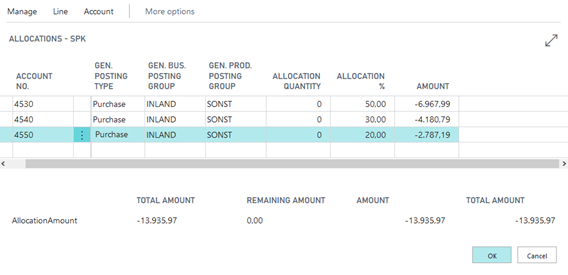
By confirming with "OK" the corresponding allocation is transferred to the journal.

If you do not confirm the window via "OK" but leave it via "Cancel", the entered values are not deleted. You can display them again by selecting "Split Line" again.
Insert Conv. LCY Rdng. Lines:
This is the standard function for application when converting foreign currency into local currency.
Action Submenu, Additional Features
Standard Journal, Incoming Document and Request Approval:

These menu items are standard functions.
Navigate Submenu, Account:
Card: With this function you open the card of the account of the respective line
Ledger Entries: You use this function to open the ledger entries of the account in the respective line.