Connecting Webservices
Setup of Webservice
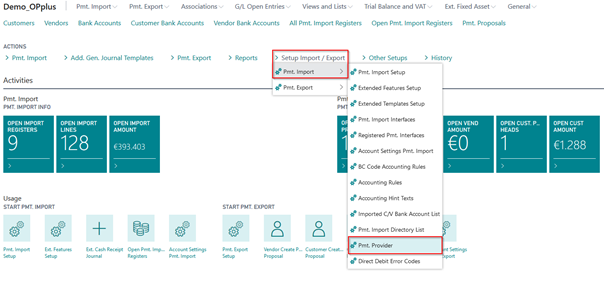
After having received the access data, you need to specify the Pmt. Provider table. For this, open the Pmt. Provider page via the Setup Import/Export menu:
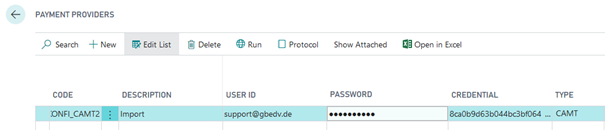
An option for a payment provider would be Confipay from Windata. For this solution we show here an example of the configuration. Create a provider KONFIPAY and enter your e-mail address, your password and the credential information which you have received from windata.
This data is required in order to use the web service for the retrieval of bank statements and for the dispatch of payment files.
Setup of Web Service for Statement Retrieval
Go to Pmt. Import Setup and open the Pmt. Import tab.
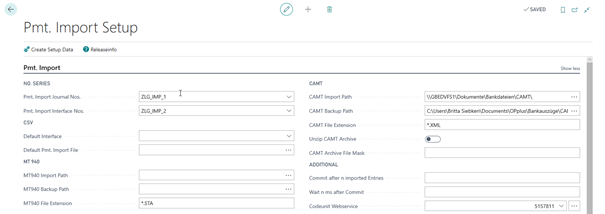
Fill in the following field:
| Option | Description |
|---|---|
| Codeunit Webservice | 5157811 (Standard OPplus Codeunit) |
Setup of Interfaces
During the first import, the payment import interfaces are created and automatically filled with the corresponding fields. The further setup is done as described in the chapter Pmt. Import Interface.

| Option | Description |
|---|---|
| Payment Provider Code Input | Enter the payment provider you want to use to perform the import incl. the respective data like logs, logins etc. |
| Payment Provider Bank ID | Enter the corresponding bank ID (Konfipay = IBAN) which is used for unique assignment during retrieval. If you validate the “Payment Provider Code Entry“ field and the “Import in Account No.“ is filled, the specified IBAN will be automatically used. |
Get Statements
In order to get the statements, go to “Open Pmt. Import Registers“ and select Import: Get Statements via Webservice.
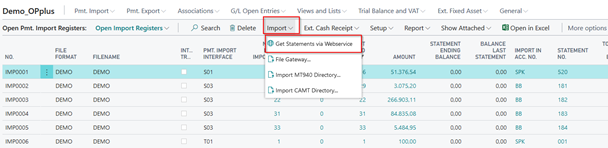
All subsequent steps correspond to those you would have performed if retrieval of statements had been done via bank software like SFirm or Multicash.
For further information, please refer to the respective manual of the respective payment provider.
New payment provider Bizcuit
With Bizcuit another payment provider has been connected to OPplus. The connection is not included in the standard package. For this purpose an extra extension is provided, which can be requested from us.
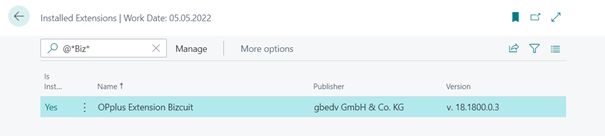
The setup and specifics for this payment provider are described in a separate manual.
Base/Payment/G/L Account – Open Entries → Foreign Currency
In the Base module, you are offered a number of possibilities to use foreign currencies in an enhanced form.
The affected fields are not directly available and must be made visible in consultation with your partner. With this feature, you can completely override and change the default behavior of the Business Central system in the Foreign Currency area.
Currency Tab
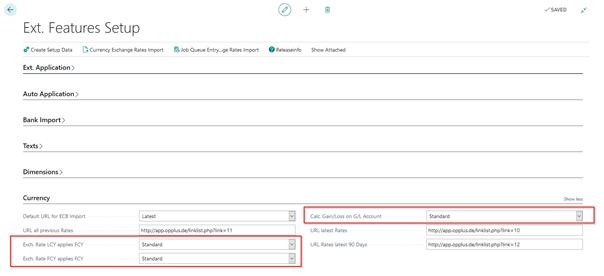
In the OPplus Setup, you will find the following 3 additional foreign currency fields, all of them preset to the “Standard” setting. This setting means that posting and application is not changed according to the Business Central standard.
Exch. Rate FCY applies FCY:
The following two options are available:
- Standard
- Journal Line
If foreign currency amounts are paid in local currency, you can select the “Standard” option. The system will retrieve the currency exchange rate on the posting date and perform the application with the converted amounts.
With the option "Journal Line", the application amount is not recalculated, but passed on from the journal line to the application.
Exch. Rate FCY applies FCY:
The following two options are available:
- Standard
- Original Factor
If foreign currency amounts are paid in foreign currency, you can select the “Standard” option. The system will retrieve the currency exchange rate on the posting date and perform the application with the converted amounts. This may lead to exchange rate differences.
If you select the “Original Factor“ option, the system will retrieve the factor of the original entry and post the payment by using the 1:1 factor. This does not lead to any exchange rate differences.
Calc Gain/Loss on G/L Account:
This field is relevant in the G/L entry application. The following 3 options are available:
- Standard
- Yes
- No
Standard: application is carried out in FCY at the exchange rate of the payment date and any existing balance (if the exchange rate has changed in the meantime) is displayed in a new application line
Yes: the application is carried out in FC at the exchange rate of the payment date and any existing balance (if the exchange rate has changed in the meantime) is created in a new line as an exchange rate difference
No: application is carried out at the exchange rate of the original posting and no exchange rate difference is created
Example “Exch. Rate LCY applies FCY”
„Standard“ Option:
Select the “Standard“ option. Post an invoice with an amount of USD 1,000.00 with an exchange rate of 1.5 on the invoice posting date, which are 666.67 in LCY.

After having posted the payment, the exchange rate has changed to 2.0.
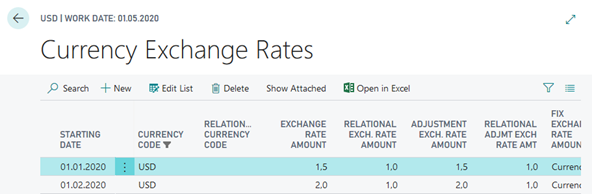
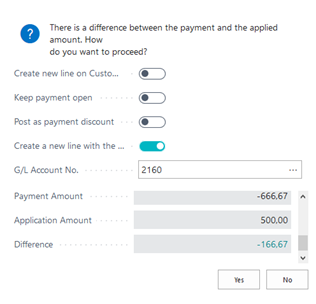
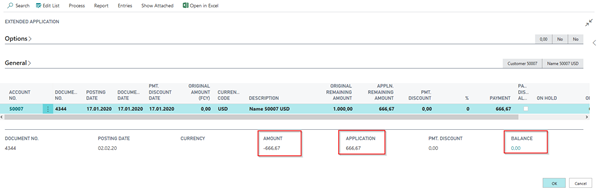
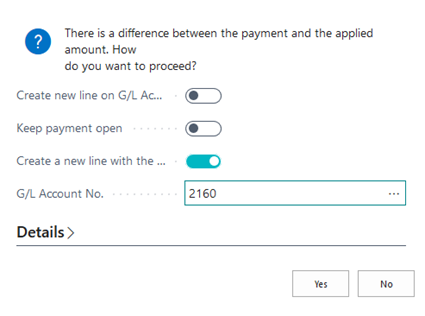
For example, because the rates were hedged, the payment is made at the original value, in this case 666.67 €. But because the standard option uses the new rate from 01.02., there is a difference of 166,67
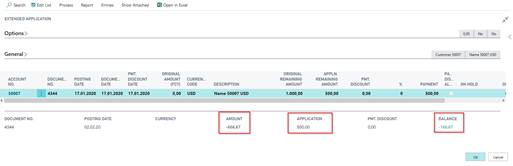
Here the user must decide how to handle it:
„Journal Line“ Option:
The same application as above takes place. In this case, however, the system checks for the exchange rate on the invoice date and no difference occurs:
Example “Exch. Rate FCY applies FCY”
„Standard“ Option:
Post an invoice with an amount of USD 1,000.00 with an exchange rate of 1.5 on the invoice posting date.

Posting of payment to the amount of USD 1,000.00 with an exchange rate of 2.0 on the payment posting date.
When posting the application, the exchange rate of the payment applies and the calculated rate difference will be posted to the exchange rate profit and loss account specified for the currency.
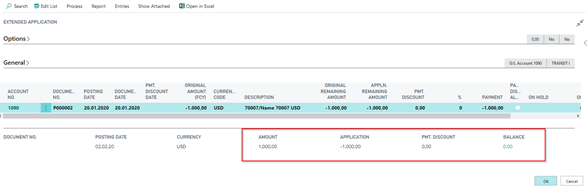
„Original Factor“ Option:
The same application as above takes place. In this case, however, the system checks for the exchange rate on the invoice date and this does not result in a difference that is posted in the background (as above):

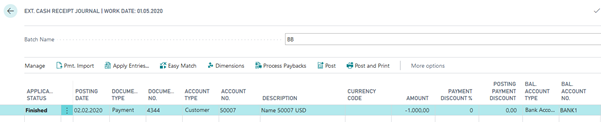
This setup is considered in the Ext. Cash Receipt Journal if the same currency code is defined on the balanced account (so in the above example the bank account must be a USD bank account). It is also generally considered in account in the payment proposal.
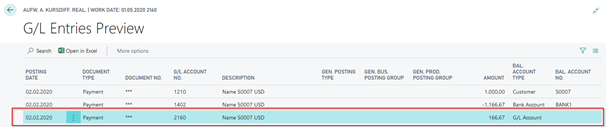
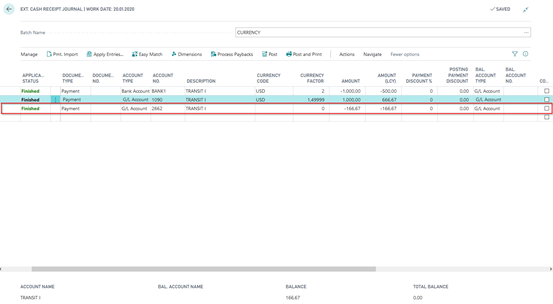
Example “Calc Gain/Loss on G/L Account“
A payment proposal for 1000.00 USD is posted in the Pmt. Import module. This results in a posting on the transit account on 20.01. - at an exchange rate of 1.5, an amount of 666.67 in LCY.
On 01.02. the exchange rate has changed to 2.0 for USD. On 02.02. The amount of 1000.00 USD is now to be applicated:
„Standard“ Option:
1000.00 USD is entered as the application amount. With an exchange rate of 1.5 666.67 LCY.
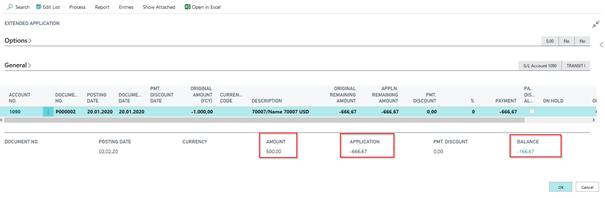
The user must decide how to handle the difference:
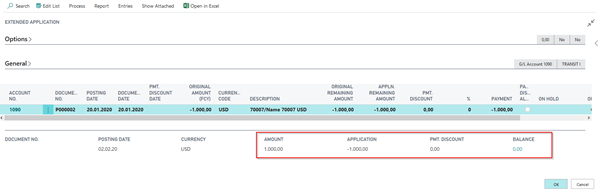
„Yes“ Option:
No difference is indicated:
Only when you leave the window does the system indicate that the exchange rate difference is automatically posted:
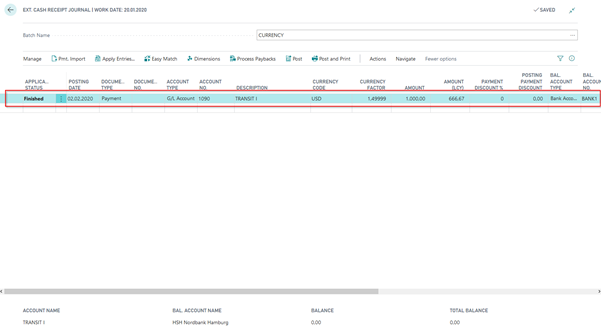
„No“ Option:
There is no exchange rate difference, because valuation is based on the original currency factor:
General Topics
General Ledger Entries
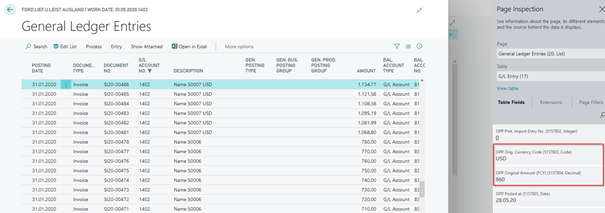
If the payment import module has been activated, 2 OPplus fields are automatically filled in the G/L ledger entries:
- OPP Orig. Currency Code
- OPP Original Amount (FCY)
These fields are not integrated into the entry mask by OPplus. You can display these fields using the page inspection. These fields are for information purposes only; no rate adjustments or other things are made.
No setup is necessary to obtain this information.
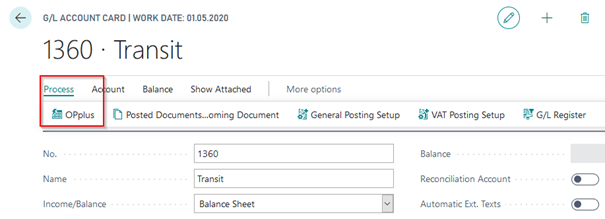
G/L Account Card
The Payment Import module adds the OPplus menu button to the G/L account card:
![New Option Fields]/images/COPP/en-us/pmtimport/OptionsInGLAcc.png)
Dim. for System entries:
Here you have the following options to select from:
- Gen. Jnl. Line (Always)
- G/L Account (Always)
- G/L Account (if empty Gen. Jnl. Line)
These values are used for system postings, such as the Adjust Exchange Rate, to determine the dimensions in the postings.
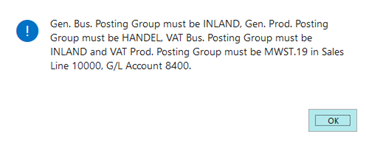
Check Tax Key:
If you placed a checkmark here, the system checks the tax key for all G/L account postings. If this key does not match that of the G/L account, an error message appears.
Note
Consequently, the corresponding G/L account is also checked during the shipping and invoicing of purchasing and sales documents with items.
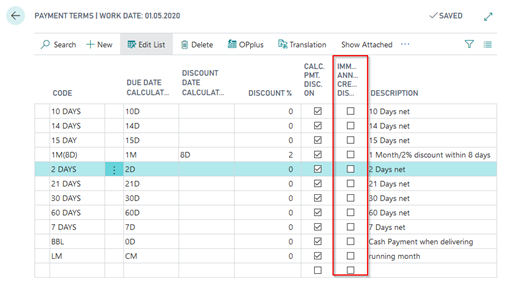
Payment Terms
The OPplus Payment Import module enables you to have the due date in credit memos automatically set to the document date. Credit memos are then due immediately. The setup occurs via the payment terms: Here there is the field "Immediate Annuity Credit Disc./Refund".