OPplus Association
New setup from version OPplus 19
{% hint style=info %} This article describes OPplus version OPP 365 16.0.0.2. {% endhint %}
Starting with version OPplus 19, the association-specific setup fields have been moved from the Extended setup of the module Payment import to a setup table of the Associations module.
For the new setup of the module it is therefore necessary from version 19 on that the module is activated accordingly.
To activate the module:
- Go to Other setups > Associations setup.
- In the General section, enable Enable association.
The module has two components:
- You can merge any number of customers into a customer association or any number of vendors into a vendor association.
- You can link a customer with a vendor to form a customer / vendor link for clearing entries.
In the Extended Application window, you can display all the open entries belonging to an association or link and thus to assign a payment amount across the board. The aim is that a payment from one customer or vendor can be distributed to several customer/vendor items in one step. For example, because the central administration executes a payment for different customers.
You can also use the OPplus payment proposal for outgoing payment, for example, to have a customer offset against a vendor and only instruct the difference to the payment.
{% hint style=warning %} You can only use this module in conjunction with the Payment Import and Payment Export (OPplus Bundle) modules. {% endhint %}
To apply an association
To apply an association:
- On OPplus, navigate to Associations > Associations. The page of the association list opens. You can also access the card from here. The Association Card opens.
- To create a new association, click the + symbol in the card header (Create a new entry). In the following table, only the fields of the card that are essential for the application are explained:
| Option | Description |
|---|---|
| Type | In this field, you have to select the type of association (customer or vendor). |
| No. | In this field, enter the number of the association. To use a number series, you have to enter the corresponding number series code in the Association numbers field on the Ext. Application tab page in the OPplus setup. |
| Leading Account No. | Here you enter the number which is the leading account number of the association. This field is also relevant for parallel use of the OPplus Payment Export module, since the bank details are required for payment transactions. |
| Pmt. Account No. | Here you enter the G/L account number on which the total payment of the association shall be posted. If this field is filled, the entire payment amount is first posted to the association against the bank, then a write-off takes place via the payment account no. and the individual association accounts are posted against this account. See also the chapter Usage Pmt. Account No.. |
| Assoc. Credit Limit (LCY) | Here you can enter the credit limit (LCY) that is to apply to this association (debit only). |
| Check Credit Limit | Is this field activated, the credit limit for this association is checked in the journal and in the document (debit only). |
- If you change the association number for an existing association, the association number does not automatically change to the new number in the corresponding customer and vendor ledger entries. In the display of the entries over an association, these are then also dropped. Since no value has yet been written to the database when the new number is entered, it is technically not possible to change the entries at runtime. For this case, click Update Association Entries. This function makes sure that the entries of the corresponding accounts are updated with the association number.
- Now enter the association number you have just assigned to the customers or vendors you wish to identify as members of the association. You will find the field via the function button Process/OPplus on the corresponding card of the personal account and there in the tab Associations. There you can also assign an association key which you can use to sort the members of the association.
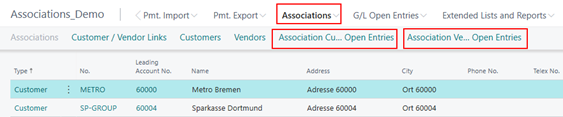
- The list of all created associations is displayed directly from the main menu:
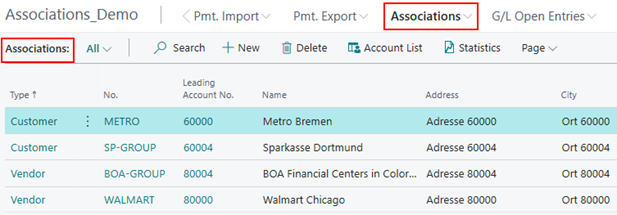
- The sorting of the association list is carried out by default in the sequence Art, No. ascending. You can assign any number of customers or vendors to an association. Which accounts are assigned to an association can be viewed by clicking on the button Associations > Account List of the association card:
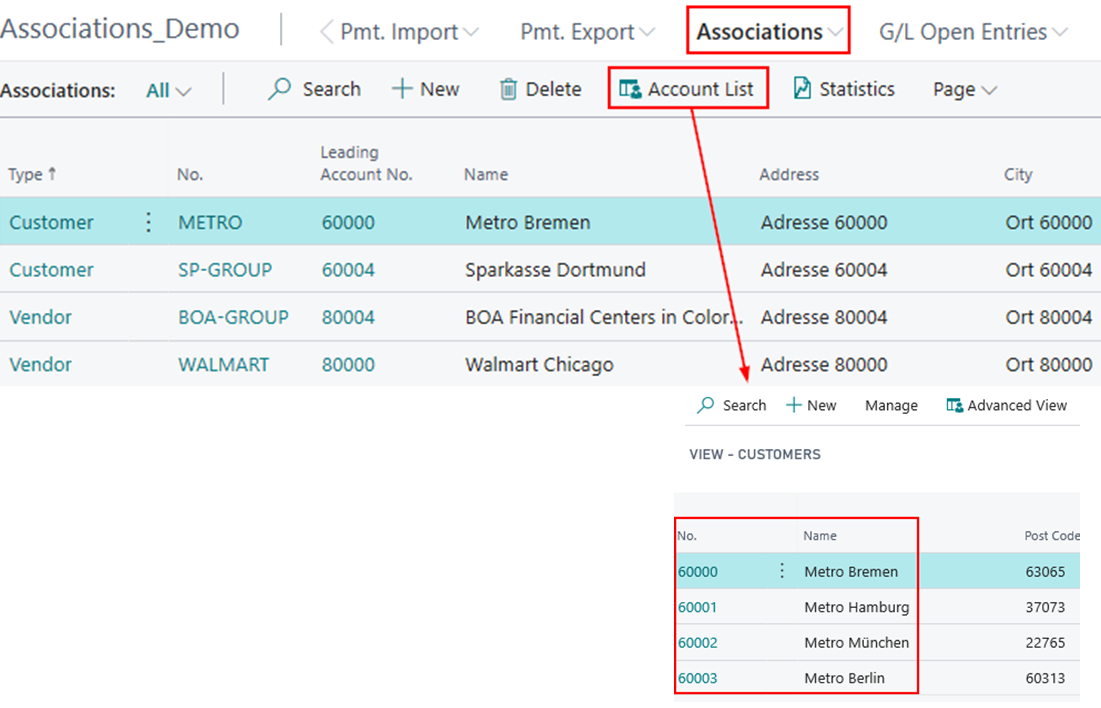
{% hint style=info %} By default, the account list is sorted in ascending order of type and number. {% endhint %}
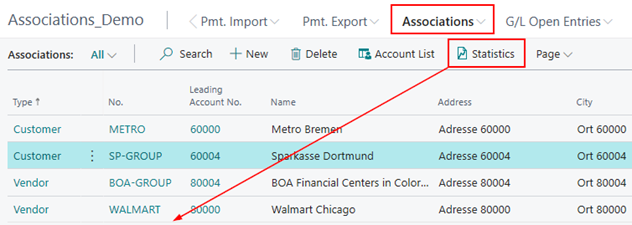
Association Statistics
In the area of associations, an association statistic for customer and vendor associations was integrated. These statistics are based on the standard customer and vendor statistics and can be opened directly from the association list and association card.
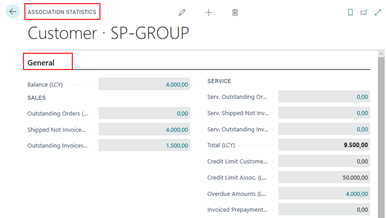
In the upper area, you will find the general information about the association.
In the lower area the corresponding sales values (or purchase values) and other association data:
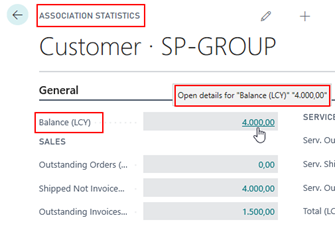
The corresponding LookUps, as here in the Balance field, are also available in the statistics at association level:
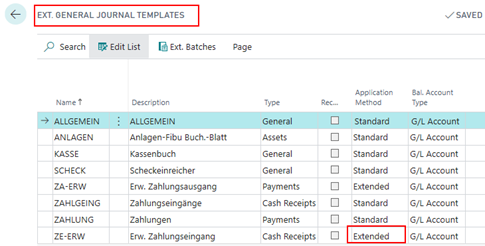
Extended Application: Additional Fields for Association
You can only open the extended application if the general journal batch is set to Extended:
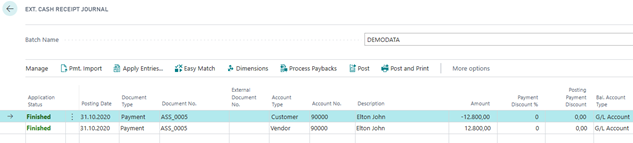
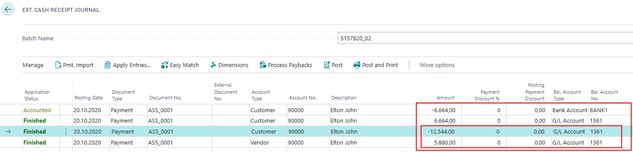
If a payment of a customer is processed in the ext. cash receipt journal and this customer belongs to an association, the extended application has additional functions:
The association is activated and therefore all related items of all customers are displayed:
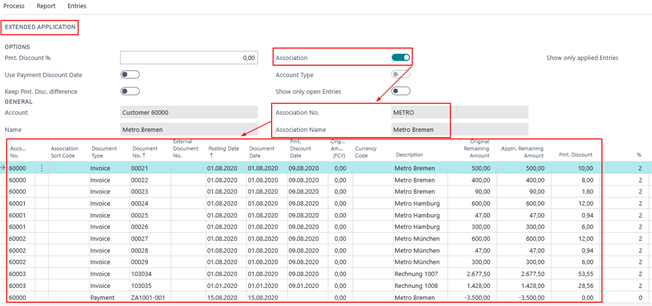
If the Association field is deactivated, only the items of the customer from the ext. cash receipt journal will be displayed in the entry application.
Extended Application: Posting in the Ext. Application Window split at Association
Depending on the option selected in the Posting Method in Ext. Application field, the transactions are split or not when leaving ext. application.
If the option is set to Application Splitting and you have entered an adjustment via associations in the Ext. Application window, the entry will be shown in the journal as a split posting.

Credit Limit via Associations
For debit-side associations, the check of an association credit limit was integrated. The corresponding checks take place in the journal as well as in the documents.
There are correspondingly two setup fields in the association:
- Assoc. Credit Limit (LCY)
- Check Credit Limit
Only if the checkbox Check credit limit is activated on the Association Card, a check will actually take place. Otherwise, the Assoc. Credit Limit field is initially only an informative field.
Credit limit information was also added to the association statistics.
If, when entering an amount, it is determined that this amount exceeds the limit of the association, a corresponding credit limit check is displayed via a notification.
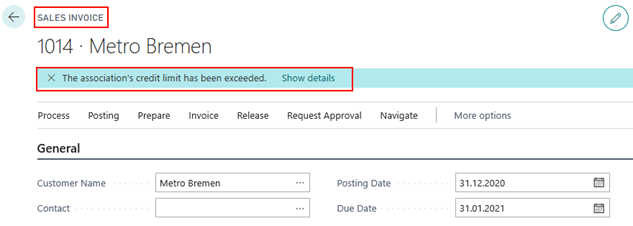
By displaying the details of the notification, the corresponding display of the credit limit check appears with the items of the relevant association that lead to the credit limit being exceeded. This serves the user as information and overview.
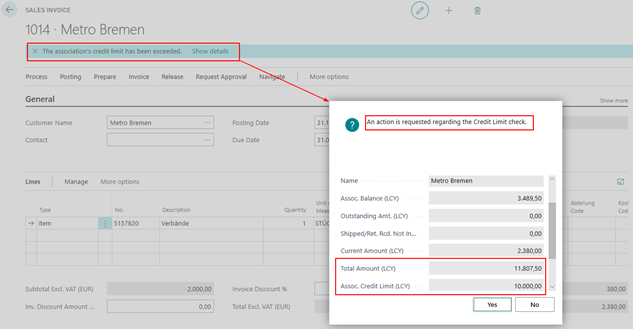
It is now up to the user to continue or cancel the processing.
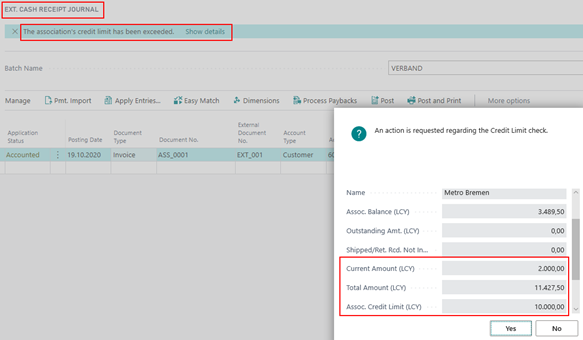
The association credit limit message described above is also implemented in the journals:
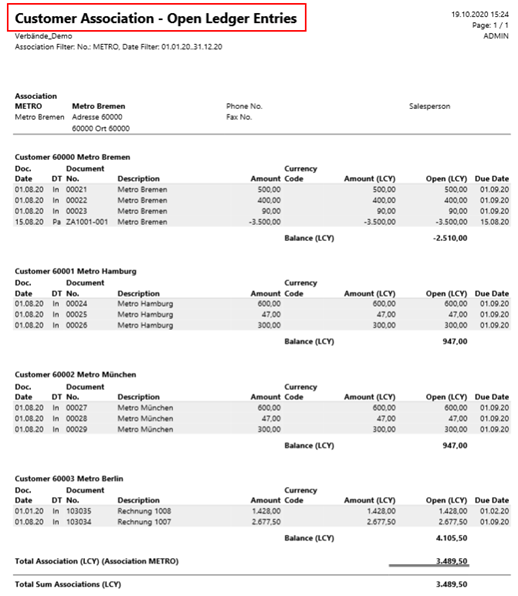
Association Customer – Open Entries / Association Customer – Open Entries
There is the possibility for the association to print the open entries on the respective report. You have several setting options:
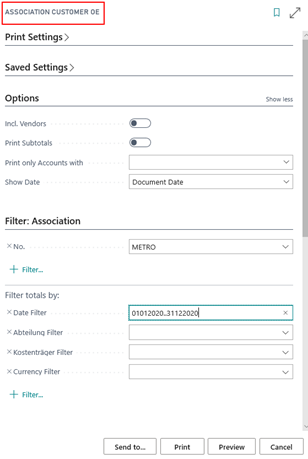
Incl. Vendors: If there are assigned customers / vendors for a customer / vendor, they can also be displayed. To do this, activate this field.
Print Subtotals: Optionally, a subtotal can be printed after each customer/vendor.
Print only Accounts with: Here you select whether all open association entries should be displayed or only those associations whose balance is less than, greater than or equal to 0.
Customer / Vendor Link
The OPplus Association module allows you to link customers and vendors in such a way that their entries are evaluated together: At this point we use the term Customer/Vendor link.
Any number of vendors can be assigned to a customer (by a vendor association) and vice versa. In practice, however, the simple linking of a customer to a vendor is more common when a customer also acts as a vendor.
All the items belonging to such a customer/vendor link are displayed in the Extended Application window. This enables you to assign a payment amount there across the link.
To create a link:
In the navigation area OPplus, select Associations > Customer/Vendor Link. The list of the created customer/vendor links opens.
Use the list view to access the card of an already created link (More options > Navigate > Link > Customer/Vendor Card). Or you can create a new link.
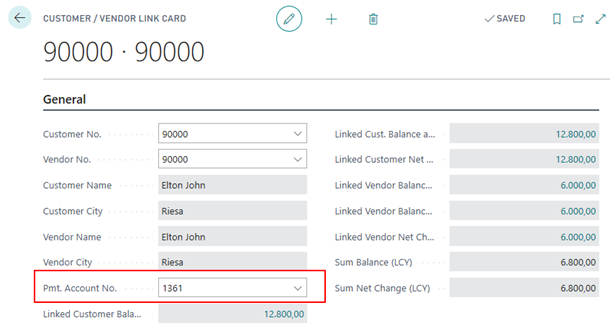
To create a new link, click the + symbol (Create a new entry) in the link list or in the link card. You then only need to select a customer and a vendor. The following table describes the fields in detail:
| Option | Description |
|---|---|
| Customer No. | Specifies the customer account number that the entry is linked to or select one using the Assist button. |
| Vendor No. | Specifies the vendor account number that the entry is linked to. |
| Customer Name | The program copies the name from the Customer table. You cannot change it at this point. |
| Customer City | Is copied from the Customer table. Not editable here. |
| Vendor Name | The program copies the name from the Vendor table. You cannot change it at this point. |
| Vendor City | Is copied from the Vendor table. Not editable here. |
| Linked Customer Balance (LCY) | This field displays the current balance of the linked customer in client currency. The application automatically calculates and updates the contents of the field using the Amount (LCY) field of the entries in the Detailed Customer Ledger Entries table. You can filter the Balance (LCY) so that its content is based only on certain Global Dimension Values 1 and Global Dimension Values 2. You can display the customer entries that make the amount by clicking on the amount displayed in the field. |
| Linked Cust. Balance at Date (LCY) | The balance of the linked customers in local currency up to the end date of the date filter entered. The application automatically calculates and updates the value based on the Amount (LCY) field in the Detailed Customer Ledger Entries table. You can filter the Balance (LCY) field so that its content is based only on certain Global Dimension Values 1 and Global Dimension Values 2. The customer entries that make the amount can be accessed by clicking on the amount displayed in the field. |
| Linked Customer Net Change (LCY) | This field displays the net change of the connected customer for the period entered in the date filter of the Customer/Vendor Link table in client currency. The application calculates and updates the contents of the automatic field using the Amount (LCY) field of the entries in the Detailed Customer Ledger Entries table. You can filter the field net change (LCY) so that its content is based only on certain Global Dimension Values 1, Global Dimension Values 2 and/or Data. You can display the customer entries that make up the amount by clicking on the amount displayed in the field. |
| Linked Vendor Balance (LCY) | This field displays the current balance of the connected vendor in client currency. The application automatically calculates and updates the contents of the field using the Amount (LCY) field of the entries in the Detailed Vendor Ledger Entries table. You can filter the Balance (LCY) field so that its content is based only on certain Global Dimension Values 1 and Global Dimension Values 2. You can display the vendor entries that make up the amount by clicking on the amount displayed in the field. |
| Linked Vendor Balance at date (LCY) | The balance of the linked vendor in client currency up to the end date of the entered date filter in the Customer/Vendor Link table. The application automatically calculates and updates the value based on the Amount (LCY) field of the Detailed Vendor Ledger Entries table. You can filter the Balance (LCY) field so that its content is based only on certain Global Dimension Values 1 and Global Dimension Values 2. You can display the vendor entries that make up the amount by clicking on the amount displayed in the field. |
| Linked Vendor Net Change (LCY) | The balance of the linked vendor in client currency up to the end date of the entered date filter in the Customer/Vendor Link. The application automatically calculates and updates the value based on the Amount (LCY) field of the Detailed Vendor Ledger Entries table. You can filter the Balance (LCY) field so that its content is based only on certain Global Dimension Values 1 and Global Dimension Values 2. You can display the vendor entries that make up the amount by clicking on the amount displayed in the field. |
| Pmt. Account No. | Here you enter the G/L account number to which the total payment of the link should be posted. If this field is filled, when a payment is posted to a linked account, the entire payment total is first posted to the group against the bank, and then a write-off is made via the account number group account. The individual link accounts are then posted against this account. |
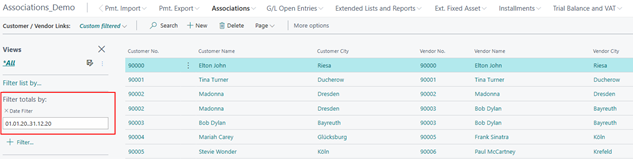
To influence the totals fields via a date:
- Use the Filter totals by function in the link list view:
When deleting a customer/vendor, the system checks in the background whether there is a link to this account. If this is the case, the link is automatically removed. For the customer Whitney Houston, a link has been set up with the vendor Amy Winehouse.
If the customer is deleted, the corresponding link no longer exists.
Usage Pmt. Account No.
If there is a balancing between related customers and vendors, it is possible that the balancing is done via a transit posting - just as with the association. For this purpose, a payment account can be defined in the association card.
This is always drawn if a link card has been set up for the adjustment account and a linked person holding account involved in the adjustment and a payment account has been defined there.
Once a suitable link is found, this payment account is valid for the entire clearing.
The search for the payment account link occurs in the order after the search for the payment account association. If the adjustment account belongs to both an association (as the leading account number) and a link, the payment account will be the account defined in the association card.
This representation of the application is only obtained if you have deactivated the option Application splitting in the payment import setup.
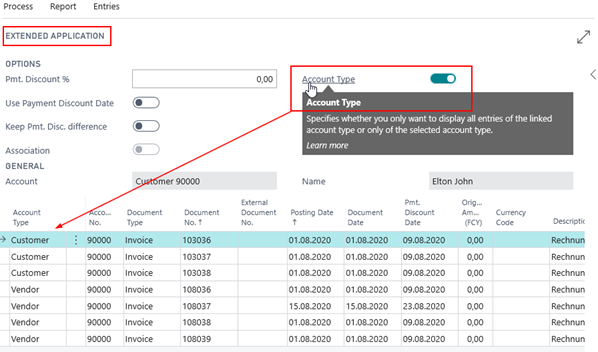
Extended Application: Additional Fields for Customer/Vendor Link
Additional Fields for Customer/Vendor Link
The Account type field that can be activated has the effect in extended application within a customer/vendor link that either all items of the connected account type are displayed in the application lines or only the entries of the current account type. You can see this attitude in the extended application in the application lines for a selected link.
Split Posting in Ext. Application for Customer / Vendor Link
Depending on the option selected in the Posting Method in Ext. Application field (in the Extended Features Payment Import Setup), the transactions will be split or not when exiting the Extended Application.
If the option is set to Application splitting, and you have entered a customer/vendor links application in the Ext. Application window, the entry is displayed in the journal as a split posting.
See also the chapter Presentation of Split Posting on Exiting the Extended Application in the OPplus Basic or Payment Import manual.
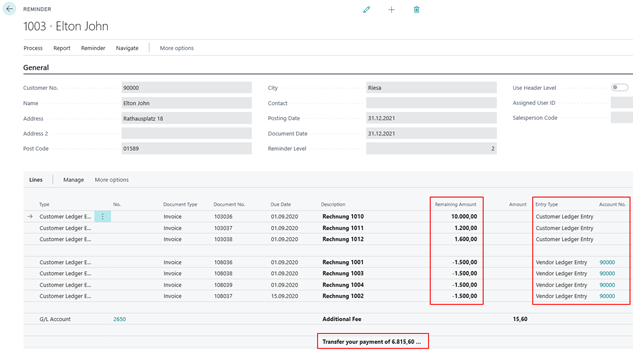
Reminder incl. Vendor Ledger Entries for Customer / Vendor Link
If you use the Associations module, you can consider creditor ledger entries of a customer/vendor link when creating reminders.
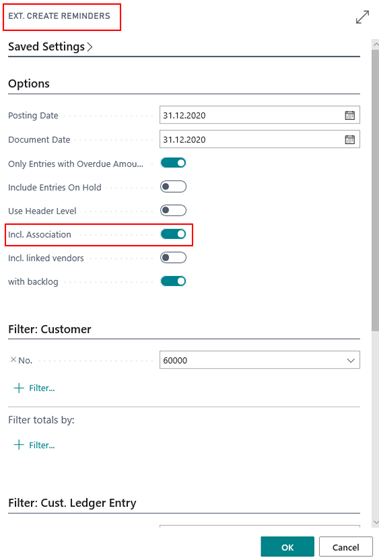
You can create an extended OPplus reminder by entering the search term Reminders and then selecting Process/Ext. Create reminders.
This report request contains three additional options: Inclusive linked vendors (Incl. linked vendors), Incl. Associations and with backlog:
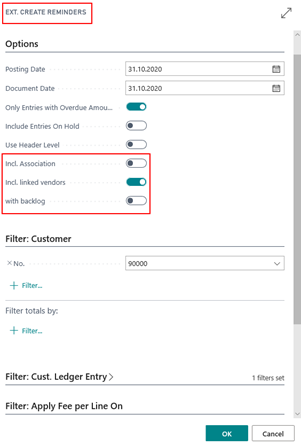
| Option | Description |
|---|---|
| Incl. Association | If you activate this field, all customers of an association are printed. A prerequisite for this is that the selected customer is assigned to an association. |
| Incl. linked vendors | If you activate this field, when reminding the customer, the vendor ledger entries of the corresponding customer/vendor link are also included in the reminder and offset. |
| with backlog | If you activate this field, a reminder will also be created if there is a credit balance in the customer/vendor link. |
Example of a reminder within a Customer/Vendor Link:
Ext. Vendor Ledger Entries – Reminder Level and Reminder Entries
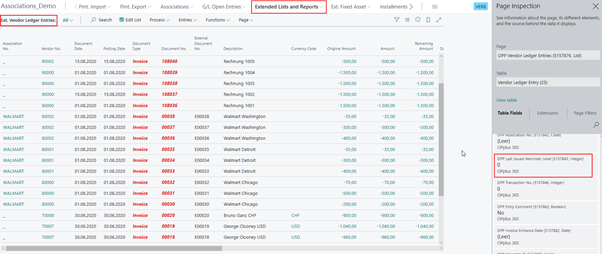
In the Ext. Vendor Ledger Entries, the last registered reminder level per entry is displayed in the Last Issued Reminder Level field, in the same way as for customer entries. The field Last Issued Reminder Level must be inserted by design if required (OPP Last Issued Reminder Level 5157843).
If you are also using the OPplus Views and Lists module, the last registered reminder level can also be displayed in the following screen for the extended vendor ledger entries. Here, too, the field Last Issued Reminder level must be inserted by design if required.
- Extended Lists and Reports > Ext. Vendor Ledger Entries
In addition, you can display the highest reminder level on the OPplus vendor card using the Views and Lists module. On the OPplus Vendor Card go to Extended Lists and Reports > Highest Reminder Level.
Reminder Print
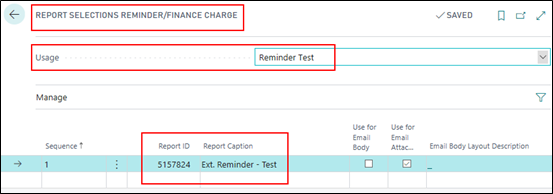
OPplus offers you two customized reminder reports, which are based on the standard of Business Central, but have been extended with associations and links. If the OPplus reports are to be used, they must be added in the report selection.
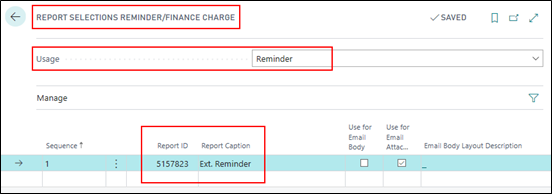
Reminders with Associations
There is also the option to create a reminder for the association. The option Incl. Association is responsible for this in the processing of the reminder creation (Reminders/Process/Ext. Create Reminders...).
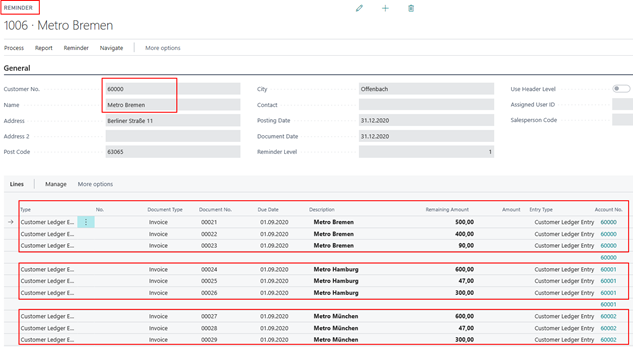
You will receive an ordinary reminder in which the individual association customers are listed one after the other. No separate reminder is generated for the customers contained in the association reminder.
In this example, a reminder was created for customer 60000, containing entries for customers 60000, 60001 and 60002.
A separator line is inserted between the individual customers. This line does not contain an entry, but only the previous customer number.
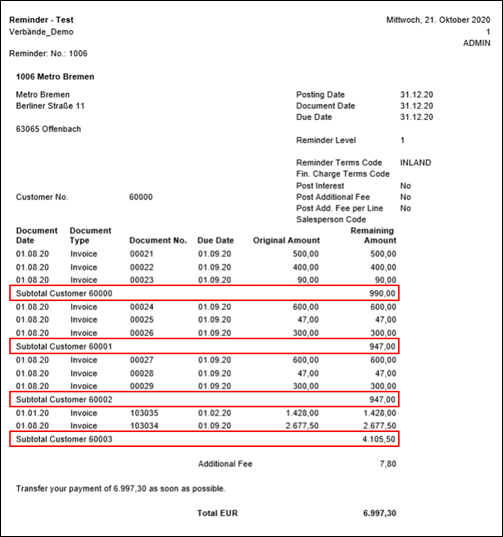
Reminder Report Associations
The reminder report (as well as the test report) shows subtotals for the individual customers included in the reminder.
Subsequent Application
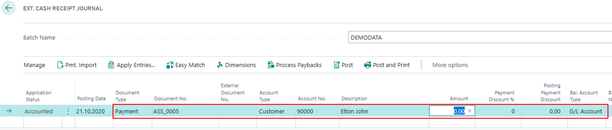
If you want to subsequently applicate association or link entries, open the additional Ext. Cash Receipt Journal window and proceed as follows:
Application for a Association
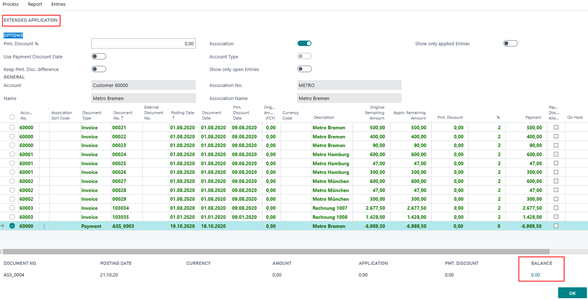
- Enter a line with one of the customers or vendors from the association without a balance account and with an amount of 0

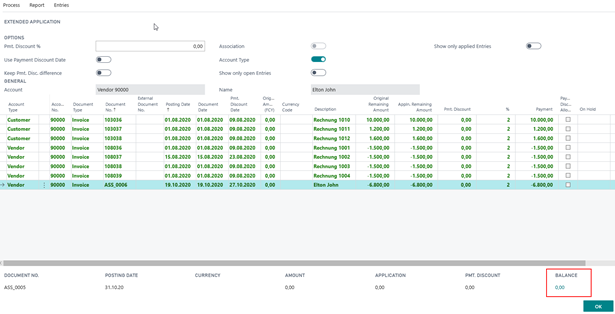
- Open the Extended Application window and mark the desired entries for clearing. In the balance below, you can check whether the subsequent application is successful:
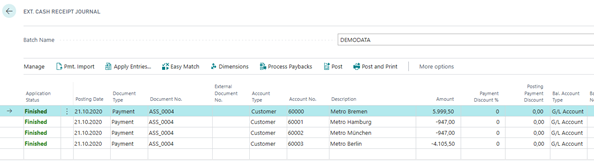
- When you exit the window by clicking OK, the application splits the entry according to the customers
Application for a Link
- Enter a line with one of the customers or vendors from the link without a balance account and with an amount of 0
- Open the Extended Application window and mark the desired entries for clearing. In the balance below, you can check whether the subsequent application is successful:
- When you exit the window by clicking OK, the application splits the entry according to the customers: