Using the Easy Match Window
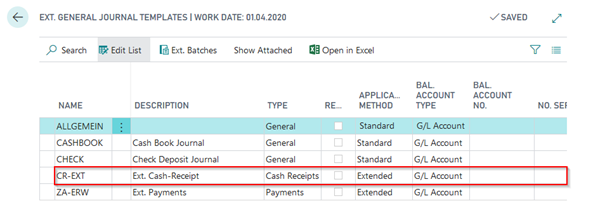
The Easy Match window enables the user to easily check and prepare applications which is described in detail in the following. To be able to use the Easy Match function, the respective template must be set to Extended in the "Application Method" column of the Ext. General Journal Templates window:
You can open the Easy Match from the Ext. Cash Receipt Journal window by either selecting the Easy Match menu item via the Functions button or by pressing Shift+F3. The window is divided into the following 3 areas:
- Journal lines
- Open entries of the respective data record
- Bank statement data
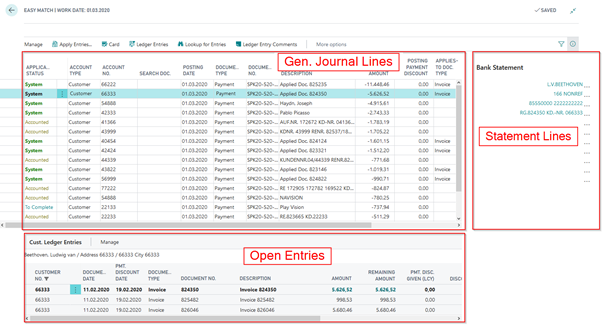
in the lower Open Entries area the corresponding entries:
- If a G/L account is specified, the entries of the G/L account will be shown in the lower section, sorted in descending order by the posting date. If you also use the OPplus G/L Open Entries module, and you have specified a G/L open entry account in the Account No. field, the Easy Match window will display all open G/L entries.
- If you have selected a customer in the Account No. field, you will only see the customer's open ledger entries in the Open Entries area. If you leave the Account No. field empty, the Easy Match window will show the open ledger entries of all customers.
- If you have selected a vendor in the Account No. field, you will only see the vendor’s open ledger entries in the Open Entries area. If you leave the Account No. field empty, the Easy Match window will show the open ledger entries of all vendors.
The applied entries are shown in bold letters and in green color.
Specifying Missing Account Numbers:
The Easy Match window offers a number of different options to specify missing account numbers:
By Manual Entry: You can directly enter the account number into the Account No. field in the journal line.
By Using the Doc. Search field: If the Account No. field is empty, the Easy Match Window will list all open entries of the specified account type in the Open Entries area (e. g. Account Type = Customer, display of all open customer ledger entries). If you can enter the document number into the Doc. Search field, the system will browse the Document No. field of all open entries. If the document number is found, the Open Entries area in the Easy Match window will be automatically filtered on the associated customer/vendor.
By Searching in the Open Entries area: If you have placed the cursor into the Open Entries area on the respective entry, the account number will be automatically copied into the journal line by pressing F9 (Set Applies-to ID).
Ribbon Direct Access in Easy Match
You can access the following items via the ribbon:
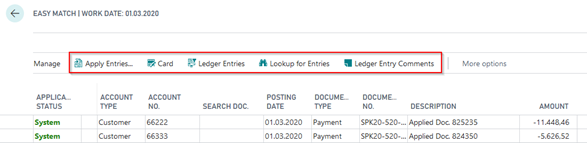
Apply Entries: By selecting this menu item, you can open the Extended Application window.
Card: By selecting this menu item, you can open the card of the account number specified in the journal line. If the account number is not specified, the system will show the first record in the table of the specified account type.
Ledger Entries: By selecting this menu item, you can open the G/L, customer or ledger vendor entries depending on the account type of the line.
Lookup for Entries: By selecting this menu item, you can open the Extended Customer Ledger Entries. In the Open Entries area, you can use the filter to look up specific entries.
Ledger Entry Comments: This menu item is only available if you have licensed the OPplus Ext. Lists and Reports module. By selecting this menu item, you can open the ledger entry comments of the currently selected entry.
Action Menu Bar
Via Actions tab you have access to the following points.

Block Bank Account for Import: By selecting this option, you can block the specified bank account for import, if you do not want the bank account in this line to be used for future account assignments.
Show Pmt. Import Line: By selecting this option, you can display all information about the respective journal line in the corresponding Pmt. Import Line table.
Only open Lines: By selecting this function only the open and assigned lines are displayed.
Only applied Lines: This displays only those lines that have system or completed status.
Show all: Deletes the filter and all lines are displayed again.