OPplus Demodata
In this document you will find a description of our demo data tool. You can use it to quickly and easily run demos in a sandbox environment and also test the functionalities of OPplus in your environment. The document will be extended continuously.
OPplus is the program package (AddOn) developed by gbedv for Microsoft Dynamics™ NAV and Dynamics 365 Business Central (BC for short). OPplus is a collection of different extensions in the area of financial management of BC.
Within the scope of BC's product delivery, a test client with a sufficient amount of test data (master and transaction data) is provided within the client CRONUS AG. For the presentation of the OPplus functionalities, a program module has now been provided which generates a slimmed-down CRONUS database containing only the master data required for OPplus. This database can be used equally for all BC versions.
The report 5157991 OPP Build Demodata provides various scenarios for the presentation of individual OPplus functionalities. For this purpose, the above-mentioned database is supplemented by the necessary equipment and data required for the OPplus functions.
This document describes how to use the report 5157991 OPP Build Demodata DEMO.
General
The following documentation contains a detailed description of the procedure for setting up and using the new demo data tool in OPplus, so that you can prepare and perform your own test scenarios and presentations at the customer's premises as easily as possible.
Creation of a new company in the database
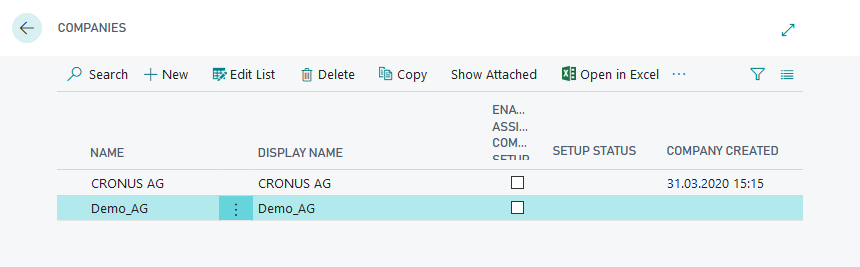
To use the "OPP Build Demodata DEMO" report described under "Objectives", which enables you to present various OPplus functionalities, a new company must be created in the database used. Please note that the term "DEMO" or "TEST" has to be used in the name of the created company. In a SaaS environment it is sufficient that the corresponding company is marked as an evaluation company. To create the new demo company, open the list of companies in the Microsoft Dynamics 365 Business Central Webclient. Via the menu item "New" you create a new line in the company list in which the name of the company needs to be assigned. After leaving the "Name" field, the company is created. Then you can assign the display name. If no display name is assigned, it will automatically be filled with the assigned company name when the report starts.
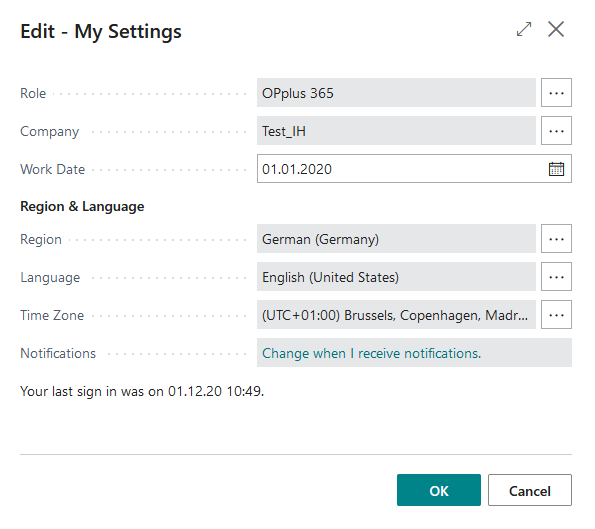
The next step is to choose the newly created company throughout the menu "My Settings".
In the newly created company you are now able to add, setup and start the report "OPP Build Demodata" in the list of Run Objects.
Start of the report OPP Build Demodata DEMO
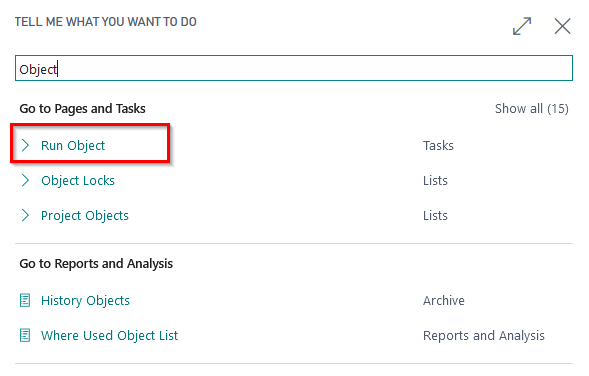
Use the BC Search function to access the menu item "Start Object".
The object type "Report" with the object ID 5157991 is firstly entered and selected.
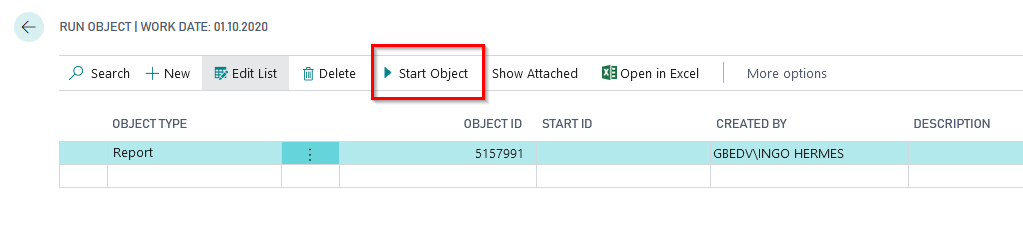
After choosing the report throughout the menu item "Start Object" you are able to run the setup and choose and run the functionalities.
In the following, the options in the setup area on the setup tab of the demo module are described.
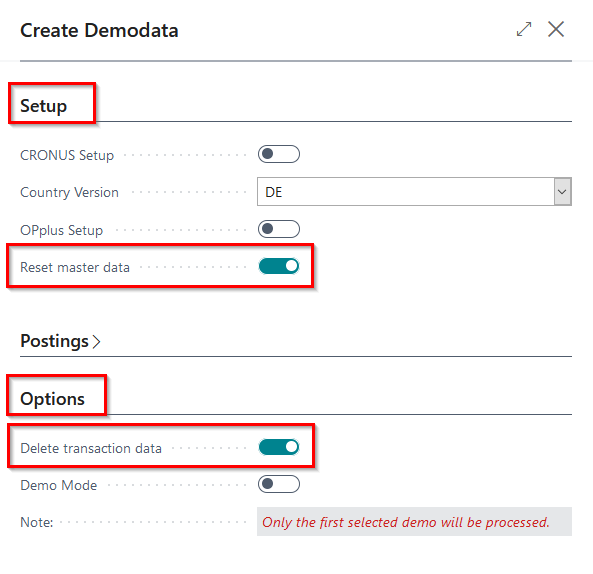
Setup
In the register "Setup" the original data reduced from the CRONUS can be set up by selecting the corresponding field "CRONUS Setup". This ensures that the setup and master data tables relevant for OPplus are already filled for the selected country version. The available country versions for the demo data are DE, W1, US, AT, CH, FR, NL, UK, ES and BE.
If the OPplus Setup table is already set up in the respective client, i.e. if a data set exists, this field is not actively preset, and if the table is not set up, this field is preset with a corresponding selection. The same applies to the CRONUS setup.
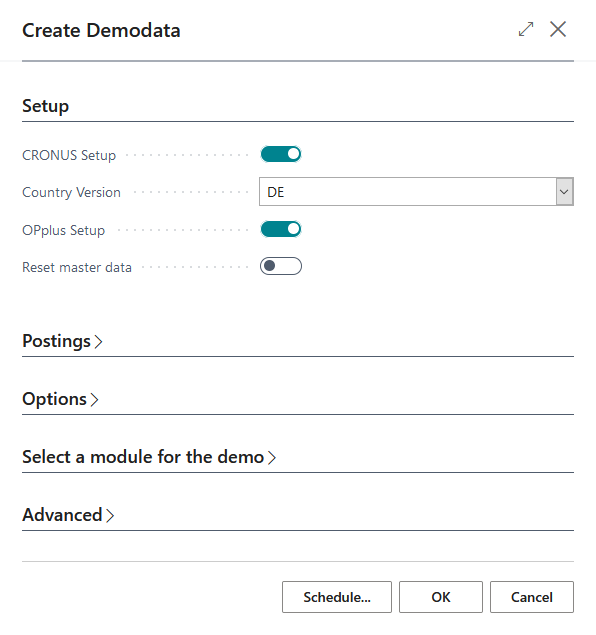
Furthermore, if the corresponding field is selected, the report adopts the OPplus setup and creates customers, vendors, bank accounts and articles in the DEMO company. The payment types relevant for future payment transactions are also created by the OPplus setup. For all OPplus modules the basic setup is still carried out. In this example, the setup for the country version DE was carried out.
After successful setup, the following message appears:
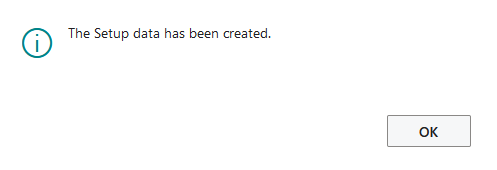
You can then view the master data generated in the DEMO company.
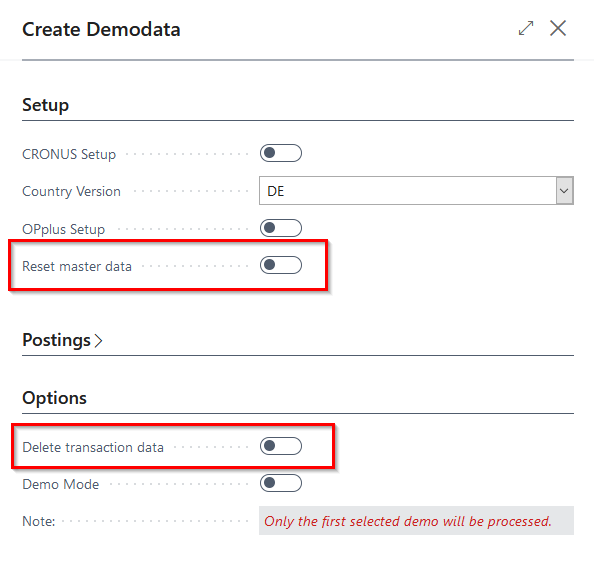
- Advice: The master and transaction data generated by the "OPP Build Demodata" can be reset or removed by restarting the report with the option "Reset master data" or "Delete transaction data".
Customers and Customer Structure
Customer master data is created by executing the setup function of the Demo Data Report. The following structure has been taken into account for presentation purposes:
Customers 50000..50003
Inland Customers, Payment Terms 1M(8D), Payment Method Direct Debit
Customers 50004..50006
EU Customers, Payment Terms 14 days, Payment Method Direct Debit
Customers 50007..50009
Third Country Customers, Payment Terms 14 days, Payment Method blank, divers foreign currencies
Customers 60000..60003
Inland Customers, Payment Terms 1M(8T), Payment Method Direct Debit, Customer Association „METRO“
Customers 60004..60006
EU Customers, Payment Terms 14 days, Payment Method Direct Debit, Customer Association „SP-Group“
Customers 90000..90003
Inland Customers, Payment Terms 1M(8T), Payment Method Direct Debit, Customer-Vendor-Linking
Customers 90004..90006
EU Customers, Payment Terms 14 days, Payment Method Direct Debit, Vendor Association
Vendors and Vendor Structure
Vendor master data is created by executing the setup function of the Demo Data Report. The following structure has been taken into account for presentation purposes:
Vendors 70000..70003
Inland Vendors, Payment Terms 1M(8D), Payment Method Bank
Vendors 70004..70006
EU Vendors, Payment Terms 14 days, Payment Method Bank
Vendors 70007..70009
Third Country Vendors, Payment Terms 14 days, Payment Method Ausland, divers foreign currencies
Vendors 80000..80003
Inland Vendors, Payment Terms 1M(8T), Payment Method Bank, Vendor Association „WALMART“
Vendors 80004..80006
EU Vendors, Payment Terms 14 days, Payment Method Bank, Vendor Association „BOA-GROUP“
Vendors 90000..90003
Inland Vendors, Payment Terms 1M(8T), Payment Method Bank, Customer-Vendor-Linking
Vendors 90004..90006
EU Vendors, Payment Terms 14 days, Payment Method Bank, Customer-Vendor-Linking
Please note that only for the country versions DE, AT and CH, the first inland customers and vendors are preassigned with a payment discount payment term.
Customers/ Vendors Bank Accounts
For the presentation of the Payment Export module a bank account with corresponding bank details is set up for each of the customers and vendors. The following structure is used:
Customers 50000..50006/ Vendors 70000..70006
Bank accounts at Hamburg Comercial Bank, DZ Bank or Deutsche Bank. Following informations are given:
- Bank Code and SWIFT-Code for the corresponding Bank (State April 2020)
- Bank Account Number (corresponds to customer-/vendor number)
- IBAN (for DE: calculated from Bank Code and Bank Account Number)
- Country-/Regionscode: DE
Customer 50007 / Vendor 70007
Bank Accounts at the Bank of America. Following informations are given:
- Bank Account Number (corresponds to customer-/vendor number)
- SWIFT-Code (State April 2020)
- Countr-/Regionscode: US.
Customer 50008 / Vendor 70008
Bank Account at the UBS AG. Follwing informations are given:
- Bank Code and SWIFT-Code (State April 2020)
- Bank Account Number (corresponds to customer-/ vendor number)
- IBAN (calculated from Bank Code and Bank Account Number for CH)
- Country-/Regionscode: CH.
Customer 50009 / Vendor 70009
Bank Account at the Bank of Japan. Following informations are given:
- Bank Account Number (corresponds to customer-/vendor number)
- SWIFT-Code (State April 2020)
- Country-/Regionscode: JP.
Customers 60000..60006 / Vendors 80000..80006
Bank accounts at Hamburg Comercial Bank, DZ Bank or Deutsche Bank. Following informations are given:
- Bank Code and SWIFT-Code for the corresponding Bank (State April 2020)
- Bank Account Number (corresponds to customer-/vendor number)
- IBAN (calculated from Bank Code and Bank Account Number for DE)
- Country-/Regionscode: DE
Customers / Vendors 90000..90006
Bank accounts at Hamburg Comercial Bank, DZ Bank or Deutsche Bank. Following informations are given:
- Bank Code and SWIFT-Code for the corresponding Bank (State April 2020)
- Bank Account Number (corresponds to customer-/vendor number)
- IBAN (calculated from Bank Code and Bank Account Number for DE)
- Country-/Regionscode: DE
Bank Accounts
To show the functions of the Payment Export module different ordering banks with different currency codes are created.
Bank1, Bank2, Bank3, Transit I
- Bank Accounts at Hamburg Commercial Bank, DZ Bank and Deutsche Bank
- Bank Code and SWIFT-Code for the corresponding Bank (State April 2020)
- Bank Account Number (fictitious number)
- IBAN (calculated from Bank Code and Bank Account Number for DE)
- Currency Code blank
- Country-/Regionscode: DE
Bank CHF
- Bank Account at UBS AG
- Bank Code and SWIFT-Code for the corresponding Bank (State April 2020)
- Bank Account Number (fictitious number)
- IBAN (calculated from Bank Code and Bank Account Number for CH)
- Currency Code CHF
- Country-/Regionscode: CH
Bank DKK
- Bank Account Danske Bank A/S
- Bank Code and SWIFT-Code for the corresponding Bank (State April 2020)
- Bank Account Number (fictitious number)
- IBAN (calculated from Bank Code and Bank Account Number for DK)
- Currency Code DKK
- Country-/Regionscode: DK
Bank JPY
- Bank Account at Bank of Japan
- SWIFT-Code of Bank of Japan (State April 2020)
- Bank Account Number (fictitious number)
- IBAN and Bank Code blank
- Currency Code JPY
- Country-/Regionscode: JP
Bank USD, Transit A
- Bank Account at Bank of America
- SWIFT-Code of Bank of America (State April 2020)
- Bank Account Number (fictitious number)
- IBAN and Bank Code blank
- Currency Code USD
- Country-/Regionscode: US
Items
Next to the master data of customer-, vendor- and bank data the setup of OPplus leads to an already setup item master data for your demo purposes, which you are able to use as part of your presentation.
Payment Types
The payment types (including payment methods) that are important for your presentation of the OPplus Payment Export module are created by executing the OPplus Setup. The following important payment types are implemented:
Payment Methodes
The standard table of payment methods has been extended with the OPplus payment methods. The Cronus and OPplus setup creates the payment methods and the extended OPplus payment methods for presentation purposes in the demo tool:
If the report is started with a country version other than DE, the created master data as well as the company data will also be adjusted according to the selected country version.
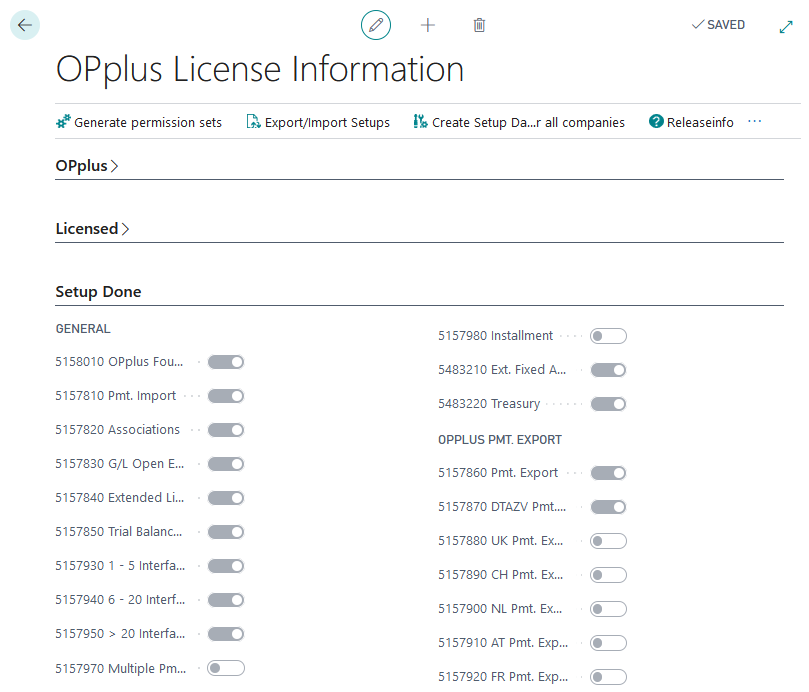
Using the OPplus license information you can see which OPP modules are licensed and which modules have been set up:
In the Setup tab of the "Create demodata" report, you will find the "Reset master data" option. The selection "Delete transaction data" can be found in the Options tab of the report. These buttons can be used to reset the transaction and master data generated by the setup and the transactions that may have been made - for example, after a presentation has been made - to their origin. The master data will then be available in its original form for further demo purposes; transaction data that have been created will be deleted.
In the following, generating customer and vendor items necessary for your demo purposes will be discussed. You can generate these items by using the functionalities in the "Postings" tab of the demo data report.
Postings
Within the Postings tab you will find functions with which you are able to generate and post entries according to the existing master data. You can choose between "create standard postings" or "create masses of entries".
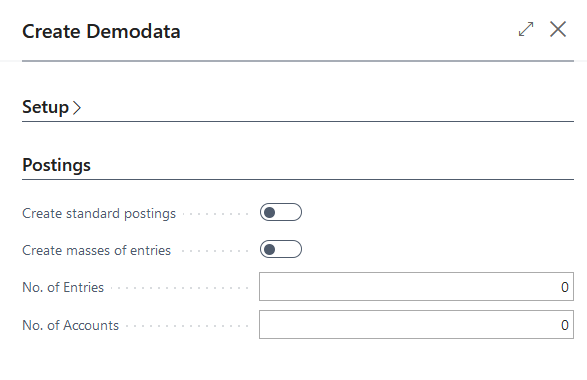
By choosing the option "Demo mode" you get shown the created journals which you are able to post afterwards. Is this option deactivated, the journals will be posted automatically.
Create Standard Postings
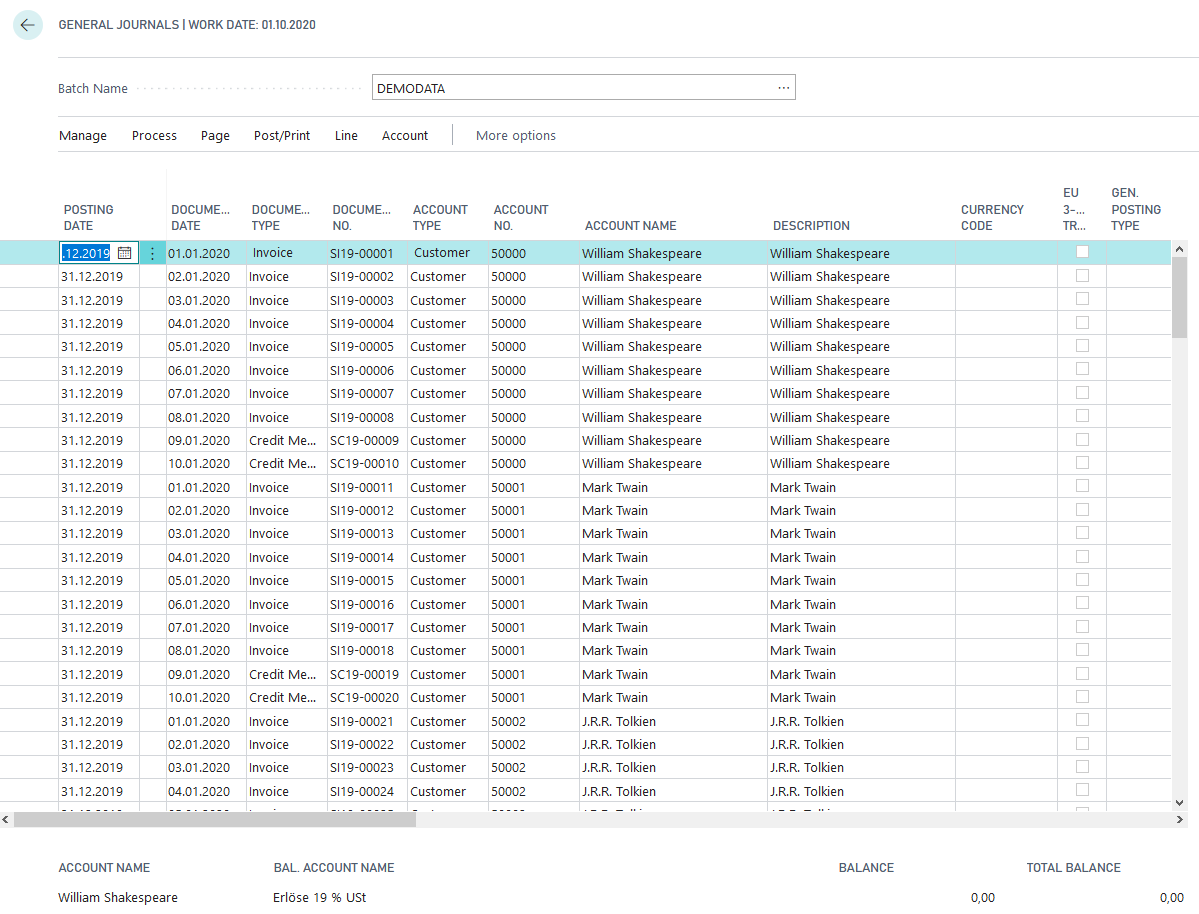
Activate the checkbox and the systems creates the postings corresponding to the already set up accounts in the Gen. Journal Demodata. There will be two times ten postings (each eight invoices and two credit notes) per account. Starting from the working date, following logic applies regarding document- and posting dates:
- 10 postings with posting date 31.12. of the previous year (to have a balance carried forward)
- 10 postings with posting date
- last of previous month, when posted from the 15th or
- last of the pre-previous month, when posted from the 15th and only if the current month is at least February
- The document date always starts with the posting date +1D and is then incremented by one day.
The currency and the purchase or sales account is derived from the corresponding personal account. The document no. starts with SI resp. SC for sales invoices resp. sales credit notes and is analog to PI resp. PS in purchase. Then the year numbers, a hyphen und a consecutive number follow.
For the Extended Asset Accounting area, items are created according to Cronus AG.
Create Masses of Entries
Mark this checkbox and you need to type in the number of entries you would like to create. Furthermore the system creates the Gen.-Journal Demodata, which contains corresponding many data sets. The logic behind is the same as for "Create standard postings". Means, depending on the "number of entries" always 8 invoices and 2 credit notes are generated. You also have the possibility to specify the number of accounts so that entries are only created for the specified number of accounts.
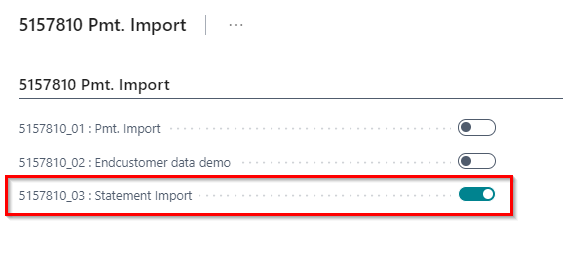
5157810 Pmt. Import
5157810_01 Pmt. Import
Use the "Start object" function to select the possible demo scenarios of the "OPP Build Demodata" report. The register Pmt. Import also contains the selection Pmt. Import. This ensures that demo data for the presentation of the automatic allocation with predefined open entries and matching bank statement data is generated.
The result of the execution of the option Pmt. Import via the "OPP Build Demodata DEMO" report can first be seen in the OPplus role center of the demo company via the respective tiles:
After executing the Pmt. Import you can trace the following setup data or transaction data:
Open entries on customers have been created by posting the journal DEMODATA.
Two payment import interfaces have been created.
Two open import registers have been created matching the customer entries. Also the corresponding payment lines were created by the system.
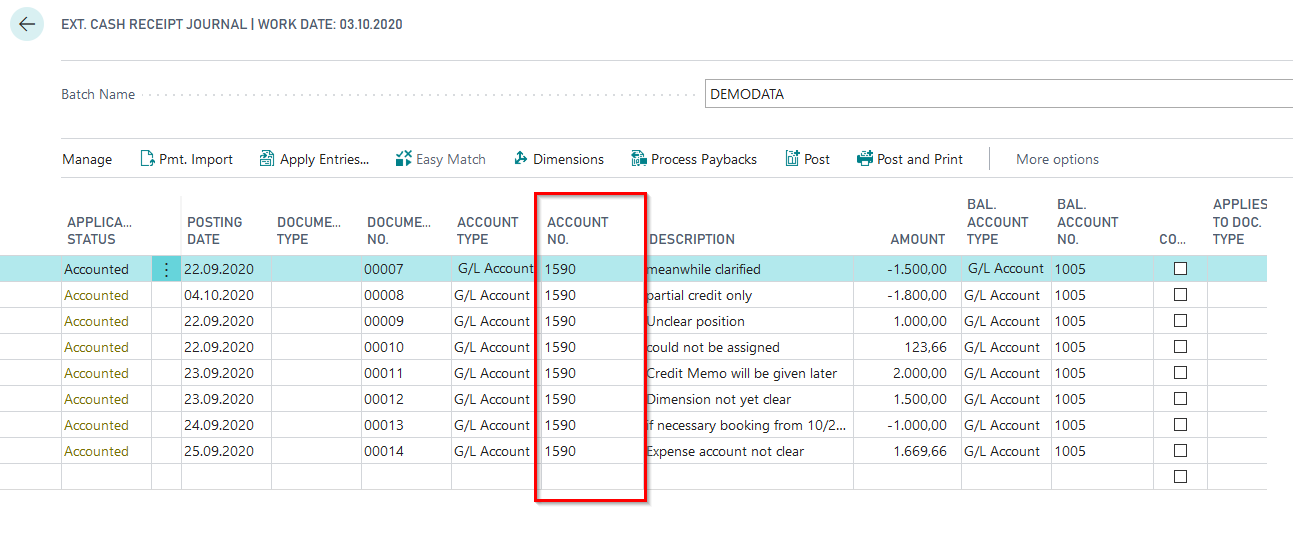
The 24 payment import lines have been imported into the ext. cash receipt journal.
Created open customer entries

Created Pmt. Import interface

Open Pmt. Import Register

Payment Import lines in the Ext. Cash Receipt Journal


Based on these payment import lines of an imported bank statement, it is now possible to present for the different clearing statuses of column 1. Further procedures for each line in the Ext. Cash Receipt Journal are:
| Column | Account | Document No. | Note | Application Status | Result |
|---|---|---|---|---|---|
| 1 | 66222 | 825235 | Document no. is given, payment amount = invoice amount | System | Account has been found and entries have been applied. |
| 2 | 66333 | 824350 | Document no. is given, payment amount = invoice amount | System | Account has been found and entries have been applied. |
| 3 | 54888 | 824722, 824782, 825437, 825438, 825443 | Document no. given, payment amount = amount of invoices | System | Documents can be shown throughout the menu item Apply Entries. |
| 4 | 42333 | 824128, 825457 | Document no. is given, payment amount = amount of invoices | System | Documents can be shown throughout the menu item Apply Entries. |
| 5 | 41366 | 825214, 825856 | Document no. is given, payment amount <> invoice amount, corresponding credit note missing | Accounted | Accounted but no application of entries. "Accounted by" viewable in the payment import entry card. Demo manual aftercare. |
| 6 | 43999 | 825307, 825348 | Document no. is given, payment amount <> invoice amount, a wrong document no. is given in the reasons for transfer | Accounted | Accounted but no application of entries. "Accounted by" viewable in the payment import entry card. Demo manual aftercare. |
| 7 | 40454 | 824124 | Document no. is given, payment amount = invoice amount | System | Account has been found and entries have been applied. |
| 8 | 42424 | 823321 | Document no. is given, payment amount = invoice amount | System | Account has been found and entries have been applied. |
| 9 | 44339 | 822652 | Document no. is partially given, credit note as an amount in the reasons for transfer payment amount <> invoice amount | Accounted | Nothing accounted and no application of entries. "Accounted by" viewable in the payment import entry card. |
| 10 | 43822 | 823146 | Document no. is given, payment amount = invoice amount | System | Account has been found and entries have been applied. |
| 11 | 56999 | 824822 | Document no. is given, payment amount = invoice amount | System | Account has been found and entries have been applied. |
| 12 | 77222 | Customer no. 077222 given | Open | Entries haven't been found. Demo: OPplus Pmt. Import Setup – Auto Accounting I: „Skip leading zero“ | |
| 13 | reasons for transfer empty | Open | No entries found. Demo: Setup of an accounting rule with catchword und given G/L account. | ||
| 14 | 22133 | 823523, 823991 | Document no. is given,payment amount <> amount of invoices | To Complete | Demo: OPplus Pmt. Import Setup - Auto Application: „Complete if there is a difference“ and Ext. Features Setup – Auto Application: „Pmt. Discount Tolerance Amount“ |
| 15 | 22233 | Customer no. is given, indicated document no. is not given. | Accounted | Accounted by Account no. "Accounted by" viewable in the payment import entry card. | |
| 16 | 40555 | 824802 | document no. is given, payment amount <> invoice amount, Accounted by document no. | Accounted | Demo: Extended Application – Balanced Application |
| 17 | No specification of reference numbers; Advice to rent and incidental expenses in the reason rows | Open | Demo: Setup of an accounting rule with catchword and deposit of a G/L account. | ||
| 18 | No specification of reference numbers; Advice to rent and incidental expenses in the reason rows | Open | Demo: Setup of an accounting rule with catchword and deposit of a G/L account. | ||
| 19 | 60000 | No reference number but a payment advice | Accounted | Demo: First, work on the journal 5157810_02 | |
| 20 | 50004 | No reference number; Returned SEPA direct debit | Accounted | Demo: Set up of a BC accounting rule |
*If the bank import finds several items, but does not apply them because the payment amount and the amount of the invoices do not match, the items are optionally applied without writing the value "Detailed Ledger Entires" in the "Applies to ID" field. The status in the Gen. Journal line is then set to "to complete". The Payment Import Setup for this is located in the "Auto Application" tab.
Explanation of the demonstrations
For the lines of the Ext. Cash Receipt Journal that have the application status "system" (lines 1-4, 7, 8, 10, 11), the entries marked for application can be reviewed and checked using the menu item Apply Entries. In the Extended Application, an automatic application can be manually removed using the menu item Set/Delete Application. The application status instantly changes to Accounted. If the application is set manually again after changes have been made, the Application Status will change to "Finished".
The import lines marked with "System" or "Finished" can be posted through Ext. Cash Receipt Journal.
The import line no. 5 is accounted by a document no. By following Actions/Pmt. Import/Show Pmt. Import Line you will get the application details regarding the corresponding line. The mentioned credit note hasn't been posted yet, so that the payment amount doesn't match the invoice total. If you set the application, the customer gets a questioning field with different options of how to handle to remaining amount. E.g. a new entry on the customer, which can be allocated later with the corresponding credit note.
The import line 6 is accounted by document no. in the reasons for transfer. Other document no.s don't match the entries. The payment amount is <> than the invoice amount. The customer has to decide how to handle the difference.
The import line 9 is accounted by a document no. which is given rudimentary in the reasons for transfer. The no. has been analyzed (review Pmt. Import Setup, Tab Auto Accounting II). The payment amount is <> than the invoice amount, because an existing credit note has been also set for application.
The import line 12 is status "Open". The system wasn't able to account the line, because the customer no. has a leading zero mentioned. In that case, review Pmt. Import Setup, Tab Auto Accounting I, Skip Leading Zero. The setup is also for document numbers and account numbers, which contain a leading zero. After again importing the line, the systems finds the customer no.
The import line 13 is status "Open". The reasons for transfer is blank, not giving any document or customer no. Demo: Setup of a General Accounting Rule with the catchword mentioned in the description and application on a e.g. G/L account.
The import line 14 is status "to Complete". It is set to, when multiple entries have clearly been found (here according to the document numbers), but the payment amount <> than the invoice amount is. This requires that the option "Complete if there is a difference" is set in the "Auto Application" tab of the import setup. In the application mask the customer has to decide how to proceed with the difference.
The import line 15 has been accounted via the customer number (see payment import line on the Details tab). The document number specified in the reasons for transfer does not exist. Demo: E.g. in the Extended Application, clear a partial payment via "Process".
The import line 16 has been accounted via the document no. The payment amount doesn't match the invoice amount. Demo: Apply the balance in the Extended Application with "Process/Balance Application". The balance will be posted as a payment discount. In this scenario the field "Pmt. Discount Tolerance Amount" in the Ext. Features Setup is necessary and should be maintained.
The payment import lines 17 and 18 are open. Throughout an accounting rule you are able to balance the lines on a G/L account. The accounting rules are already prepared, which then will be balance on a corresponding account. Delete the "X" (XRENTAL -> Rental) and import the lines once again.
The import line 19 is connected to an association. Here you are able to show the import of a payment advice for an association. Post the journal 5157810_02 and set up the accounting rule. Delete the "X" (XSEE PMT. ADVICE -> SEE PMT. ADVICE) and import the line again.
The import line 20 shows a returned SEPA direct debit. Set up a BC accounting rule. The accounting is already prepared. There are two options: 1) X109: Delete the "X" and import the line again. The fees will be balanced on a G/L account and the field "Reopen-to ID" is filled. 2) Y109: Delete the "Y" and import the line again. The fees will be balanced to the customer and the field "Reopen-to" ID is filled.
5157810_02: Endcustomer data demo
Throughout this checkbox you can import previously exported data of your end customer into the current database.
Export of customer data
Open the corresponding customer database from which the data is to be exported.
Execute the report 5157992 via "Start object".
 You have the option to anonymize the data of the customer databnak.
To do this, set the check mark "Anonymize data".
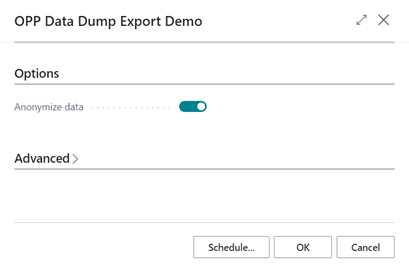
After confirming with "Okay" you will be asked if you want to download the file.
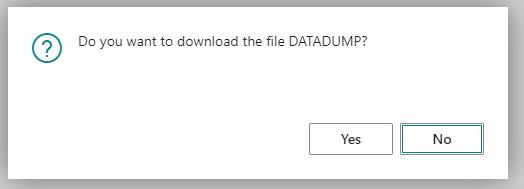
If you confirm with "Yes", the file will be downloaded.
It will be exported:
- All open entries of customers and vendors
- All corresponding names of customers and vendors as clear names or anonymized
- All associated customer and vendor bank accounts
- All bank accounts
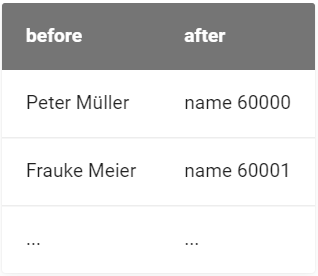
If the data has been anonymized, a combination of the text "Name" and the customer / vendor no. is used. In this way, other data such as invoices or bank accounts are also anonymized.
Import into the current database
- Switch to the current BC database
- Choose OPplus – General – Object Run:

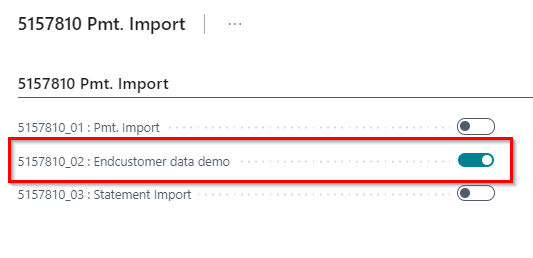
- Run the report 5157991 OPP Build Demodata DEMO:

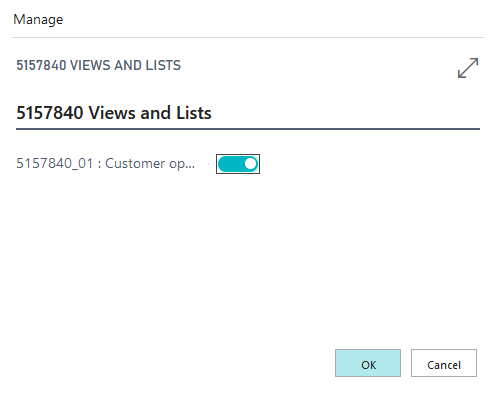
- Choose the demo mode and test 5157810_02 Endcustomer data demo. Click OK:
- Following will be created:
- Customer- and vendor accounts
- Bank accounts of customers and vendors
- Bank accounts
- Open entries will be copied in a General Journal
- Post the General Journal
Import of a current bank statement
- Import a bank statement of your customer
- Set up the Pmt. Import Interface
- Import the bank statement again
- Switch to the Ext. Cash Receipt Jounal
- Show the functionalities of OPplus with the customer data.
5157810_03: Statement Import
This item allows you to create a statement file that matches the entries of demo 5157810_01 and with which you can simulate the complete process of importing a bank account statement.
Run the demo and there opens a window.
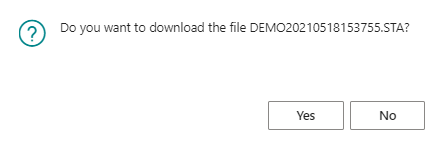
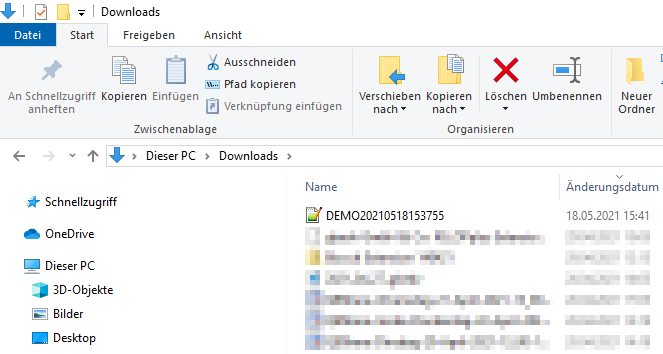
After confirmation that you would like to download the file, it will be saved on your device in a corresponding folder.
 You are now able to import the file in OPplus throughout the MT940 interface. Also you are able to show the process of importing bank statements incl the setup of import interfaces and balancing the entries from the beginning. You find a detailed description on how to import and rework over bank statement files in our manual Payment Import (https://help.gbedv.de/en-US/site/pmtimport/).
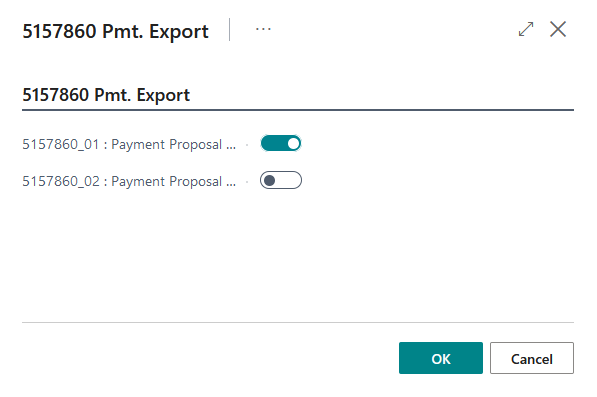
5157860: Payment Export
5157860_01: Payment Proposal (Customer and Vendor)
With this demo you can show how to create a customer and vendor payment proposal also with foreign currencies.
Payment Methods:
The payment methods already have been complemented in the OPplus General Setup with following Payment Type Codes:
| Payment Method Code | Default Payment Type Code |
|---|---|
| LAST | SEPA-LS (SEPA CORE Direct Debit) |
| BANK | SEPA (SEPA transaction) |
| AUSLAND | ISO PMT (ISO payment (XML)) |
Posting of Entries:
For the demo the system creates the General Journal 5157860_01 incl posted entries. The posting- and the document date of the entries corresponds to working date -2M. On the following customer and vendor accounts a different number of invoices with the corresponding payment method codes has been posted:
- Customer 50000 - William Shakespeare: 1 invoice with Payment Method Code LAST
- Customer 50001 - Mark Twain: 4 invoices with Payment Method Code LAST
- Customer 50002 - Thomas Mann: 1 invoice with Payment Method Code LAST
- Customer 50003 - Oscar Wilde: 4 invoices with Payment Method Code LAST
- Vendor 70000 - Harrison Ford: 1 invoice with Payment Method Code BANK
- Vendor 70001 - Keanu Reeves: 4 invoices with Payment Method Code BANK
- Vendor 70007 - George Clooney USD: 1 invoice with Payment Method Code AUSLAND
- Vendor 70008 - Bruno Ganz CHF: 4 invoices with Payment Method Code AUSLAND
Process in Demo Mode
Activate the Demo Mode under Options and the systems opens the Ext. Cash Receipt Journal 5157860_01 incl entries. Post the journal.
Payment Proposals:
Then create a customer payment proposal and select the date of work in the date fields. Leave the field "Use payment type code" empty:
Then create a similar looking vendor payment proposal, leave the field "Use payment type code" empty:
While creating a payment proposal, explain the different setup opportunities of the request-page.
Process without Demo Mode
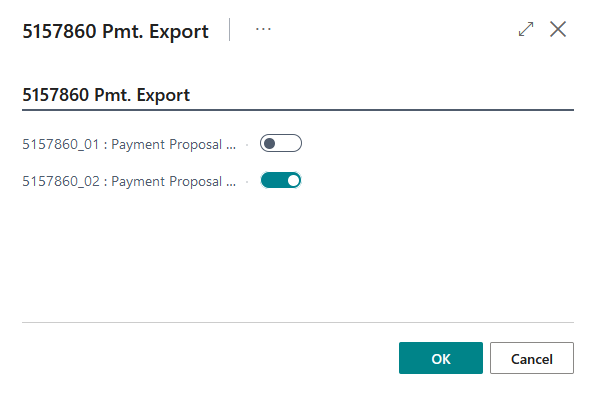
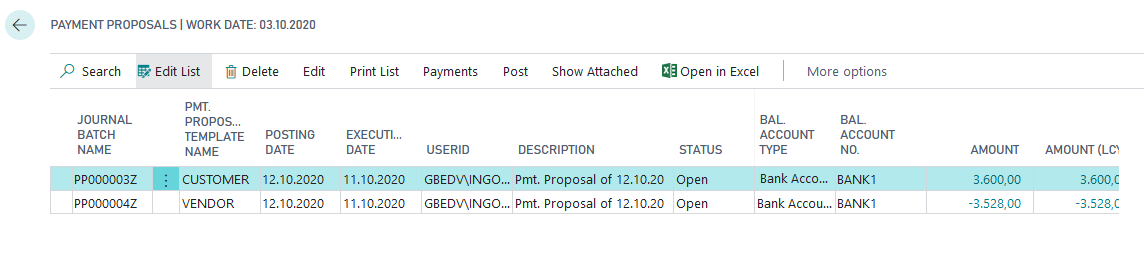
Run the test without the demo mode and the above mentioned steps are done automatically. You then start at the payment proposal page where you will find two payment proposals:
Presentation of functionalities
You are now able to demonstrate how to work with the created payment proposals.
- Explain the fields on the payment proposal page.
- Show how to work on payment proposal through the payment proposal heads and lines.
- Explain the fields on the pages.
After working on the payment proposals:
- Show the function "Create Payments" and you can show the created payment file.
- Post the payment proposal.
Optionally, as an intermediate step, you can show the creation of the postings and the entries created from the payment proposal.
After posting the payment proposal, you can still show how the corresponding payments and entry application looks on the customers and vendors.
5157860_02 Payment Proposal (Customer with backlog)
The demo creates a direct debit payment proposal for the customers William Shakespeare and Mark Twain, whereby Mark Twain has a credit note which has a higher amount as both invoices.
5157860_02 Process in Demo Mode
Activate the Demo Mode under Options and the systems opens the Gen.-Journal 5157860_02 incl entries. Post the journal.
Postings:
Payment Proposals:
Then create a customer payment proposal and select the date of work in the date fields. Select the option "incl. backlog" and explain it.
Open the payment proposal page and continue as described in "Presentation of functionalities".
5157860_02 Process without Demo Mode
Run the test without the demo mode and the above mentioned steps are done automatically. You then start at the payment proposal page where you will find a payment proposal:
Continue as described in "Presentation of functionalities".
Presentation of Functionalities
Open the payment overview and explain why Mark Twain gets an error message saying "payment amount must be positive".
Go to the payment proposal card and show the two options you have to eliminate the error text.
- Change of the payment type code to SEPA. Then the systems doesn't create a direct debit file but a SEPA transfer file.
- Delete the application of the credit note and it won't be charged.
5157820 Associations
With the Associations module within the OPplus demo data tool, you can present how the customer can combine any number of customers into a customer association or any number of vendors into a vendor association.
In the Extended Application, you can then display all open entries belonging to an association and thus assign a payment amount across associations. You can show that this functionality is only possible in the Extended Application of OPplus and not in the standard application.
5157820_01 Extended Application Association
This presentation generates predefined invoices and payments on customer and vendor accounts, which are assigned to an association. Subsequently, the extended application and, for comparison, the standard application can be called up for this purpose.
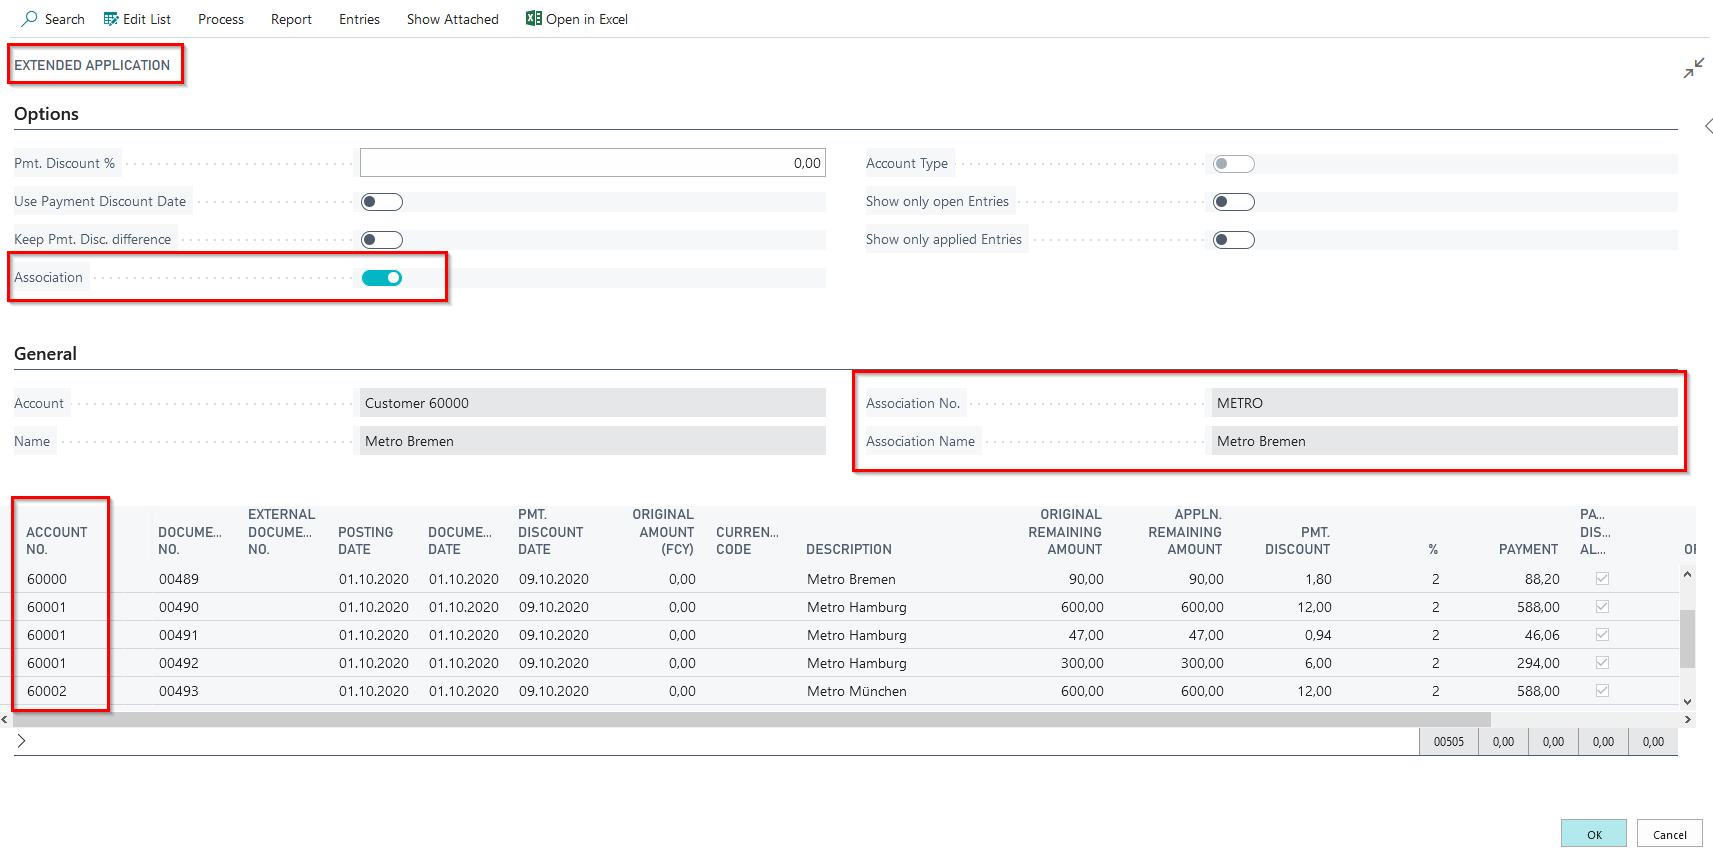
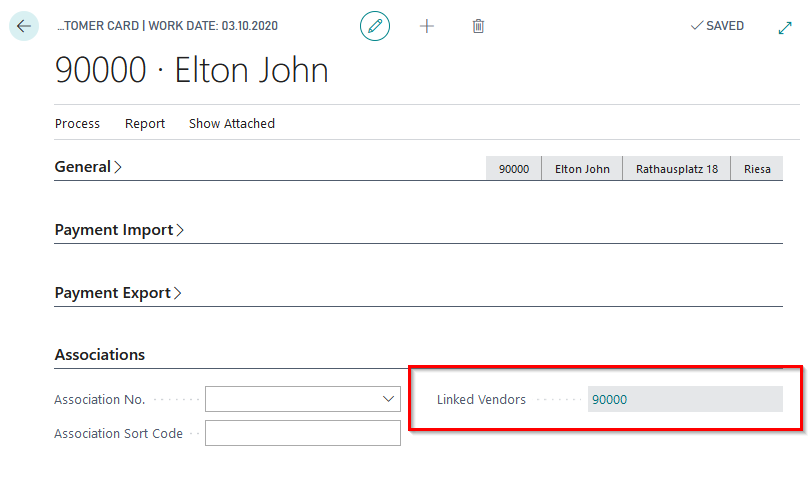
Show that the personal account in the "Associations" tab is assigned to a predefined association, by selecting one of the listed customers or vendors and the corresponding OPplus customer/vendor card on the Ext. Cash Receipt Journal.
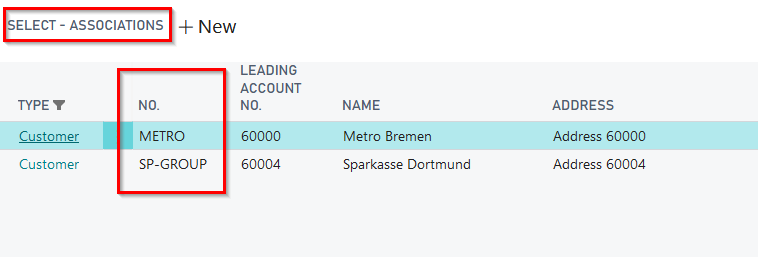
Using the association number, you can display the existing customer or vendor associations in a further step.
Call up the extended application from the first entry line of the open Ext. Cash Receipt Journal by clicking on "Apply Entries" and show that you have access to all the open entries of the association members for application.
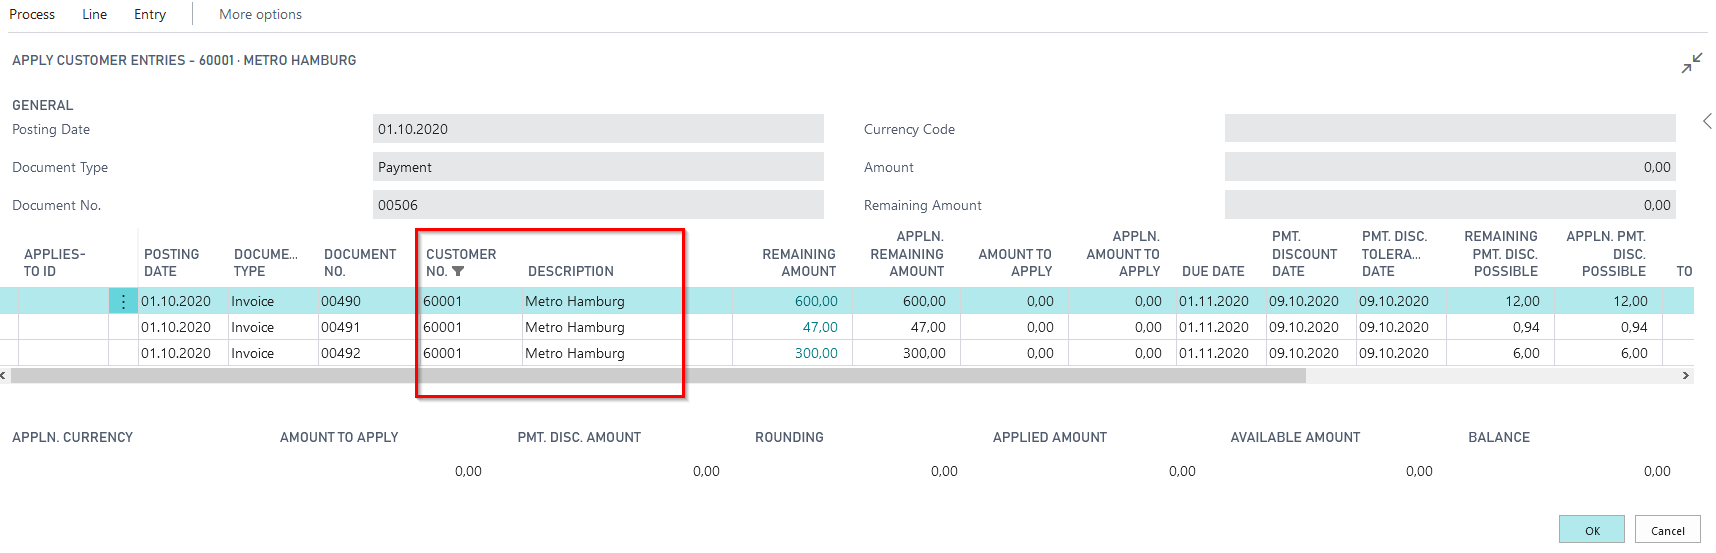
Compare the situation with standard functionality by standing in the second line and clicking "Apply Entries". The function of an association application is not available in standard BC. There are only open entries of the customer viewable.
You can show the same effect with the journal lines three and four on vendor site.
5157820_02 Ext. Application with Cust./Vend. linking
This presentation generates predefined invoices and payments on a customer and a vendor account. Both are assigned to a customer/vendor link. Afterwards the extended application and for comparison the standard application can be called up.
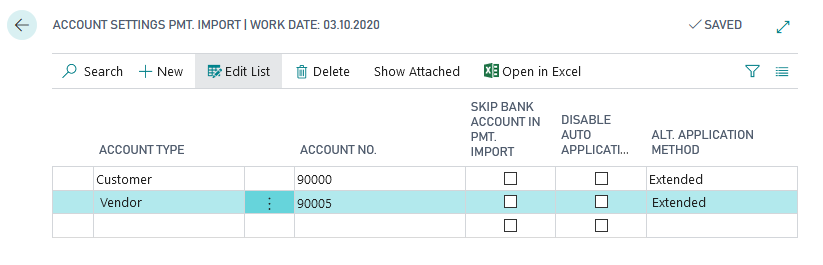
Pmt. Import Account Settings:
In the Pmt. Import Account Settings, the Alt. Application Method = Extended" is set for the customer 90000 and the vendor 90005:
Customer/Vendor Link:
The entries will be created for the following customer/ vendor links:
- Customer 90000 Elton John / Vendor 90000 Elton John
- Customer 90004 Mariah Carey / Vendor 90005 Frank Sinatra
Gen.-Journal:
For the presentation two Gen.-Journals are created: DEMODATA and 5157820_02:
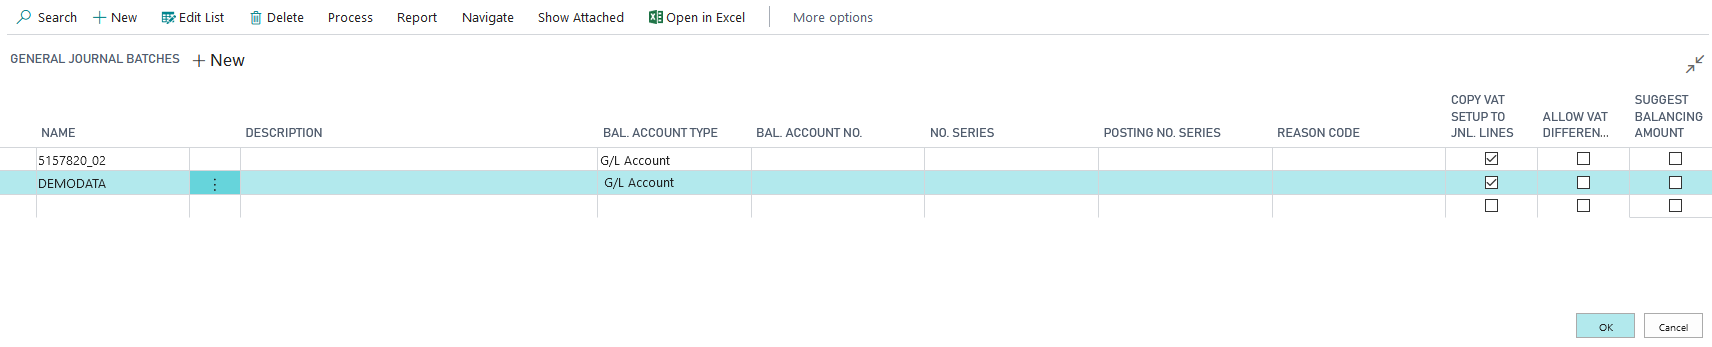
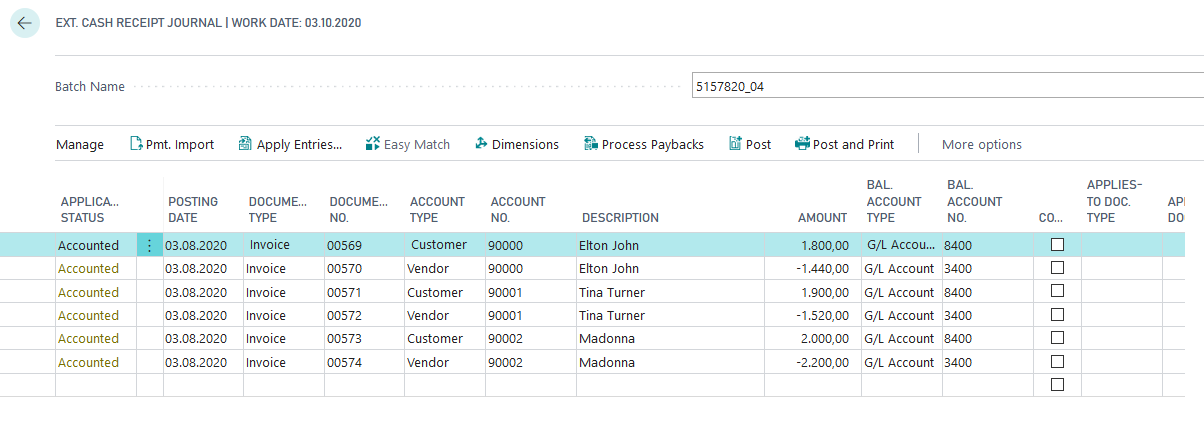
DEMODATA is created for the entries for the customers 90000 and 90004, as well as for the vendors 90000 and 90005:

The Journal 5157820_02 contains the payments. A line is created for each of the customers 90000 and 90004 and the vendors 90000 and 90005:

Presentation in Demo Mode
If you start the presentation in demo mode, the above-mentioned DEMODATA journal will be opened. Dive into the customers and vendors and show how they are linked to each other. Afterwards post the journal.
Now open the journal 5157820_02 with the payments and show for customer 90000 the extended application, in which the entries of the customer and vendor can be selected:
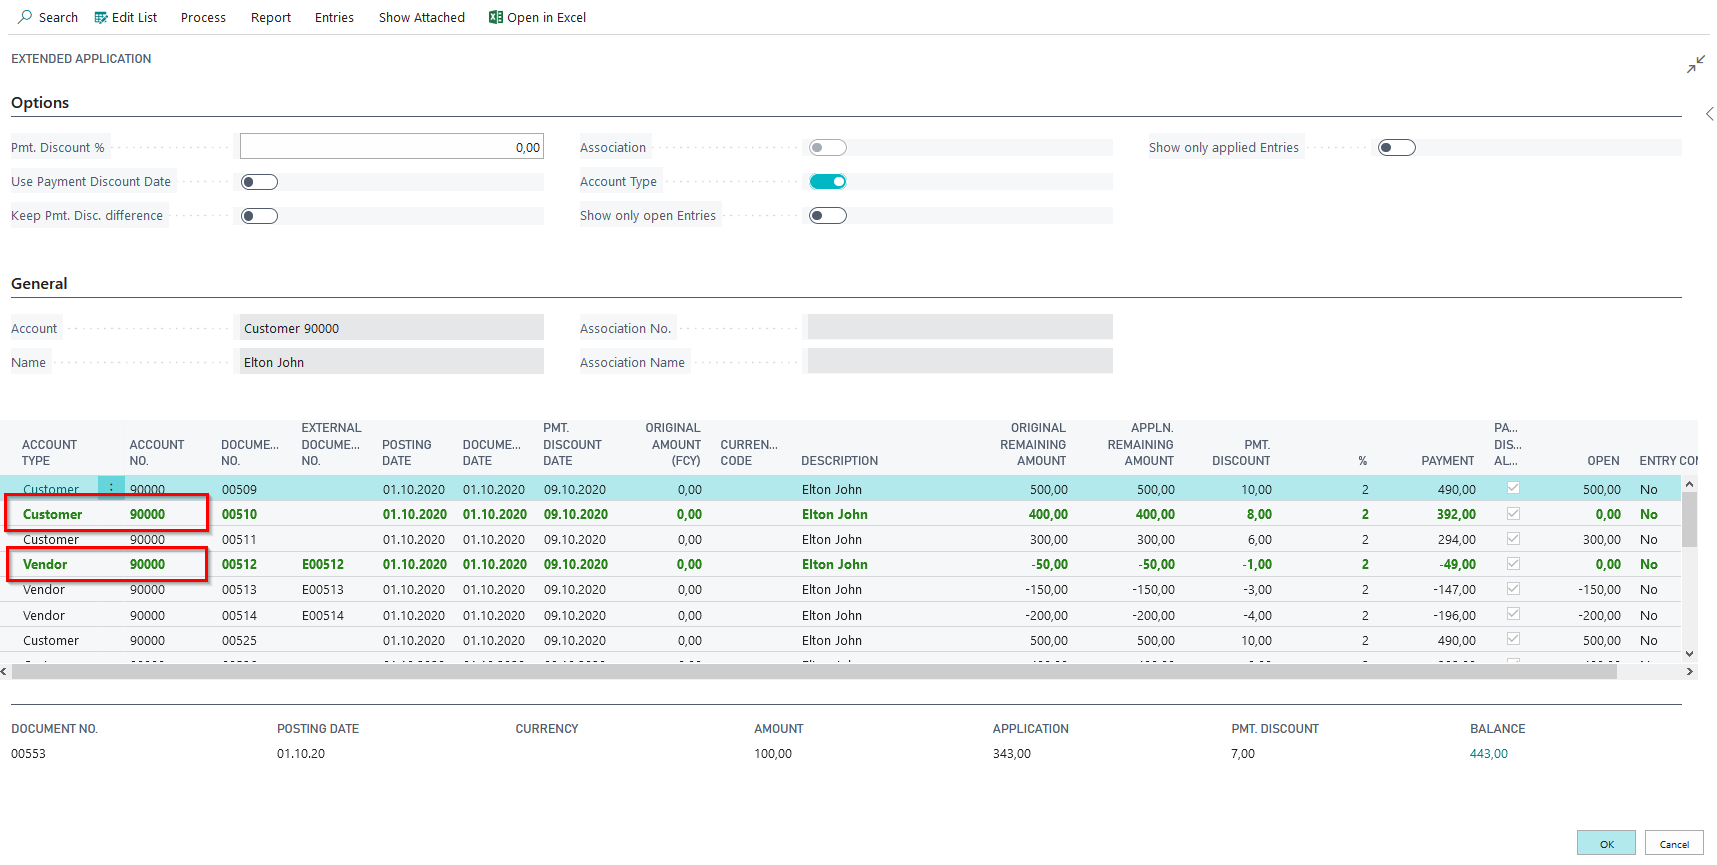
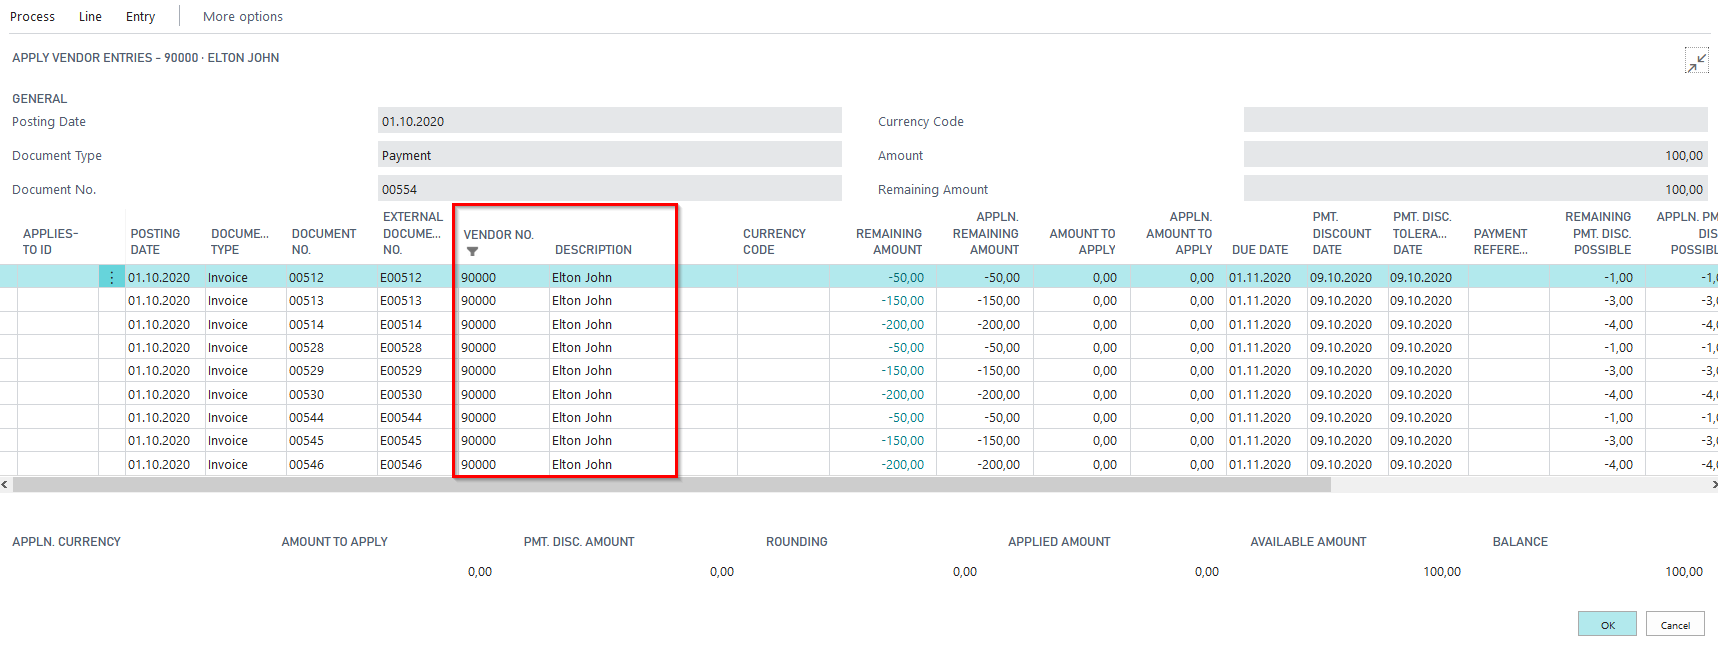
For the vendor 90000, the standard application opens, in which only the vendor entries can be selected:
Proceed in the same way for customer 90004 (standard application) and vendor 90005 (ext. application)
Presentation without Demo Mode
If you start the presentation without demo mode, the DEMODATA journal will be automatically posted and the 5157820_02 journal opens. Then show the Ext. Application and Standard Application as before.
5157820_03 Payment Proposal (Customer- and Vendor Association)
This presentation generates predefined invoices and payments on customer and vendor accounts, which are assigned to an association. Subsequently, payment proposals are to be generated for the association.
Associations
Customer association:
- Leading Account: Customer 60000 - Metro Bremen
- Associated Customers: Customer 60001 - Metro Hamburg, Customer 600002 - Metro Munich, Customer 600003 - Metro Berlin
Vendor association:
- Leading Account: Vendor 80000 - Walmart Chicago
- Associated Vendors: Vendor 80001 - Walmart Detroit, Vendor 80002 - Walmart Washington, Vendor 80003 - Walmart New York City
Entries:
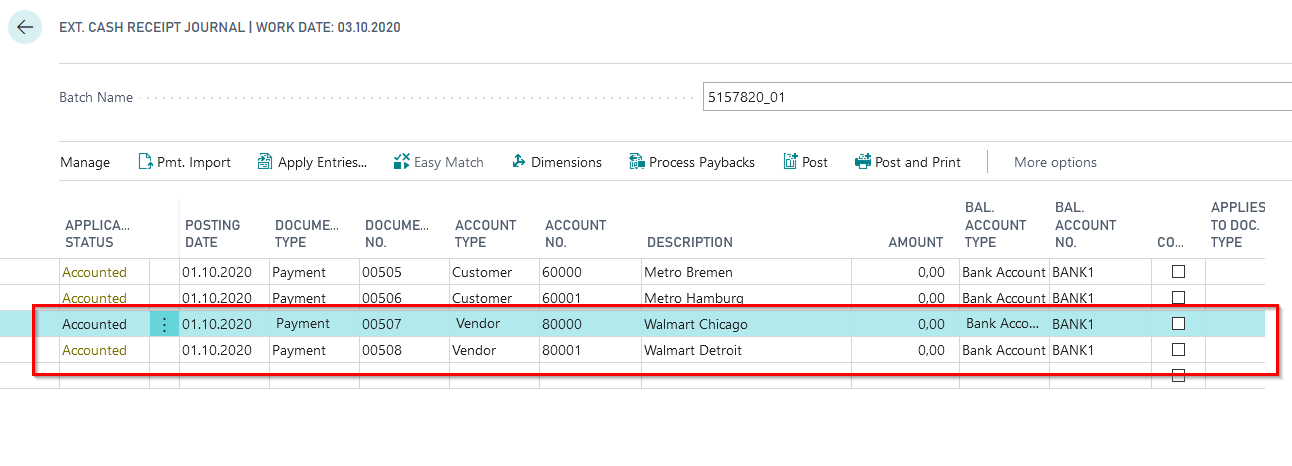
For the presentation the Gen.-Journal 5157820_03 is created. It contains the entries:
Invoices for customers 60000, 60001 and 60002 are created as well as for vendors 80000, 80001 and 80002.
5157820_03 - Presentation in Demo Mode
If you start the presentation in demo mode, the journal 5157820_03 opens. Via the lookup go to the customers/vendors and show the assignment to the association and explain the associations here. Afterwards post the journal.
Now create a vendor payment proposal and select the option "Association payment":
You get a payment proposal with one payment proposal head in it:

Now open the payment proposal card and show that the entries of the vendors 80000, 80001 and 80002 are included here:
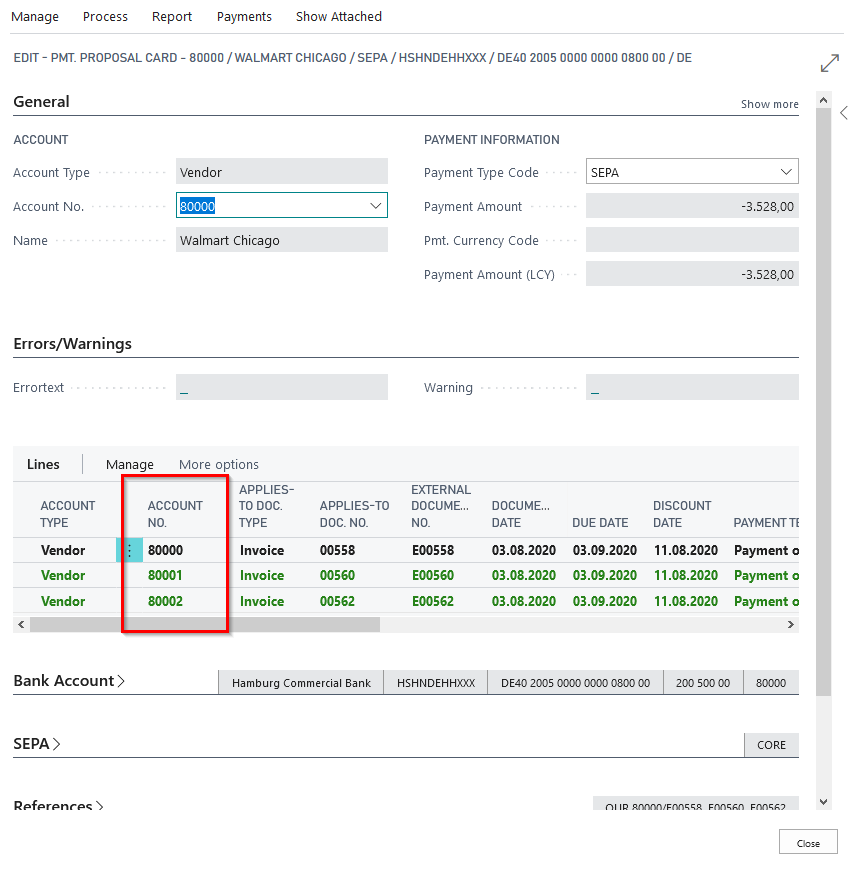
Similarly, create a customer payment proposal and show that it contains the entries of the association customers 60000, 60001 and 60002.
5157820_03 - Presentation without Demo Mode
If you start the presentation in demo mode, the journal 5157820_03 opens. Via the lookup go to the customer/vendor accounts, show the assignment to the association and explain the associations here. Then post the journal.
Now create a vendor payment proposal and select the option "Association payment":
Now proceed as with the presentation in demo mode.
5157820_04 Payment Proposal (Linked Customer/Vendor)
The OPplus module Associations allows to link customers and vendors in a way that their entries are evaluated together. This is then a customer/vendor association. In practice, this functionality is often used if, for example, a customer is also created as a supplier.
The demonstration available here enables you to present the creation of a payment proposal via customer/vendor groups and to go into the special features of these payment proposals.
To do this, start the OPP Build Demodata report with the selection 5157820_04 Payment Proposal (Customer/Vendor Group) and, if required, also select the Demo Mode option.
If the Demo mode is selected, the Ext. Cash Receipt Journal opens with several customer and vendor invoices in it, where the respective customers and vendors belong to a linking.
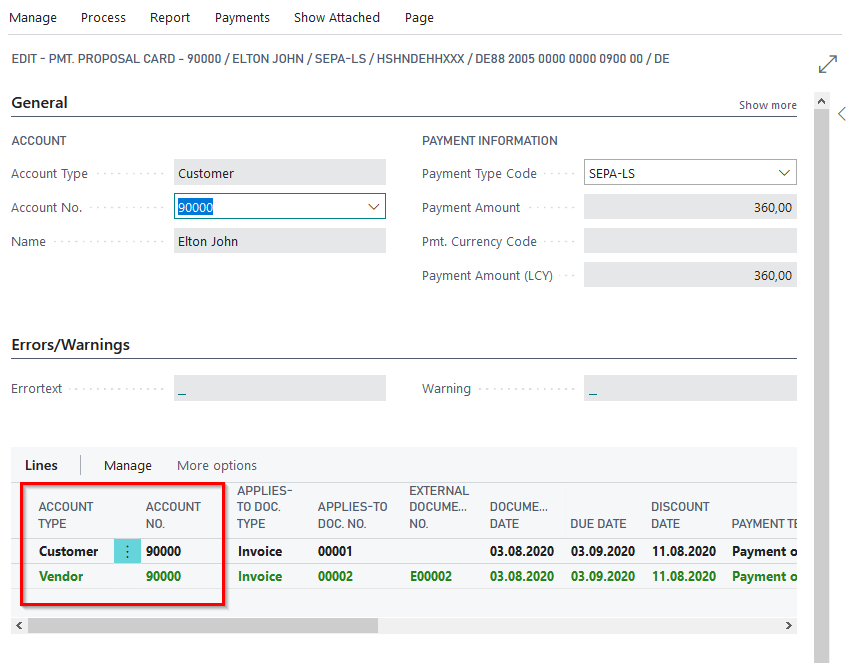
Show via the corresponding customer and/or vendor OPplus card that the corresponding personal account belongs to a linking. For example, a link exists between the customer 90000 and the vendor 90000.
Post the journal for the Cust. / Vend. links and create two payment proposals. When creating a customers payment proposal for a customers belonging to a link, show that you have selected "Cust. / Vend. Linking" in conjunction with the selection "With backlog", include the entries of the linked vendors in the payment proposal.
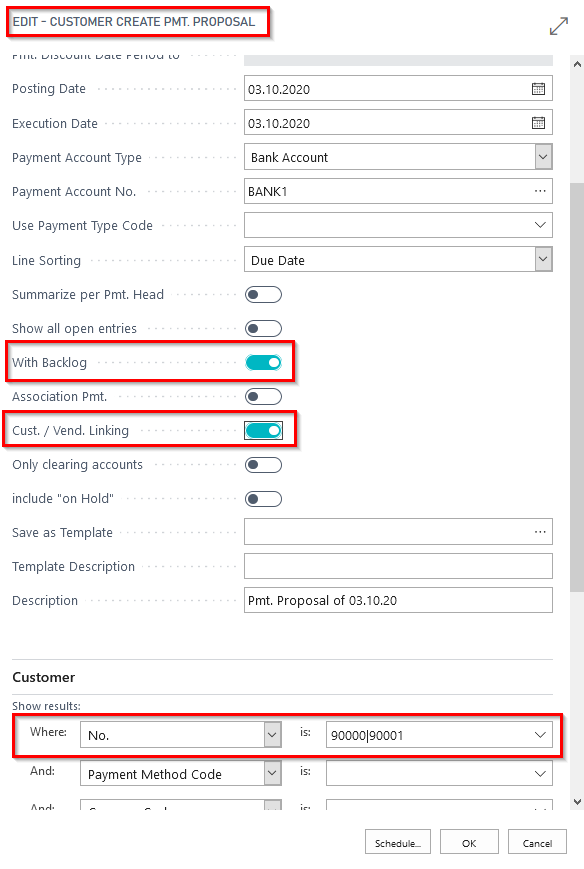
Furthermore, when creating a vendor payment proposal for a vendor belonging to a linking, show that you include customer entries in the payment proposal by selecting "Cust. / Vend. Linking" in the selection of the payment proposal.
Present the result of the created payment proposals with the application of the entries of the linked customers and vendors by calling up the created payment headers and the payment proposal lines.

Show that the amount of the respective payment proposal results from the application of the customer and vendor links entries.
If required, create a corresponding payment file and post the payment proposal. Then you are able to show the application of a customer/vendor link via the respective customer and vendor entries.
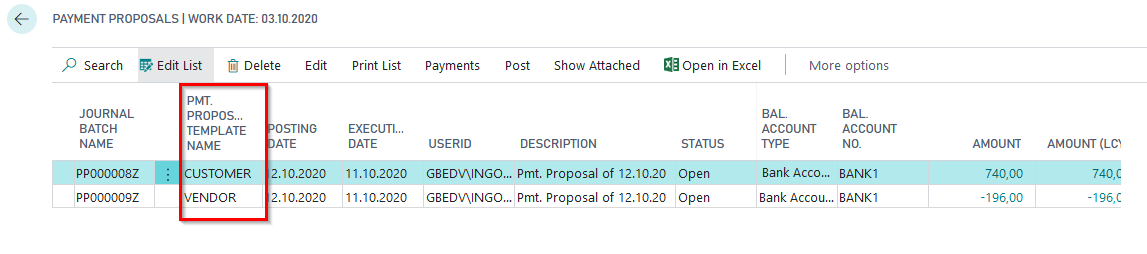
If you call up the presentation 5157820_04 without selecting the demo mode, you will immediately receive two payment proposals (customer and vendor) with a clearing of the linked customers and vendors.
With the payment discount due dates and options chosen in the payment proposal, you are able to demonstrate the clearing of the granted and received payment discount amounts within a customer/vendor linking.

You get further information on that topic in our manual "Associations", which is downloadable on our homepage.
5157830 G/L Open Entries
In the "G/L Open Entries" section of the "Build Demodata" report, two demo scenarios are available for presenting the corresponding module: "5157830_01 G/L Open Entries" and "5157830_02 : Automatic application".
With this module, the user has the possibility to create open entries on G/L accounts, similar to customers and vendors. This functionality can be particularly advantageous for inventory costs such as "cash in transit", "items in transit" or "liabilities from social security contributions".
For both presentations mentioned above, you can also select "Demo Mode". In the demo mode a journal filled with entries opens first. The journal contains the accounting records for building open entries on the G/L account 1590. After posting you can start with the demonstration of how to apply the entries.
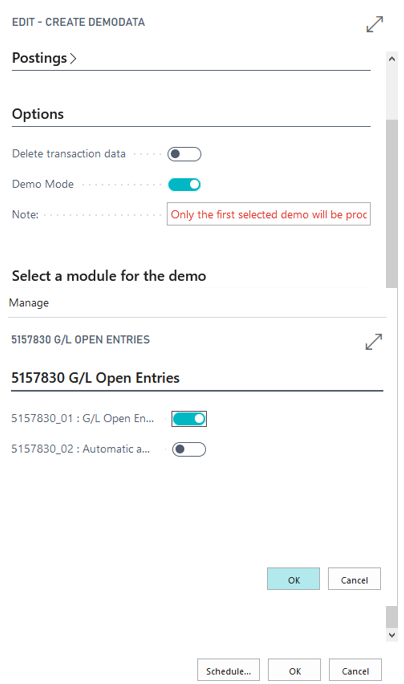
E.g. Run 5157830_01 in demo mode:
5157830_01 G/L Open Entries
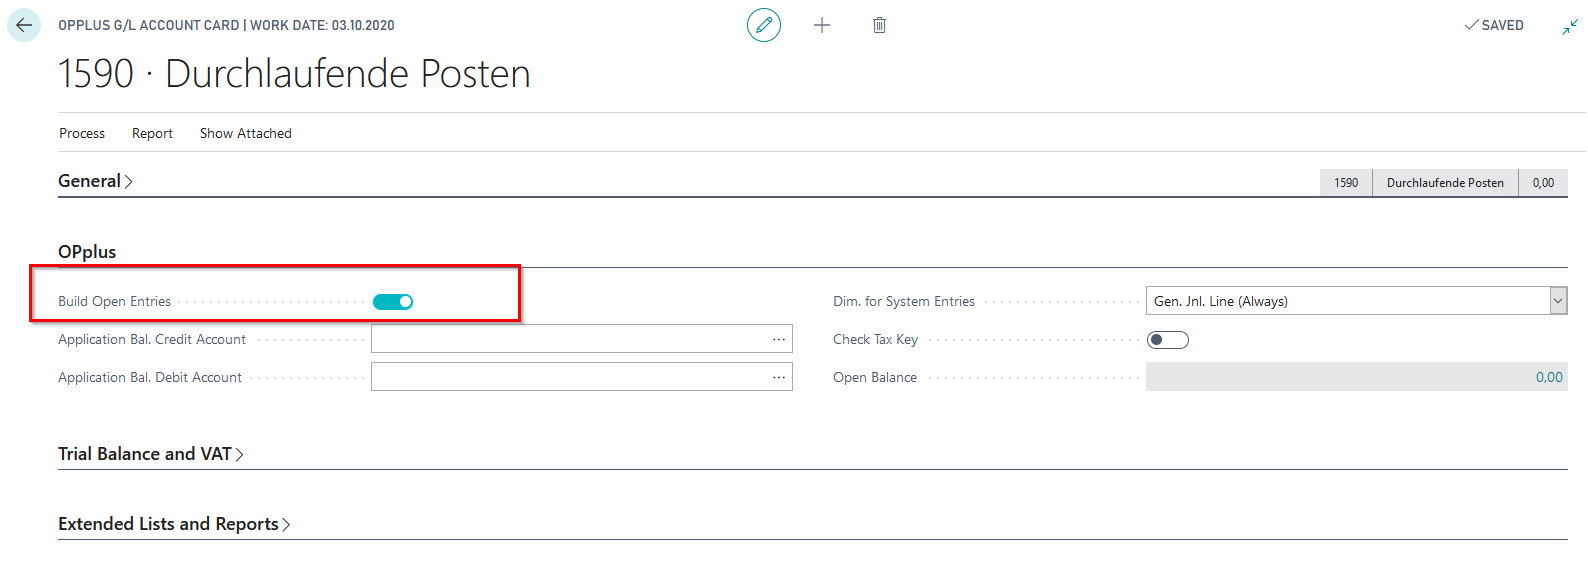
The execution of this function generates for your presentation pre-defined entries on a G/L account, which are then available for manual application. The prerequisite for using a G/L account as "OP-managed" is that the corresponding setting is made on the account in the OPplus extension. This setting is already preset for that G/L account when using the demo data tool.
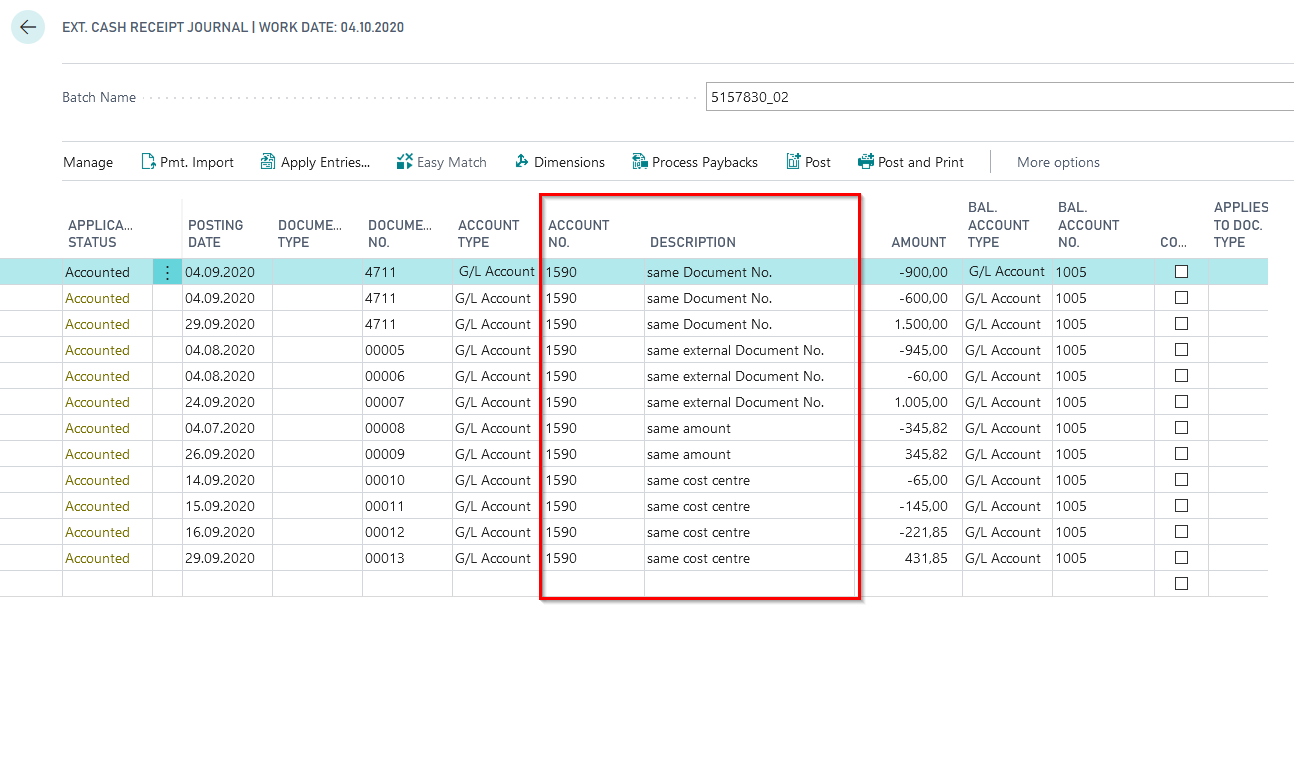
As a result of the postings made in the background (without demo mode), several open entries are available for manual application on the G/L account 1590 "Transit" which is set to open entries managed.
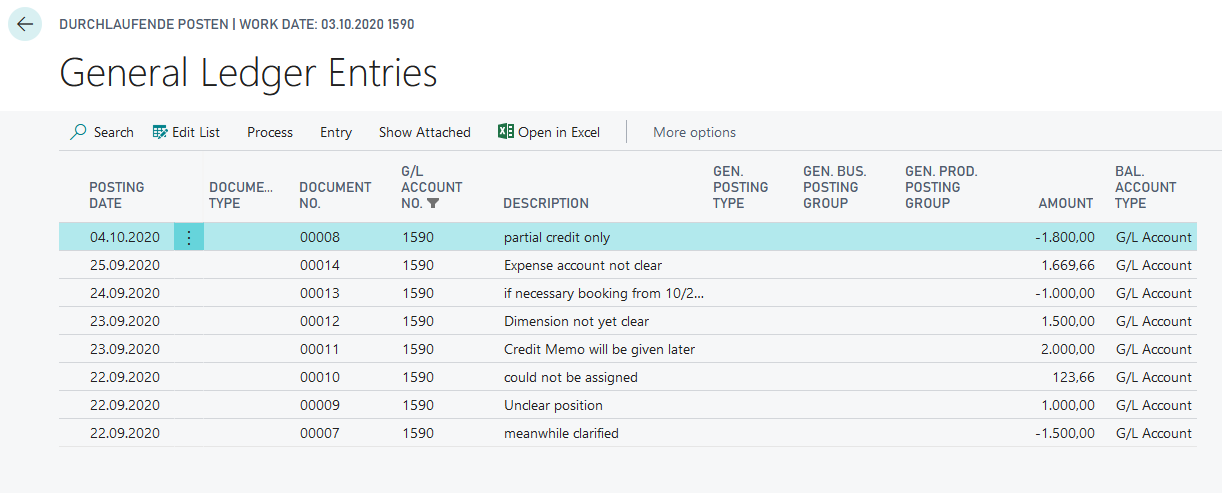
Furthermore, the Gen.-Journal 5157830_01 is provided with accounting records that you can post for demo purposes to demonstrate the manual application of entries.

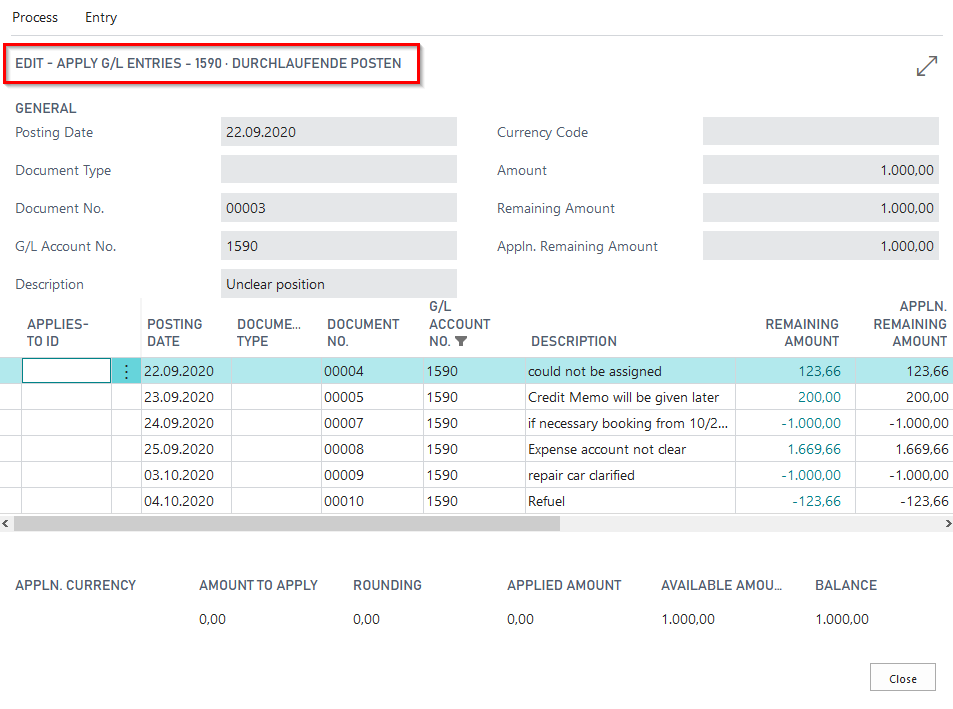
Via the OPplus page "G/L Account Open Entries" you reach the overview of G/L accounts managed on an open entry basis with the corresponding open G/L entries in it, which are directly available for manual application via this page.
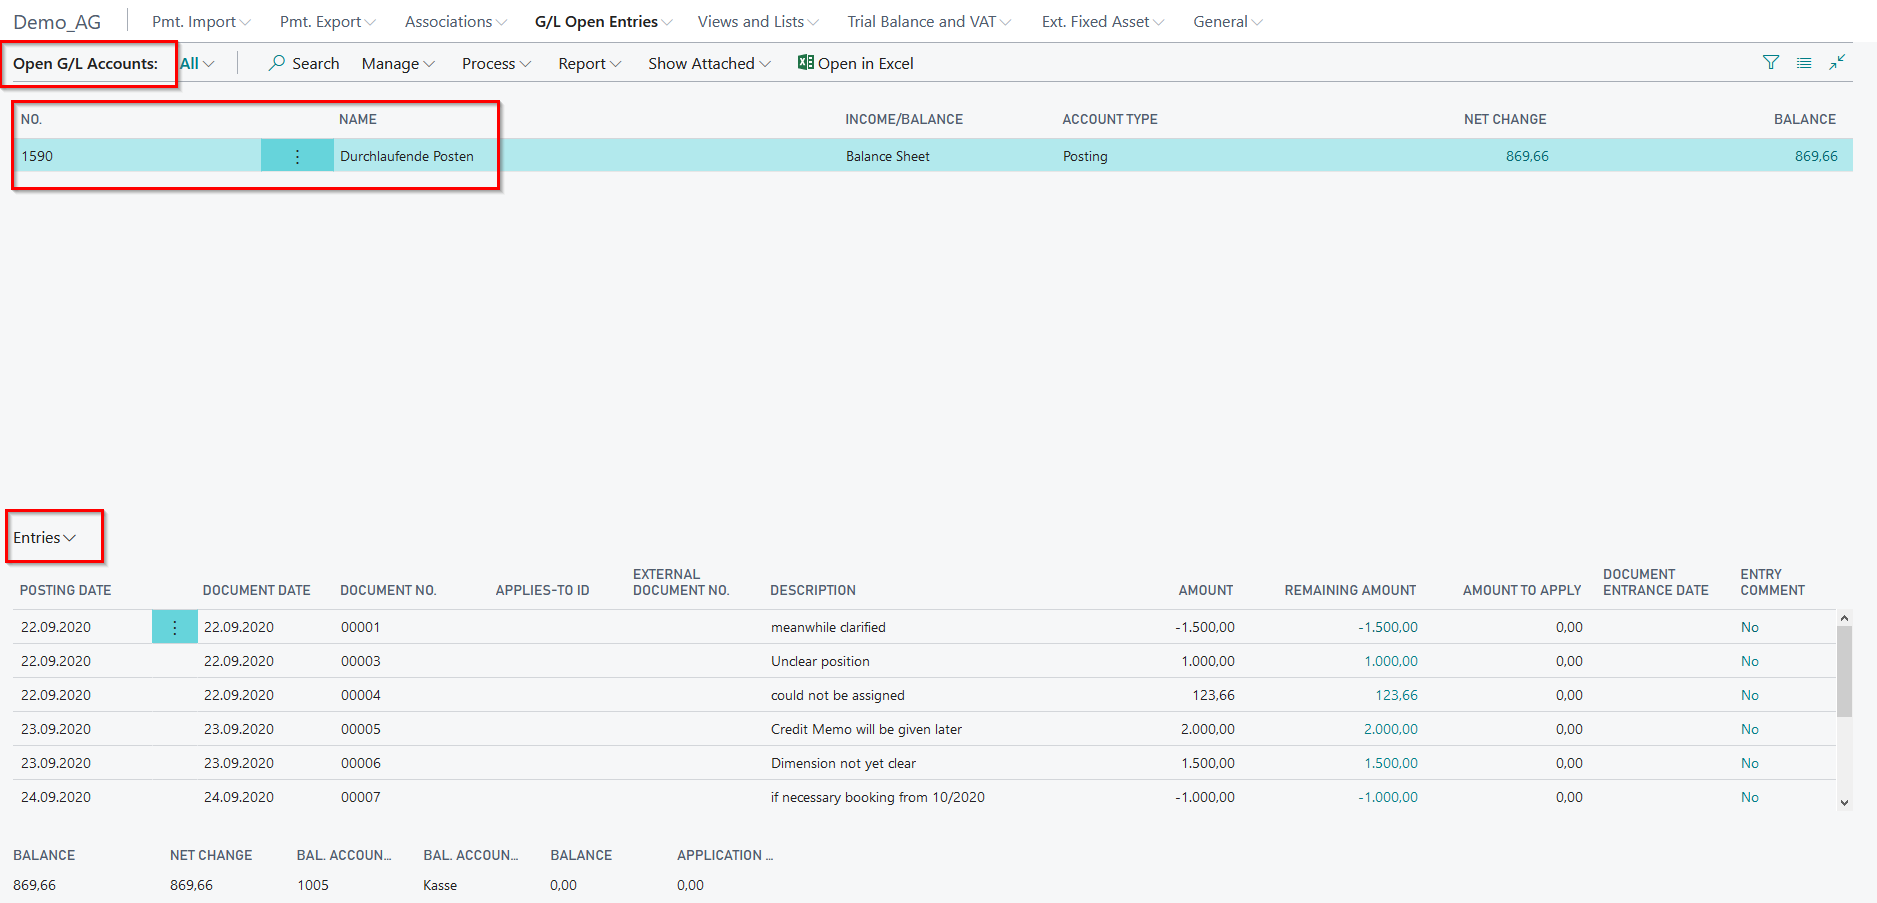
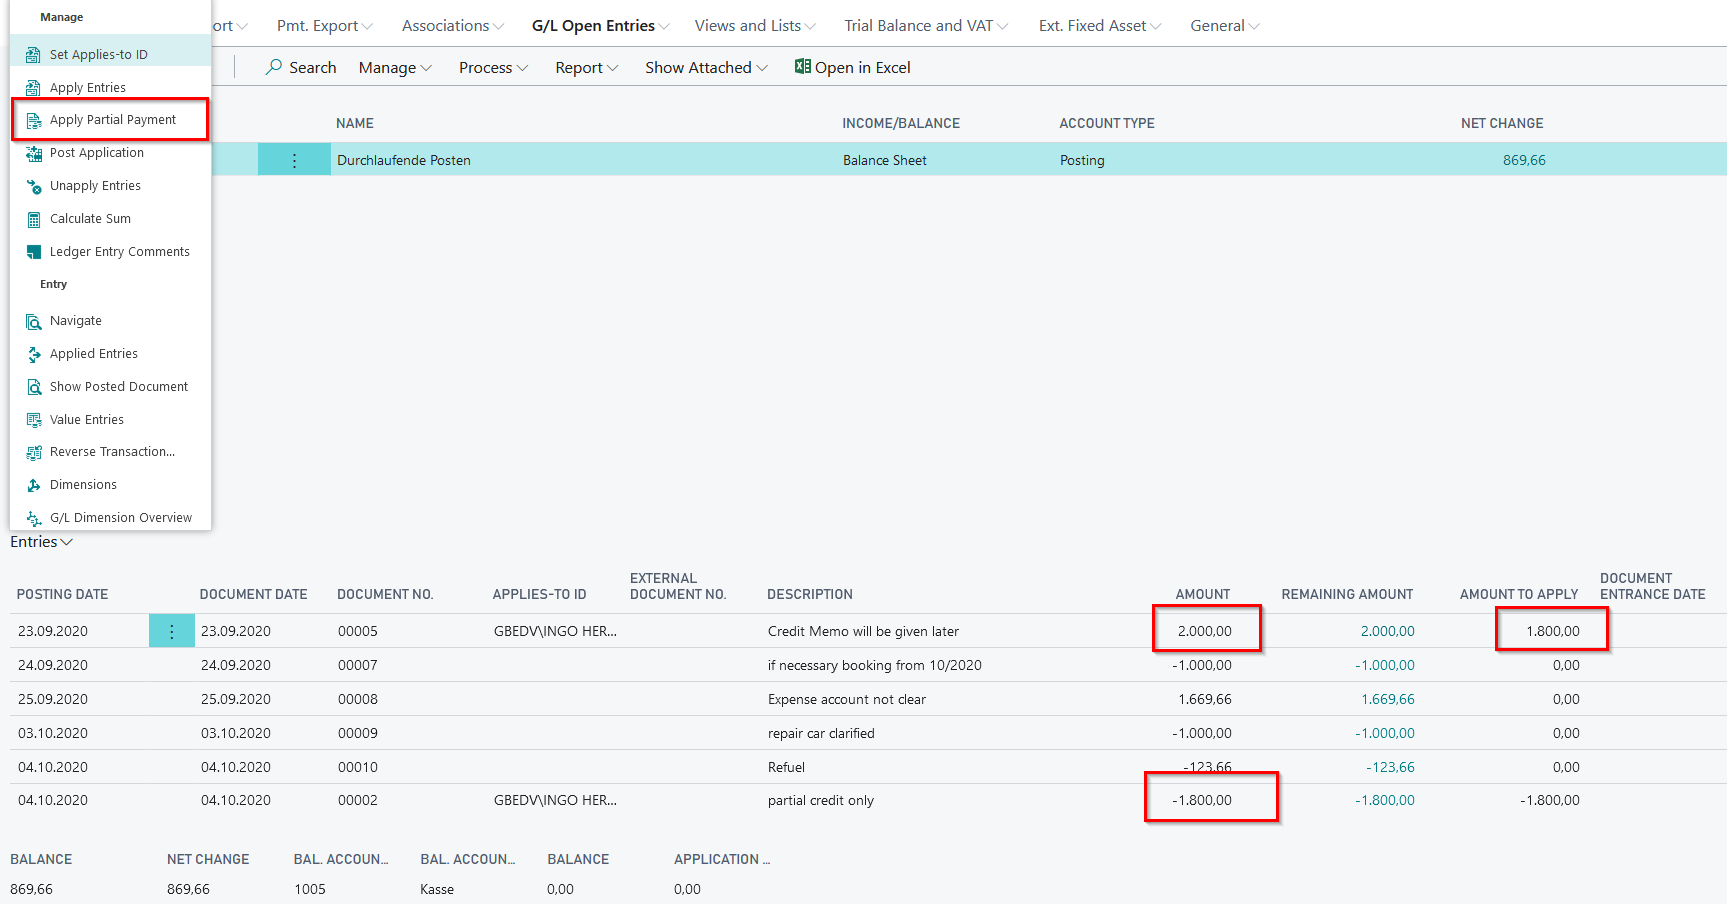
Via "Set Applies-to ID", you can now carry out or present the manual application of open G/L entries.

Post the made application via the function "Post Application".
Also the function "Apply partial payment" can be demonstrated. Thus, it is possible that the balance will be placed in the remaining amount field of the current entry and the balance can be posted by you afterwards.
You can view the created entries incl. remaining amount via the G/L account card of the open entry managed account (Process/OPplus/Process/Entries incl rem. Amount).
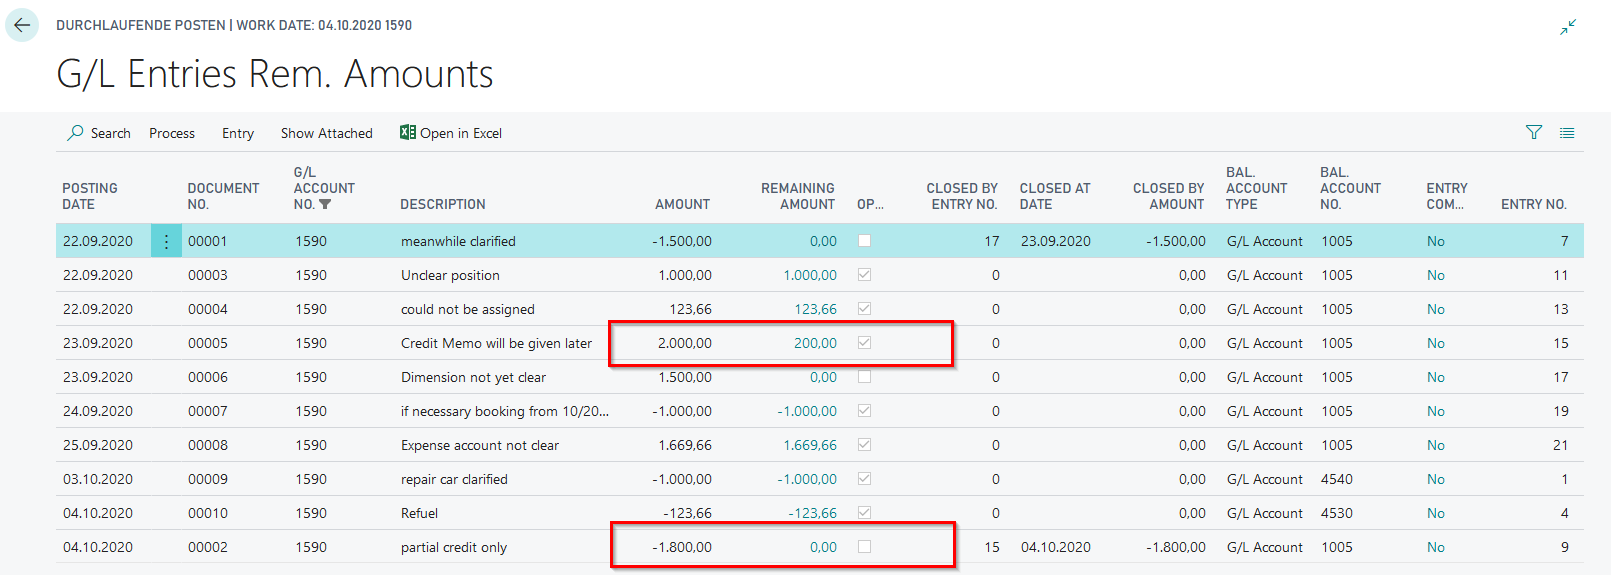
Also present the possibility to apply the open entries with other or to delete the application. You find the function on the page "Entries incl. Remaining Amount".
In combination with the module "G/L Open Entries" demonstrated here, the function for creating a G/L account payment proposal in Payment Export is also available. However, the G/L account payment proposal is not part of the demo tool.
5157830_02 Automatic Application
The execution of this functionality generates predefined entries on an open entries managed G/L account, which are then automatically applied. The G/L open entries for this scenario are located on the G/L account 1590 "Transit", which you can view by calling up the G/L open entries.
If you start this presentation with additional selection of the demo mode, the above mentioned journal will be filled first, which you post for the automatic application.
You find the call up for the report for automatic application of open G/L entries by following G/L Open Entries/G/L Account - Open Entries/Report/Automatic Application of G/L Accounts with Open Entries. It also opens directly after you have started the demo application 5157830_02 without marking the demo mode.
In the opening call for the corresponding report, a filter is already set on the selected G/L account 1590. The posting date is also predefined for the planned automatic application. At this point, you have the possibility to show the criteria that can be used to analyze the application (e.g. document no., ext. document no. aso.).
Individual customer fields can also be used to analyze the application to be made (e.g. the global dimensions used). Up to three fields are available for this purpose.
Confirm the function automatic application with OK. You will see a message with the corresponding number of made applications according to your setup.

You are able to see and show the created entry applications in the G/L account card via Process/OPplus/Process/Entries incl remaining amount.
Remember: you are able to delete the transaction data via Run Object "Delete transaction data" if you would to start a new demo.
5157840 Extended Lists and Reports
5157840_01: Customer open entry list
With this presentation you can show functionalities like "Output in Excel" and "Output in Excel Balance Ending Date" of the report "Customer - Open Entries".
Postings:
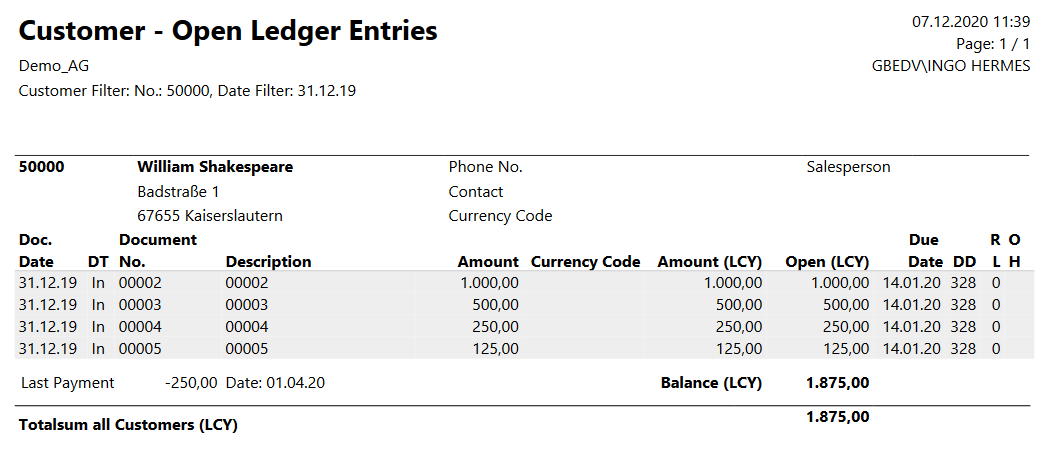
The system creates the Gen.-Journal 5157840_01 incl. entries. For the customer 50000 - William Shakespeare 4 invoices are created. The posting date and the document date is the 31.12. of the previous year (starting from work date):
- Invoice 0002: 1.000,00
- Invoice 0003: 500,00
- Invoice 0004: 250,00
- Invoice 0005: 125,00
Additional 3 payments:
Payment 0006: 750,00:
- Posting-/Document Date 1st day of the penultimate month starting from the work date
- Partial application invoice 0002
Payment 0007: 250,00:
- Posting-/Document Date 1st day of the last month starting from the work date
- Application remaining amount invoice 0002
Payment 0008: 250,00:
- Posting-/Document Date 1st day of the last month starting from the work date
- Partial application invoice 0003
5157840_01 - Test procedure in Demo Mode
Confirm with OK and the journal 5157840_01 opens:

Explain the postings and post the journal afterwards.
5157840_01 - Test procedure without Demo Mode
If you start the test without demo mode, the journal 5157840_01 will be automatically posted and the "Customer - Open Entries" report will be opened with the 31.12. of the previous year as a cut-off date.
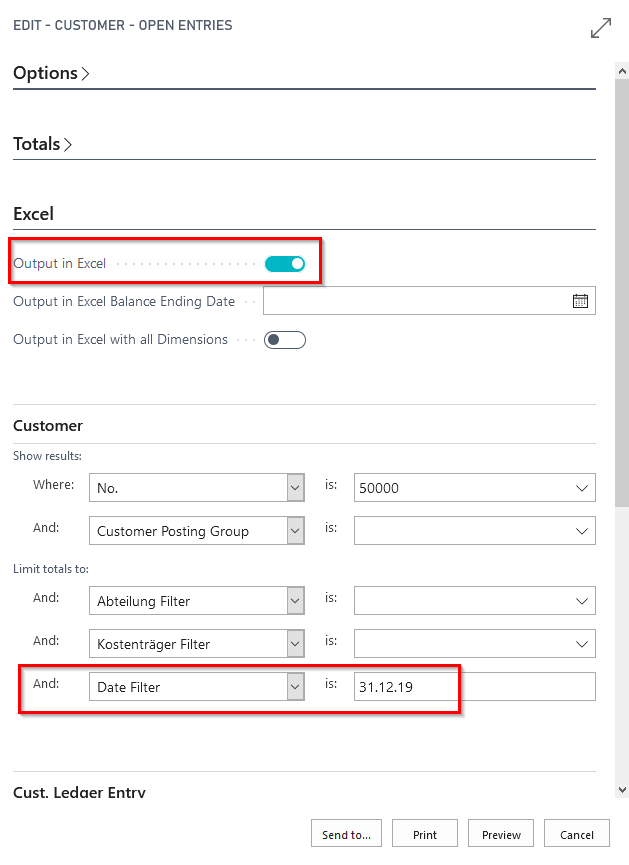
Presentation of the Excel Output
If not done yet, start the report "Customer - Open Entries" and give a filter on the date saying 31.12. of the previous year. Choose additionally the option "Output in Excel":
Click on preview
After closing the preview, you get a message of what you would like to do with the Excel file. Open it and show the additional remaining amount columns:

Repeat the call up of the report and type in the payment dates in "Output in Excel Balance Ending Date" (here: 01.02., 01.03., 01.04.). Now show the differences of the remaining amount columns:
After partial payment invoice 002:
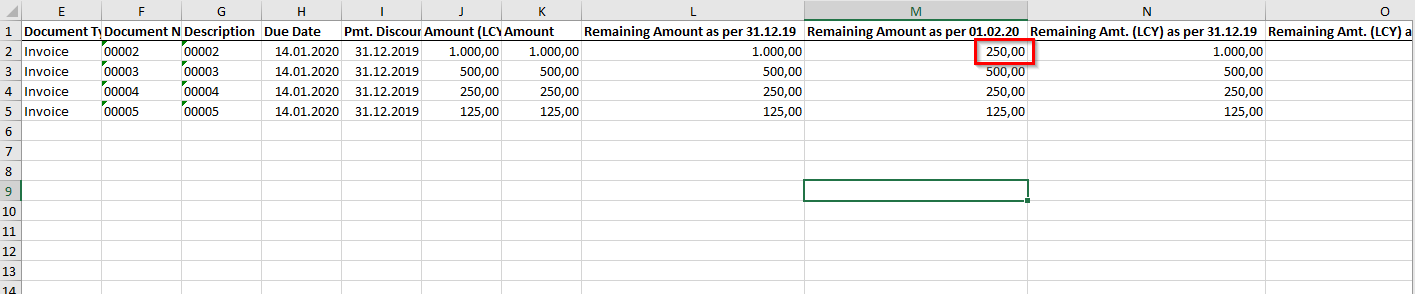
After payment of remaining amount invoice 002:

After partial payment invoice 003:

5157850 Trial Balance and VAT
5157850_01 Account Schedule with shifting accounts
The execution of this functionality through the report 5157991 OPP Build Demodata allows you to present an account schema in which the presentation of shifting accounts has been converted within the framework of a balance sheet generation. A corresponding account schema called "shifting accounts" opens immediately after the report is executed.
To display the shifting account functionality, the settings in the Balance Sheet columns are relevant here. In order to use this field, an asset/liability calculation type must be defined either in the setup of the "Trial Balance and VAT" module or in the account scheme name. The calculation type set up for the demo purposes is "Value". More detailed explanations of the possible calculation types can be found in the OPplus manual for the "Trial Balance and VAT" module.
If there is no entry in the column Asset/Liability calculation type in the extended account scheme name, the basic setup made in this area will take effect.
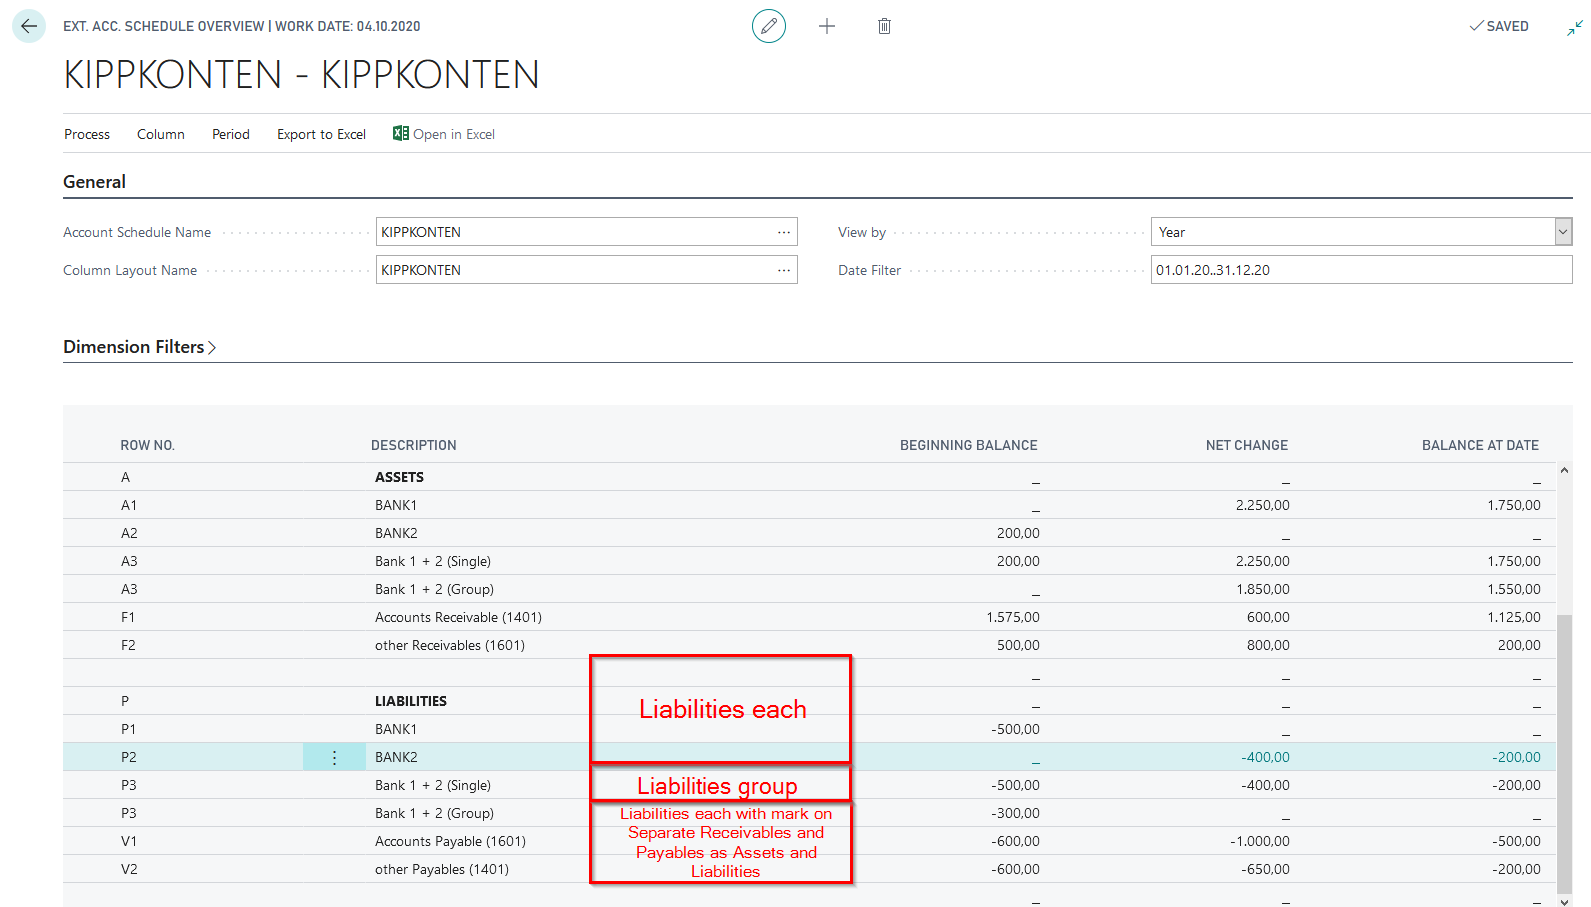
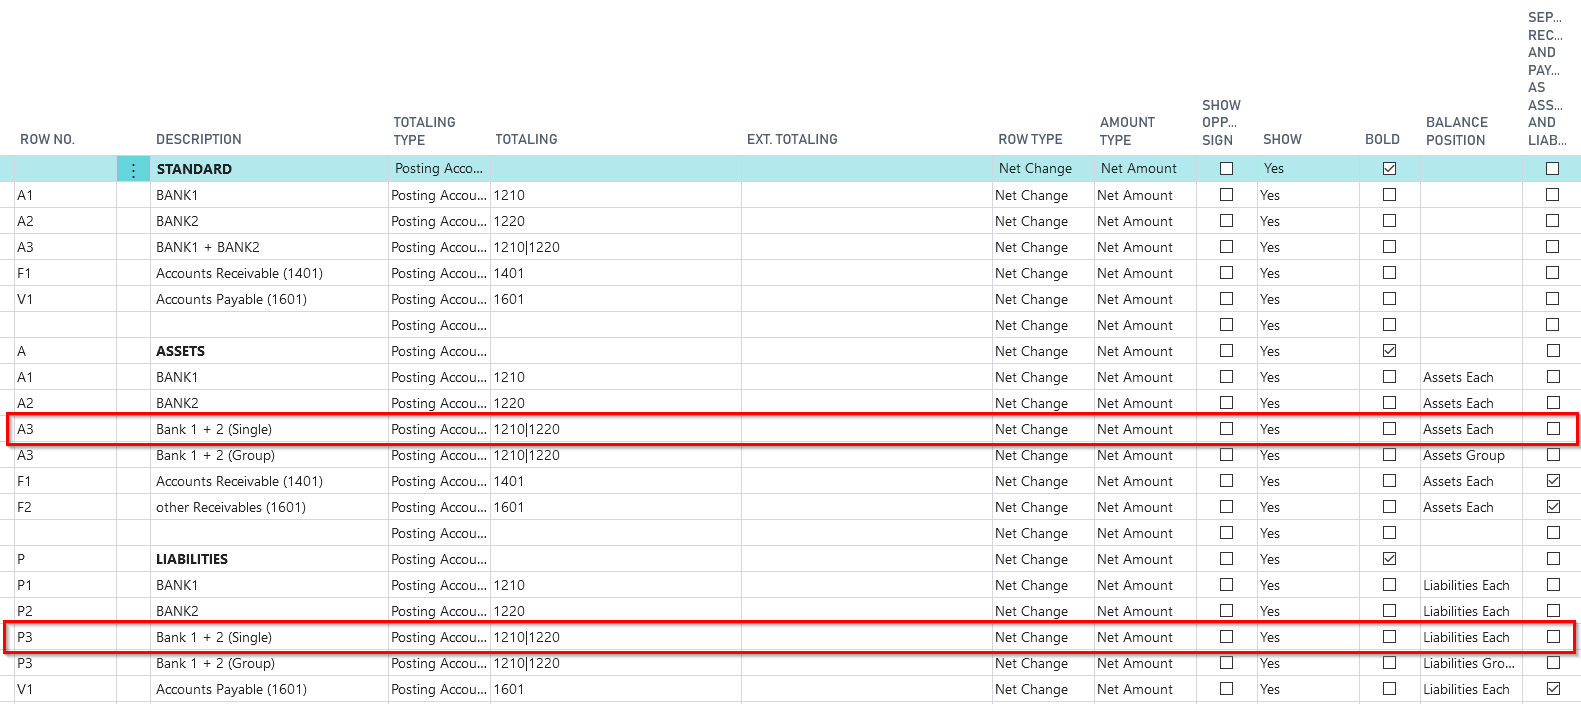
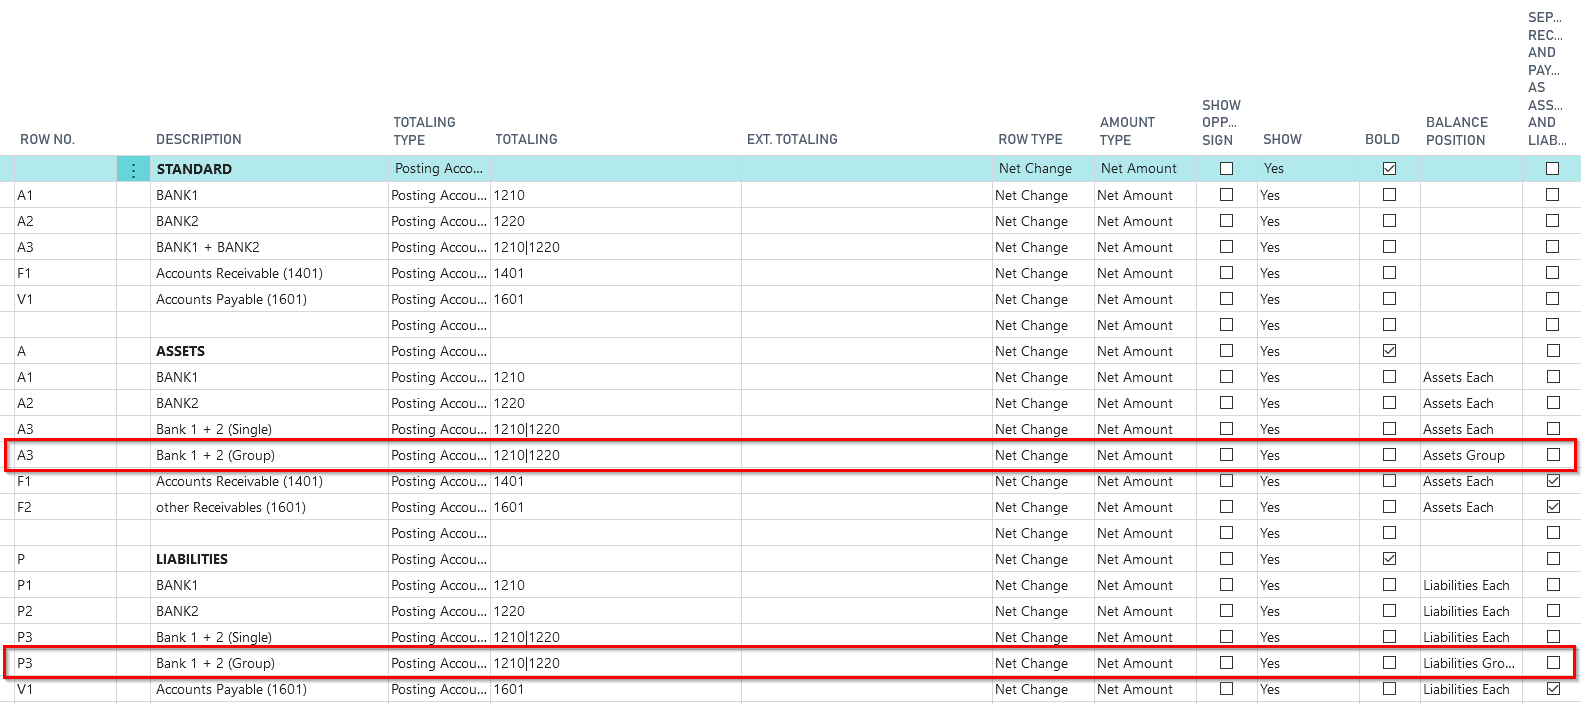
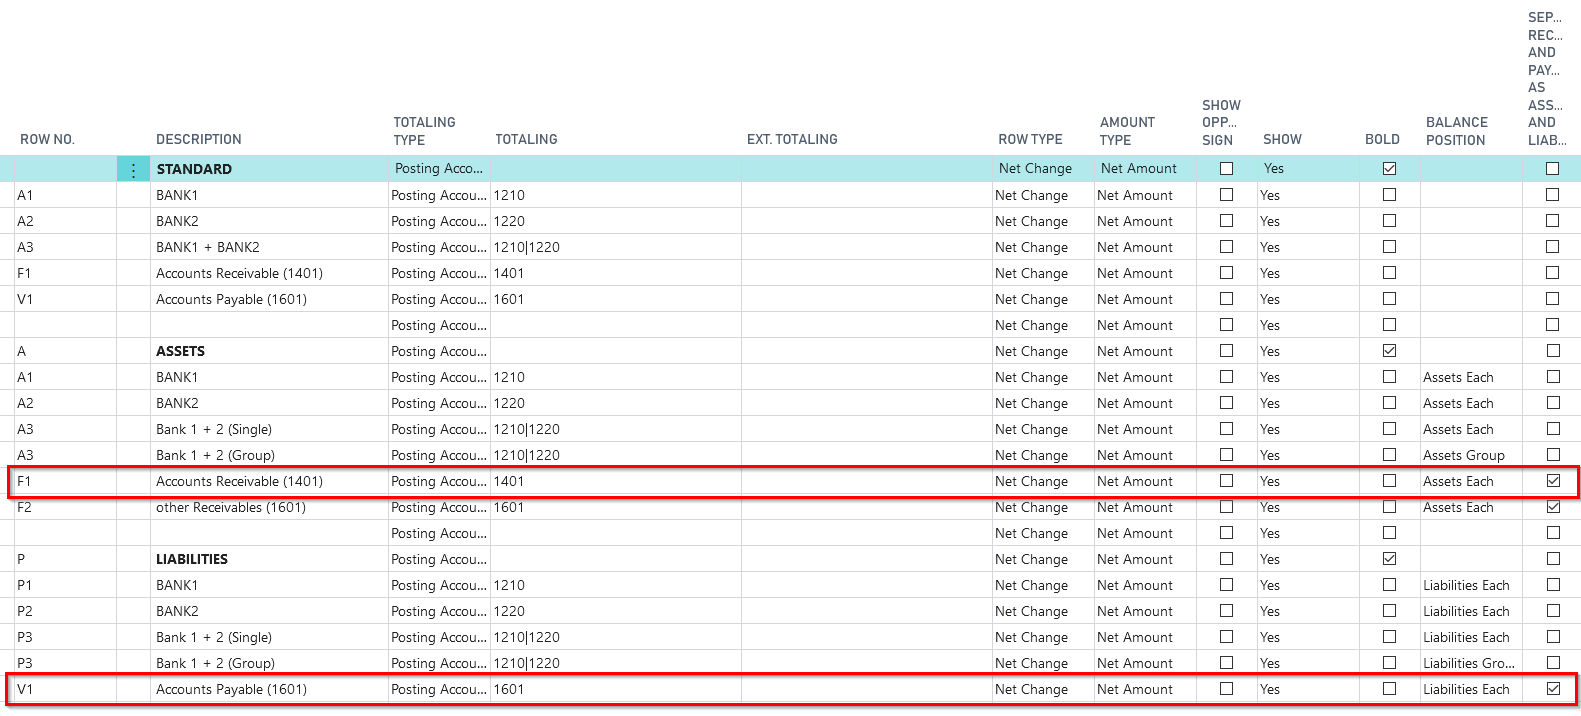
Balance Position
With the help of the entry in the field "Balance Position", you can display shifting accounts and shifting account groups. The calculation is performed for the accounts entered in the "Totaling" field. It is important to note that the "Totaling Type" is "Posting accounts". The following options are available, which you can explain using the existing setup during your presentation and whose effects can be demonstrated on the existing account scheme:
| Value | Impact |
|---|---|
| Empty | Calculated values will always be shown on this line. |
| Assets each | The system calculates the value related to the selected date filter per entered sum in the field "Totaling". That value decides whether it will be shown on the position Assets each or Liabilities each. |
| Liability each | The system calculates the value related to the selected date filter per entered sum in the field "Totaling". That value decides whether it will be shown on the position Assets each or Liabilities each. |
| Assets Group | The system calculates the value related to the selected date filter per entered sum in the field "Totaling". That value decides whether it will be shown on the position Assets Group or Liabilities Group. |
| Liabilities Group | The system calculates the value related to the selected date filter per entered sum in the field "Totaling". That value decides whether it will be shown on the position Assets Group or Liabilities Group. |
Explain here that when setting up the account scheme, for each row with the Balance Position Assets each separately, there must also be another account scheme row with the Balance Position Liabilities each separately, which will request exactly the same values. This ensures that the requested data is evaluated correctly.
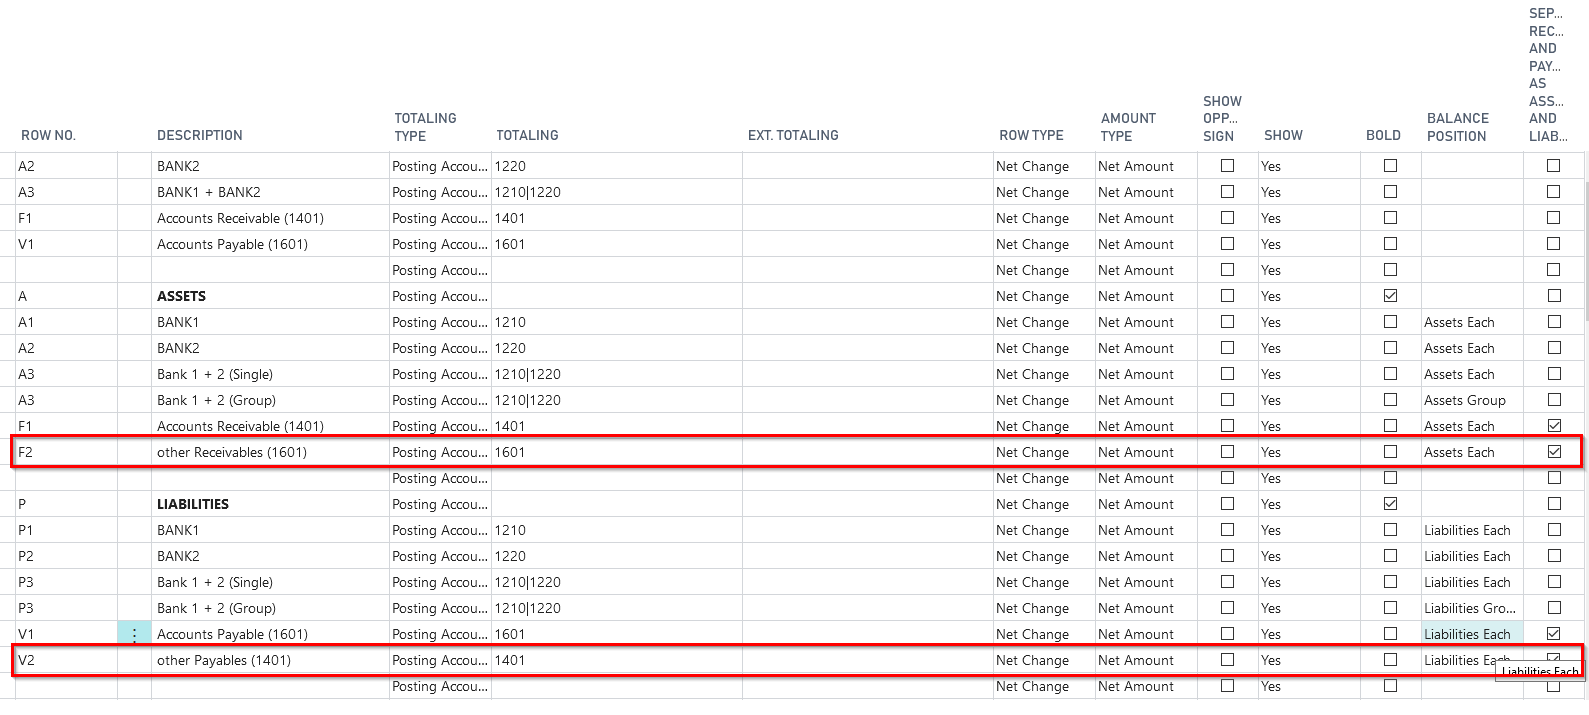
Separate Receivables and Payables as Assets and Liabilities
Here you specify whether the collective accounts are to be separated according to assets and liabilities (for example, for vendors with customer accounts). If you select the Yes option, the balances of the collective accounts themselves are not analyzed, but the customer or vendor accounts behind them are analyzed individually. This field can only be filled if there is an entry in the Balance sheet entry field.
Row numbers of the extended account scheme for demonstration purposes
The created account scheme "shifting accounts- test" for demonstration purposes ist structured as follows:
In the row numbers under the description "Standard", the account scheme is set up in such a way that the existing entries of the accounts indicated in the Totaling section can be shown in the matrix as in the BC standard.
In the row numbers under "Assets" and "Liabilities", the setup with the specifications of the extended account scheme is shown in the column "Balance Position". Here you can show the differences in the display of the values for a selected date range in the matrix. Display the differences between standard and shifting account functionality in the matrix or in the corresponding report and show the disclosure of customer vendors and vendor customers based on the analysis of the subledger accounts.
Present the following setup opportunities regarding the function of shifting accounts in the extended account schemes and the results each in the matrix of the account scheme.
Demo setup of a G/L account as a shifting account
Demo setup of multiple G/L accounts as shifting accounts
Demo setup of multiple G/L accounts as shifting accounts (Group)
Demo setup for receivables collective accounts with existing vendor customers
Additionally to the field "Balance Position", you have to set up the column "Separate Receivables and Payables as Assets and Liabilities".
Demo setup for payables collective accounts with existing customer vendors
Additionally to the field "Balance Position", you have to set up the column "Separate Receivables and Payables as Assets and Liabilities".
For more detailed explanations on the topic "extended accounting scheme", please refer to the existing manual for extended analysis or Trial Balance and VAT.
5157850_02 Affiliation
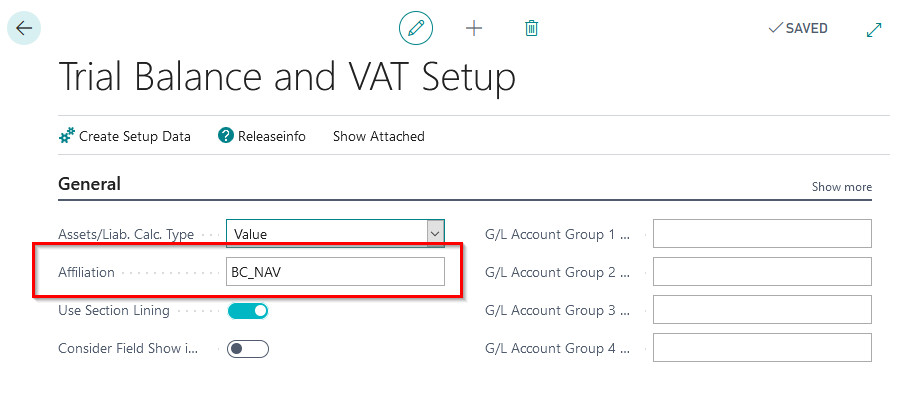
The demo tool creates suitable postings for presentation purposes (Ledger entries and VAT entries) in two different companies and brings them together in a report in an affiliation. The consolidation of the relevant VAT entries can be demonstrated in the report "VAT Entries Accounting Proof", but not in the "VAT Statement". The for the demo necessary companies, incl relevant postings, are created automatically and have the names "NAV Consulting" and "BC Consulting".
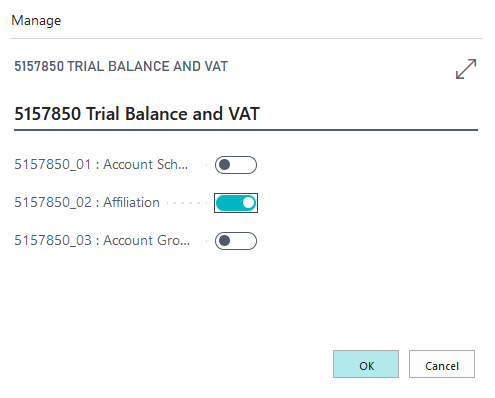
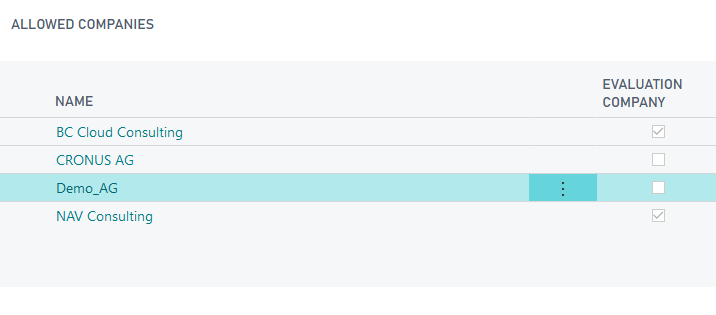
Show within the created companies, that both companies of the affiliation in the Trial Balance and VAT setup are related to "BC_NAV". This value should be the same for all companies, who are related to the VAT advance return affiliation. Explain, that only those companies, who have the same value entered in the field "affiliation", will be considered in the VAT accounting - here: "BC_NAV".
VAT Entries Accounting proof
The Trial Balance and VAT module also provides the functionality to create a VAT entry accounting proof. The purpose of this is to present the consolidation of VAT entries and tax bases from the individual companies belonging to the "BC_NAV" affiliation. In addition, this report can also be used for any other company that does not belong to a tax group.
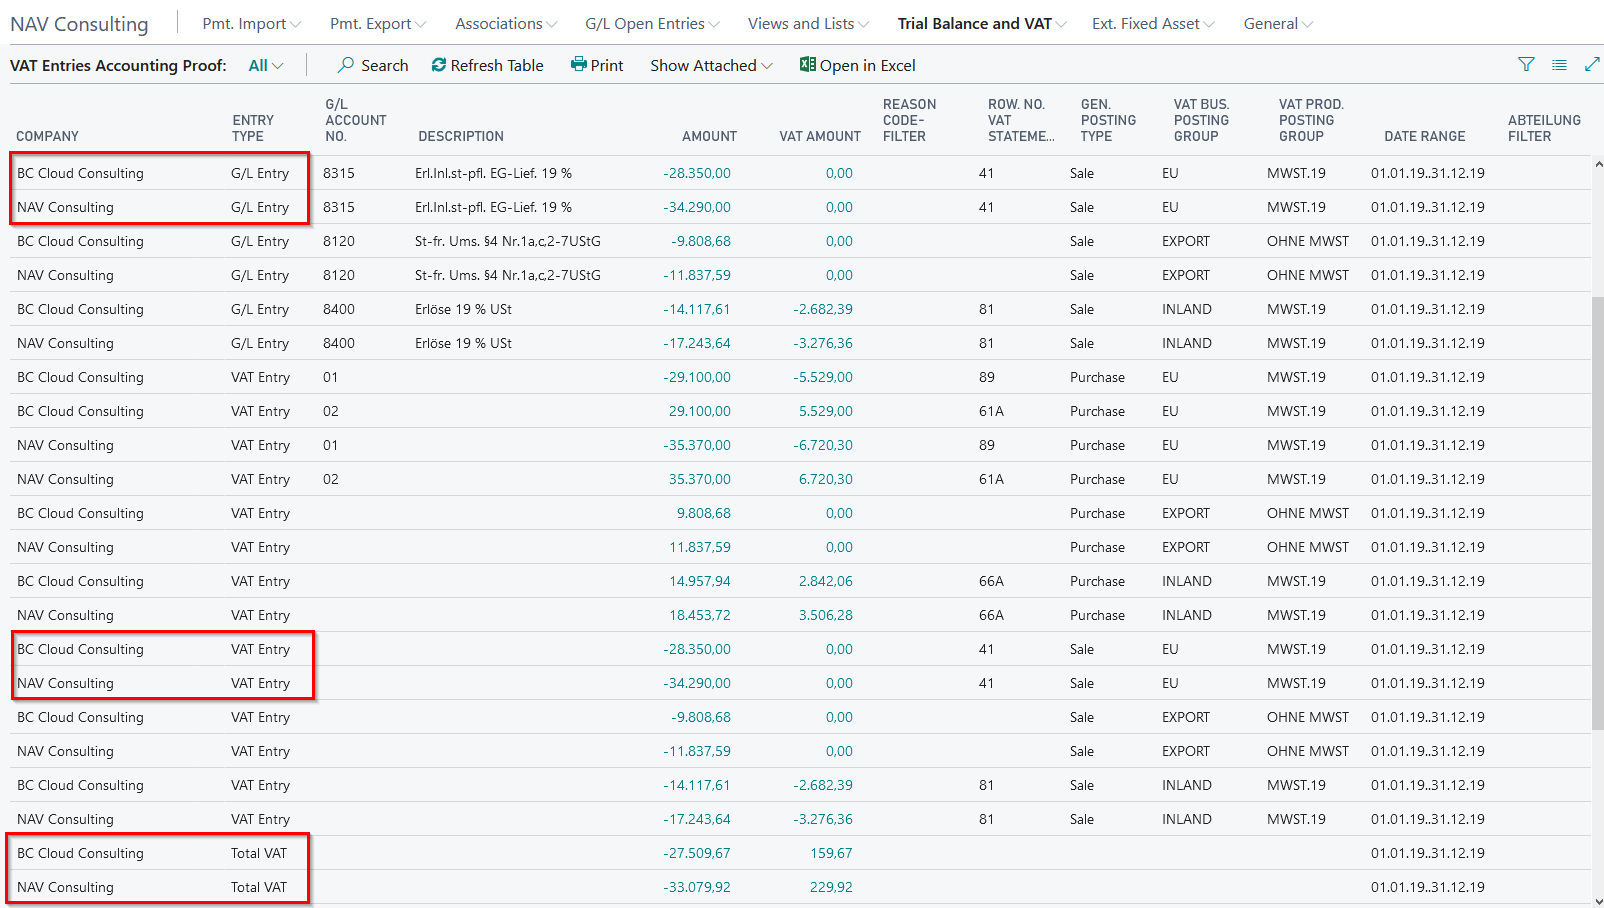
The VAT entries accounting proof report transfers, among other things, the G/L account number to which the corresponding tax base of a VAT entry is posted.
Show that for a VAT entry, the heading of the corresponding VAT statement is displayed, in which the entry is included by value. In addition, a line is generated for each company with the total of the VAT entries (entry type = total VAT).
At this point you can show that this value allows you to have a quick look at the calculated value of a payable load/credit per company, related to the displayed VAT entries.
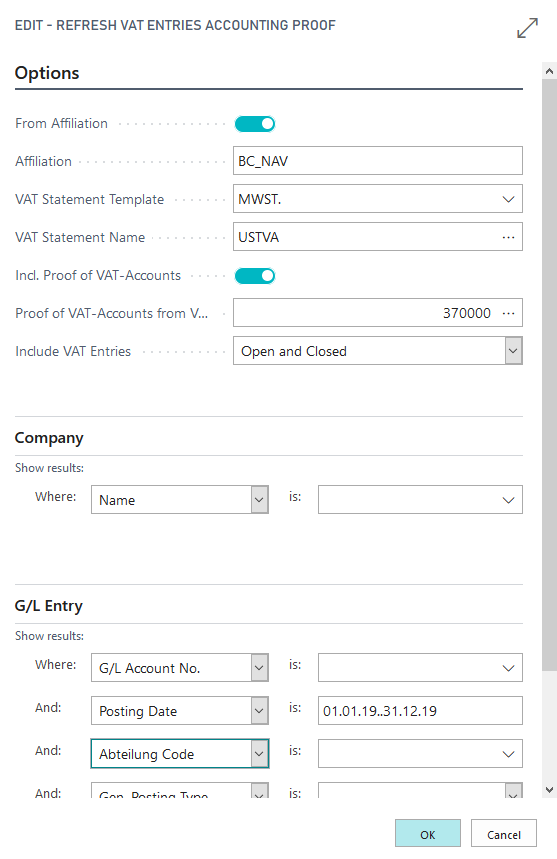
Call up the report via the menu in the OPplus Role Center: Trial Balance and VAT/VAT Entries Accounting Proof. The following menu item "Refresh Table" opens the report options to be selected.
| Register | Field | Explanation |
|---|---|---|
| Option | From Affiliation | This field automatically includes a check mark if you open the Refresh VAT Entries Accounting Proof report for an affiliation company. This way, it is guaranteed that the entries of all affiliation companies are considered in the report. If you want to refresh the report only for the current company, you must deactivate the From Affiliation check box. |
| Option | VAT Statement Template/VAT Statement Name | Here you can specify the VAT statement to be used to transfer the row number when running the Refresh VAT Entries Accounting Proof report. In the VAT Statement Name field, you can select the desired VAT statement. The template name is copied automatically and cannot be modified. |
| Option | Incl. Proof of VAT-Accounts | The VAT accounts will be listed. The prerequisite is that these are set up in the VAT statement. |
| Option | Proof of VAT-Accounts from VAT Statement Line No. | If the VAT G/L account validation is activated, the corresponding line number of the VAT accounting from which the validation is to start is entered here. |
| Option | Include VAT Entries | Possibility to filter the entries according to the setup "open" and "closed". |
| Company | Filter which companies should be considered while refreshing. If no filter is set, only the current company is considered. Please obey the explanation of the above mentioned field "affiliation". | |
| G/L Entry | Filter which G/L entries should be considered. It is possible to set a filter on the posting date, but the report also runs without any datefilters. |
With the function "Refresh Table" the information of the entries are entered. With every refreshing, the previous data will be deleted!
In the context shown here, the VAT Entry Accounting Proof is used to present the consolidation of the necessary G/L and VAT entries of companies assigned to a set up VAT group. In the further course of data processing, these entries are used to create a summarized advance VAT return (UVA) for the so-called controlling body, i.e. for the company who will submit the UVA return to the tax office. The setup of a separate VAT statement "Affiliation" and a corresponding VAT statement name, which is necessary for this purpose, is not part of this demo tool, but is dealt with in detail in the manual for the "Trial Balance and VAT" module and can be individually taken up by you in the presentation if required.
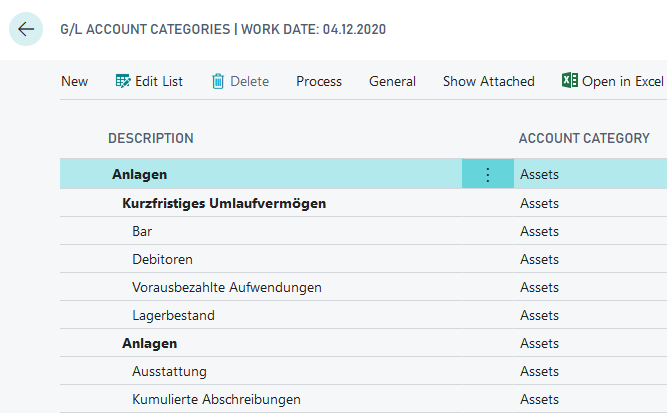
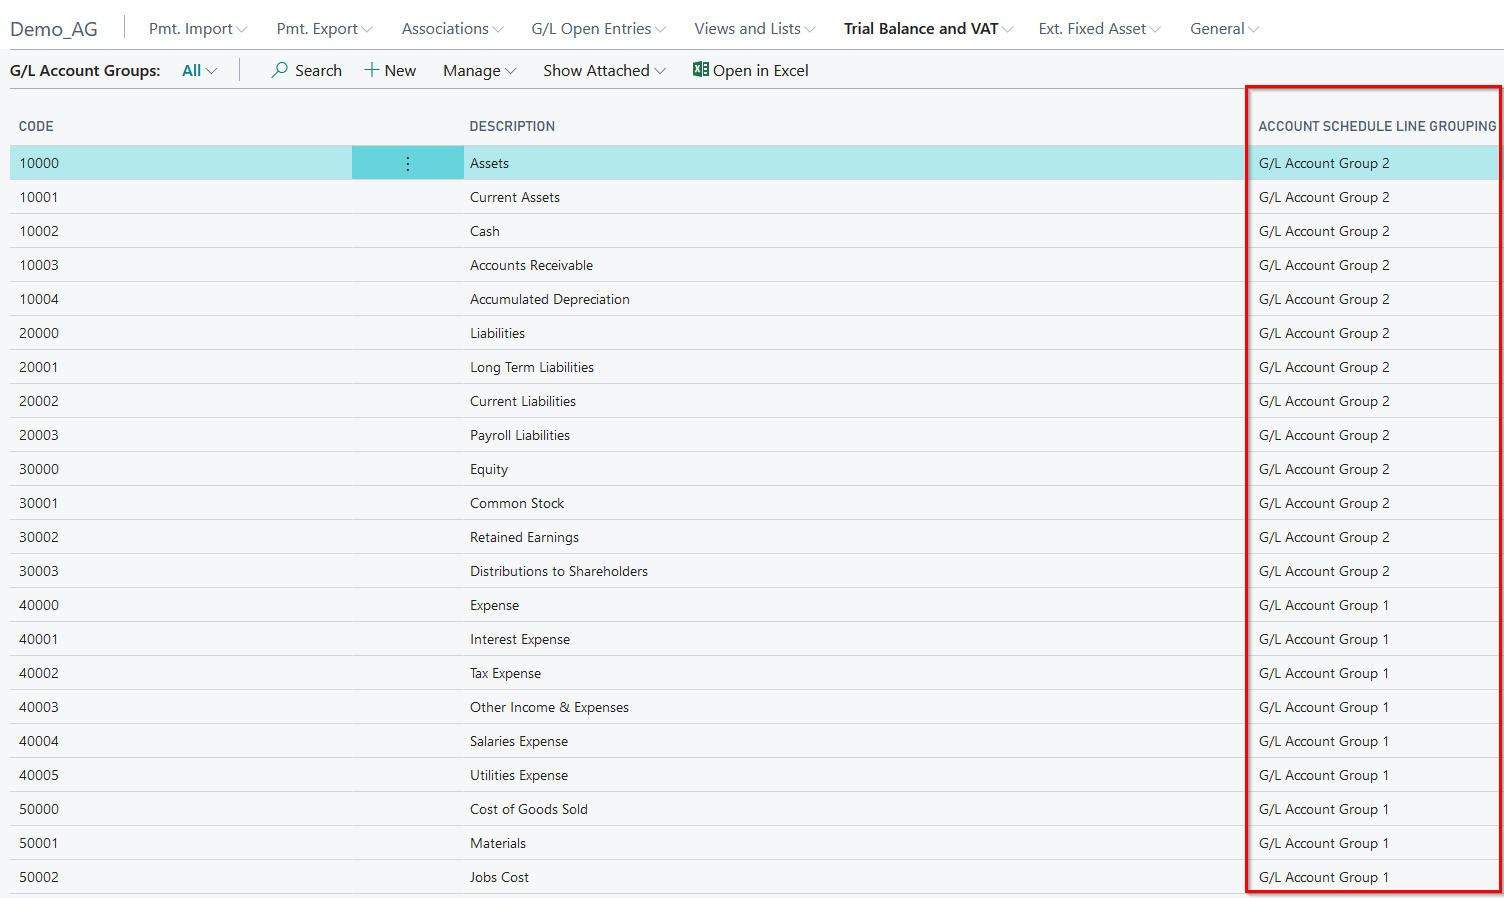
5157850_03 Account Groups
For presentation purposes, the demo tool creates account groups based on the categories and G/L account subcategories defined in the G/L accounts, as well as two corresponding account schemas, where you can demonstrate the functionality of the account groups.
Account groups are build to group G/L accounts into groups that are displayed under one heading in the extended account schemes. To do this, refer to the desired account group in the OPplus column "Extended totalling". For example, G/L accounts could be assigned to certain HGB balance sheet items that were previously defined as an account group. This eliminates the need to store each G/L account in the totalling field of a section of the account scheme.
You can start the presentation by activating the demo mode or without it.
In both cases, the "Balance Sheet Test" and "P&L Test" account schemes created will open first. For presentation purposes, these are structured for all country versions according to the G/L account categories and subcategories available in the BC Standard and therefore do not correspond to the usual HGB (German) classifications.
In the demo mode, it is also possible to display in an accounting sheet and manually enter the transactions that lead to the account group amounts to be shown in the account schemes. Without selecting the demo mode, these entries are automatically made in the background as soon as the presentation is started and the corresponding summarized amounts can be shown directly in the opening account scheme, for example through the matrix.
Account Groups
For your presentation, account groups have already been created and assigned to G/L accounts in order to include them in the extended account schemas "Balance TEST" and "P&L Test" in the column "Extended totalling" in combination with the extended totalling type "Account Group".
Account groups based on the account categories of the BC Standard:
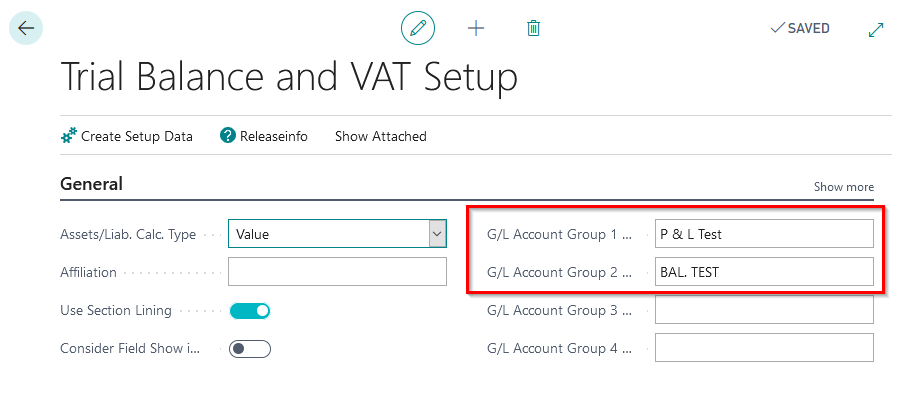
Trial Balance and VAT setup
For the presentation of the account group functionality, the fields Account Group 1 Caption and Account Group 2 Caption have already been defined with the terms "P&L Test" and "Balance TEST". These names are used when assigning G/L accounts to each account group, for example in the G/L account card.
OPplus G/L account card, Register Trial Balance and VAT:

The G/L accounts assigned to the account groups are queried using the extended account schemes generated by the demo tool, which, as described above, open after starting the presentation 5157850_03.
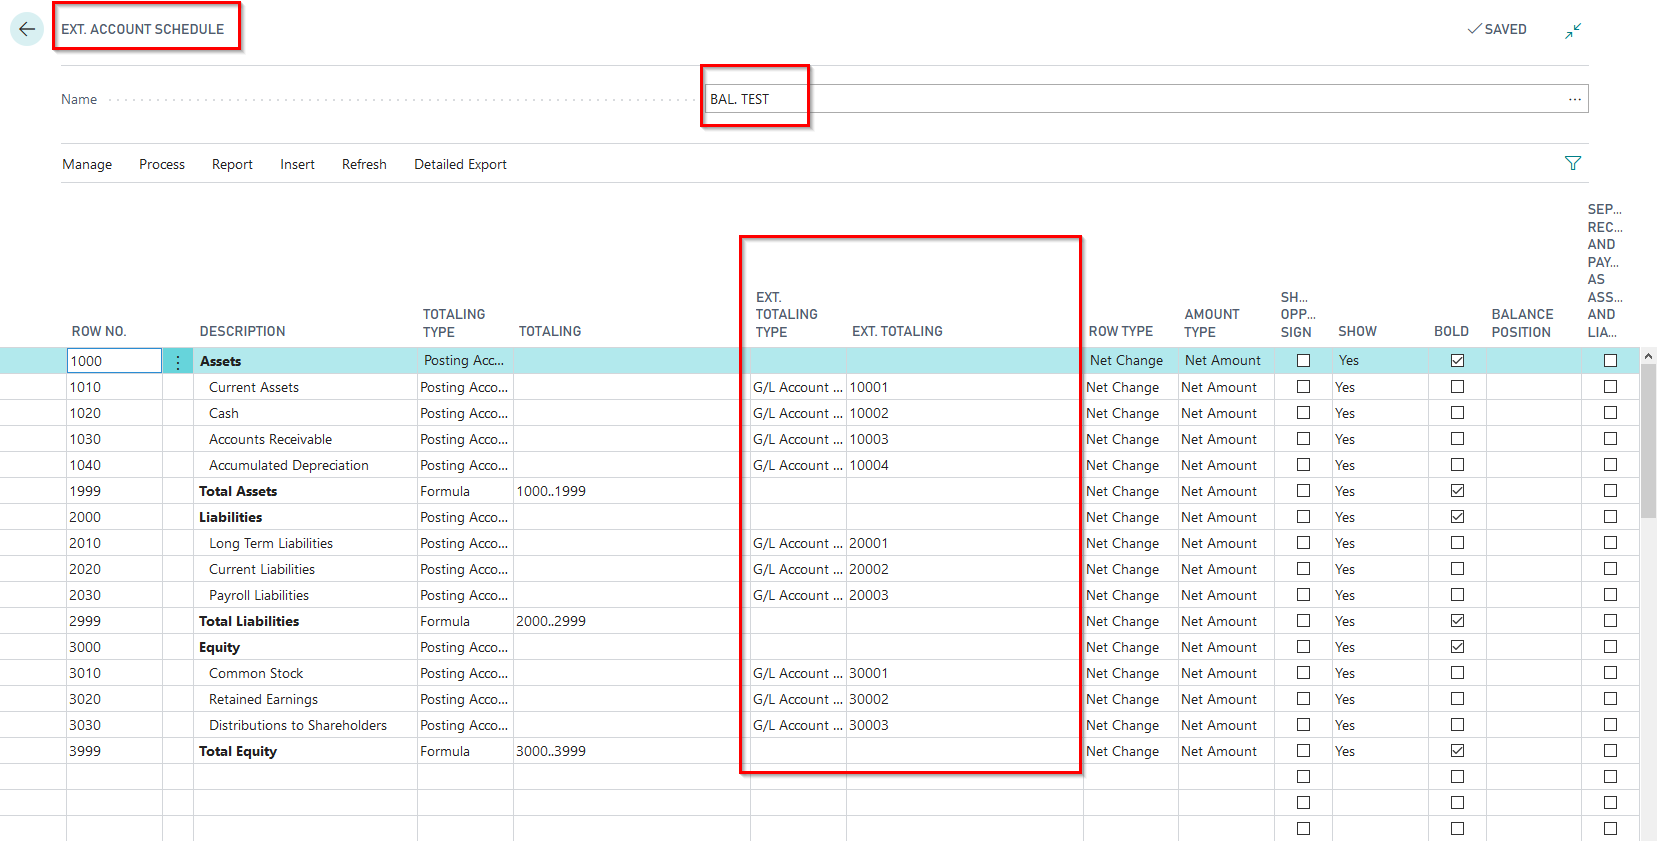
Extended Account scheme Balance TEST:
Extended Account scheme P&L TEST:
These examples demonstrate the assignment of the account groups to which each G/L account has been assigned to the heading rows of the extended account scheme. By selecting the matrix from the extended chart of accounts, the result of the extended totalling via the account groups becomes visible. The "submerging" via the amounts shown in the matrix to the corresponding accounts and further to an OPplus G/L account card enables you to show once again the connection of the assignment of a G/L account to an account category and the corresponding statement in an extended account scheme with the addition via account groups. In this way you can show, for example, that in the extended "P&L Test" account scheme, the amounts under heading 1040 "Revenue, interest" come from the assignment of account group 60004 "Revenue, interest" to account group 1 and that accounts 8650 and 8660 are assigned to this account group.
For more detailed explanations on the subject of account groups, please refer to the existing manual for extended analysis or Trial Balance and VAT.
5157970 Multiple Payment Discount
5157970_01: Multiple Payment Discount
With this test you generate a sales invoice with multi-level payment discount. In addition, the necessary settings are made.
Multiple Payment Discount Setup
Payment Terms:
A new payment term with three levels is created:
40 days net, Three level payment discount:
- Due date formula: 40 D
- Payment Discount : 10 D - 3%
- Payment Discount 2: 20 D - 2%
- Payment Discount 3: 30 D - 1%
Sales Invoice:
A sales invoice with posting-/document date = working date is created with the new payment termns.
Test in Demo Mode
If you run the test in demo mode, a page showing the payment terms appears:
Explain the fields and the multi-level payment discount.
Go to the created sales invoice.
Open the page "OPplus sales information" and then the page "Multiple Pmt. Discount" and explain those.

Test without Demo Mode
If you run the test without demo mode, the created sales invoice opens instantly.
5157980 Installments
5157980_01 Installments
In this test a sales invoice with installment payment plan is generated. It also creates the setup data for the installment payment module.
Installment Setup
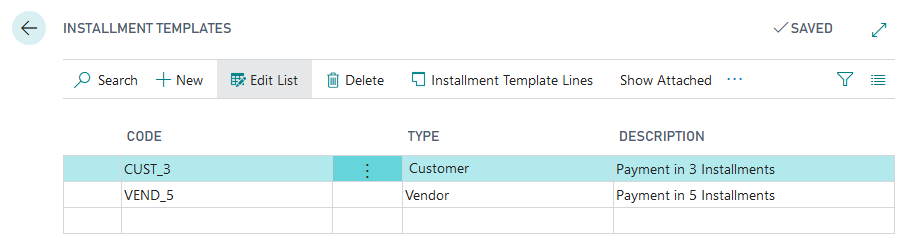
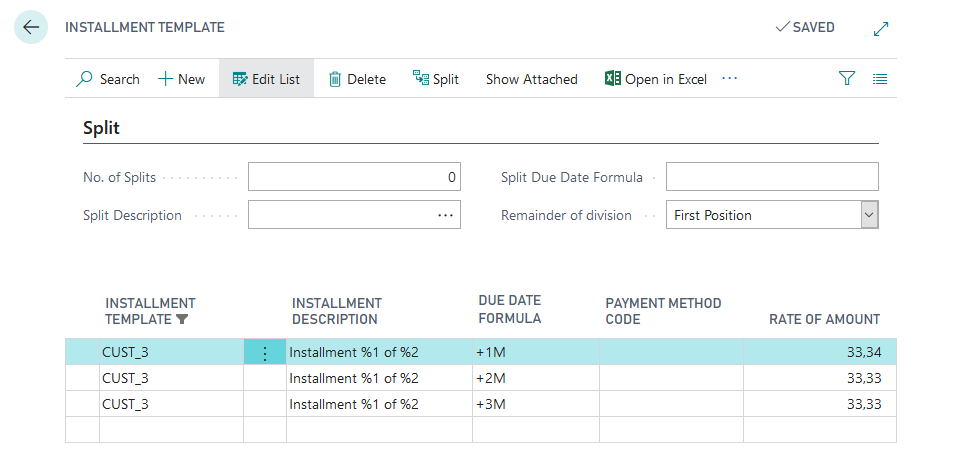
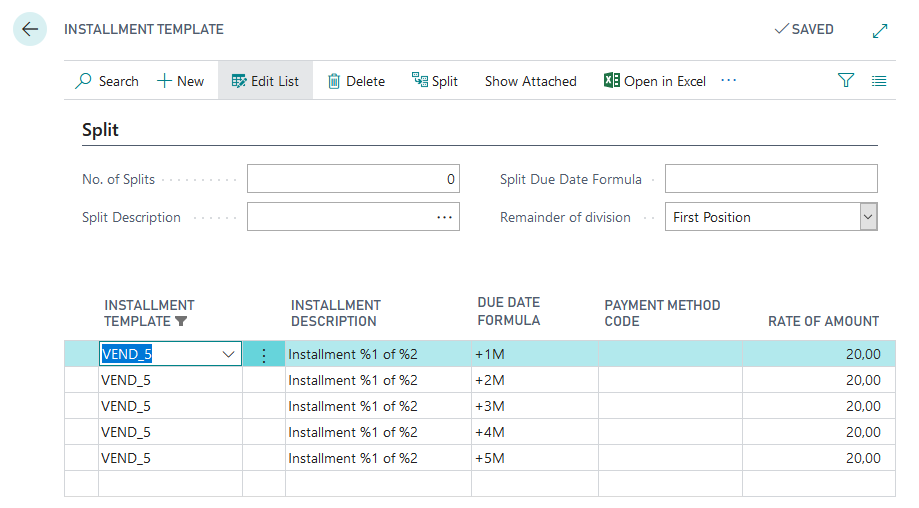
Installment templates:
The installment templates "CUST_3" and "VEND_5" are set up.
Sales Invoice:
A sales invoice is created using the installment payment template CUST_3.
5157980_01 - Test in Demo Mode
If you run the test in demo mode, the Installment Payment Templates page will open:
Use the installment payment lines to show how to set up the installment payment templates and explain the fields.
Then go to the created sales invoice and show the entered installment payment template in the OPplus sales information.
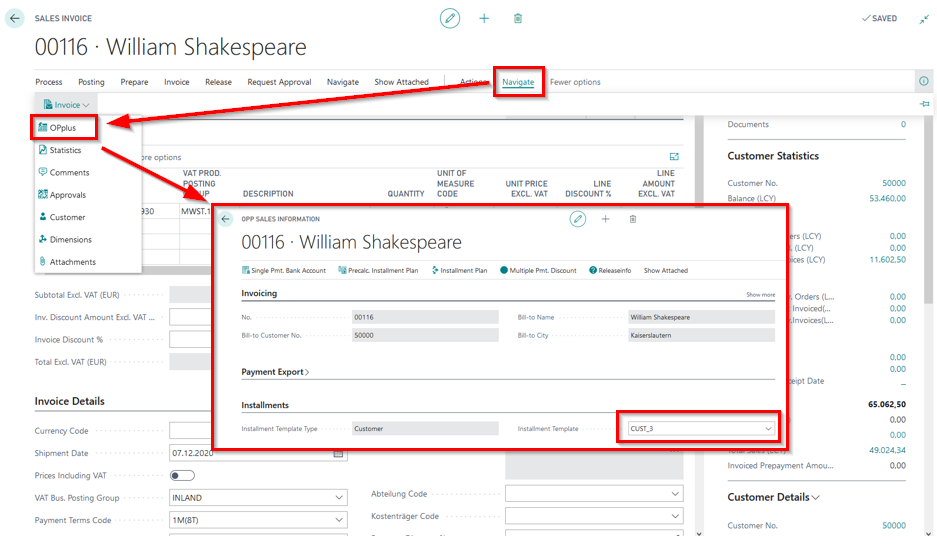
Also show the preliminary installment payment plan in the OPplus sales information.
Also show that the installment payment plan will only be filled when the invoice is released. Here you can also show that the installment payment plan can be modified, deleted and also newly created. You can show that you can print the installment plan. More information can be found in the manual OPplus Installment.
5157980_01 - Test without Demo Mode
If you do not run the test in demo mode, the created sales invoice will be opened immediately.
5483210 Extended Fixed Assets
Two presentation scenarios are available in the "Extended Fixed Assets" section of the demo data tool. In the selection "Asset Templates" different asset templates are created, which are used in the context of a purchase invoice to create capitalized assets by purchasing the assets. The selection "Asset with quantity" allows you to present the topic "Inventory managed Assets". This means that you can show the customer an acquisition of assets with quantity deposit. When selecting the desired demo, you can also decide whether you want to use the selection field "Demo Mode" under "Options". The effect is described in more detail in the individual presentations.
5483210_01 FA Templates
If you select the option "FA templates" with the selection "Demo mode" and start the report "Generate demo data", you will see the generated asset templates, which you can now work with in the presentation and on the basis of which assets can be created and purchased.
Out of the asset templates you can open the asset template card.
Show how you can speed up the process of purchasing a new asset by using the templates and how various standard fields and depreciation books can be preset. Furthermore, the "Inventory Management" field in the OPplus tab of the Asset Template Card is used to create the prerequisites for acquiring quantitatively managed assets and managing them in the further course of the process.
Call up the Asset Templates from the Gen.-Journals, from the Purchase Invoices and Purchase Orders, and from the Asset Card in order to use them accordingly. Over the asset card you can select the function "Create FA from template", in order to let the asset create automatically after filling out the necessary fields (e.g. start date normal depreciation) over the menu option "Create Asset".
If you select the demo 5483210_01 FA Templates without activating the demo mode, a purchase invoice opens after confirmation of the selection, which serves you to present the purchase of an asset from the created asset templates.
Via the purchasing lines "Create Assets/Create FA from templates" the card for selecting the asset templates opens, from which you can choose the asset to be purchased. As a result of the selection, you will receive a purchase line for the purchase of the selected asset from the respective creditor.
After posting the purchase invoice, you can view the purchased asset in the asset overview with the parameters preset from the template.
Insert Multiple Fixed Assets
The asset templates also enable you to create several assets in the purchasing document via the function call "Create asset from template" and to link each created asset to a new purchasing line immediately. To do this, after selecting the desired asset template code, enter the number of assets to be purchased and the net unit price in the "Insert multiple Fixed Assets" tab.
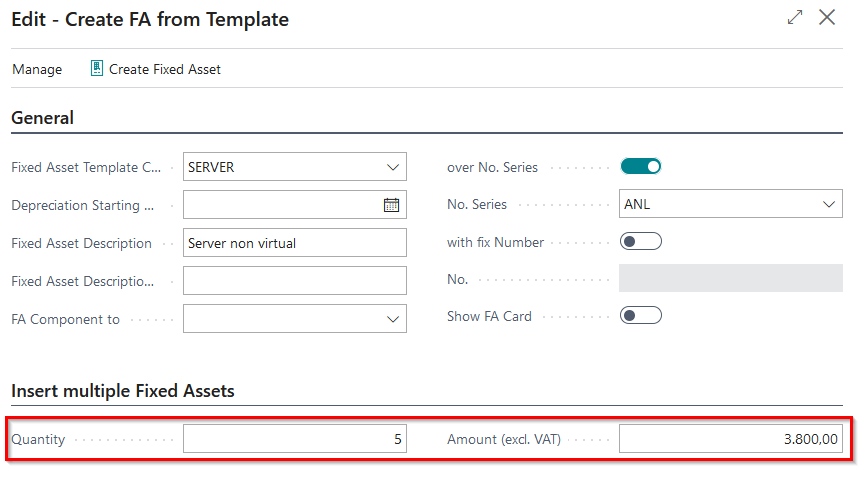
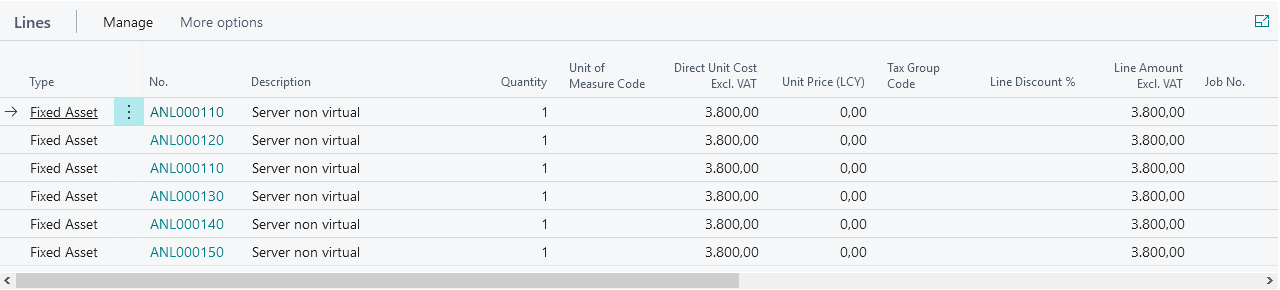
The result of the selection "Insert multiple Fixed Assets" can be seen in the purchase invoice created in the purchase lines.
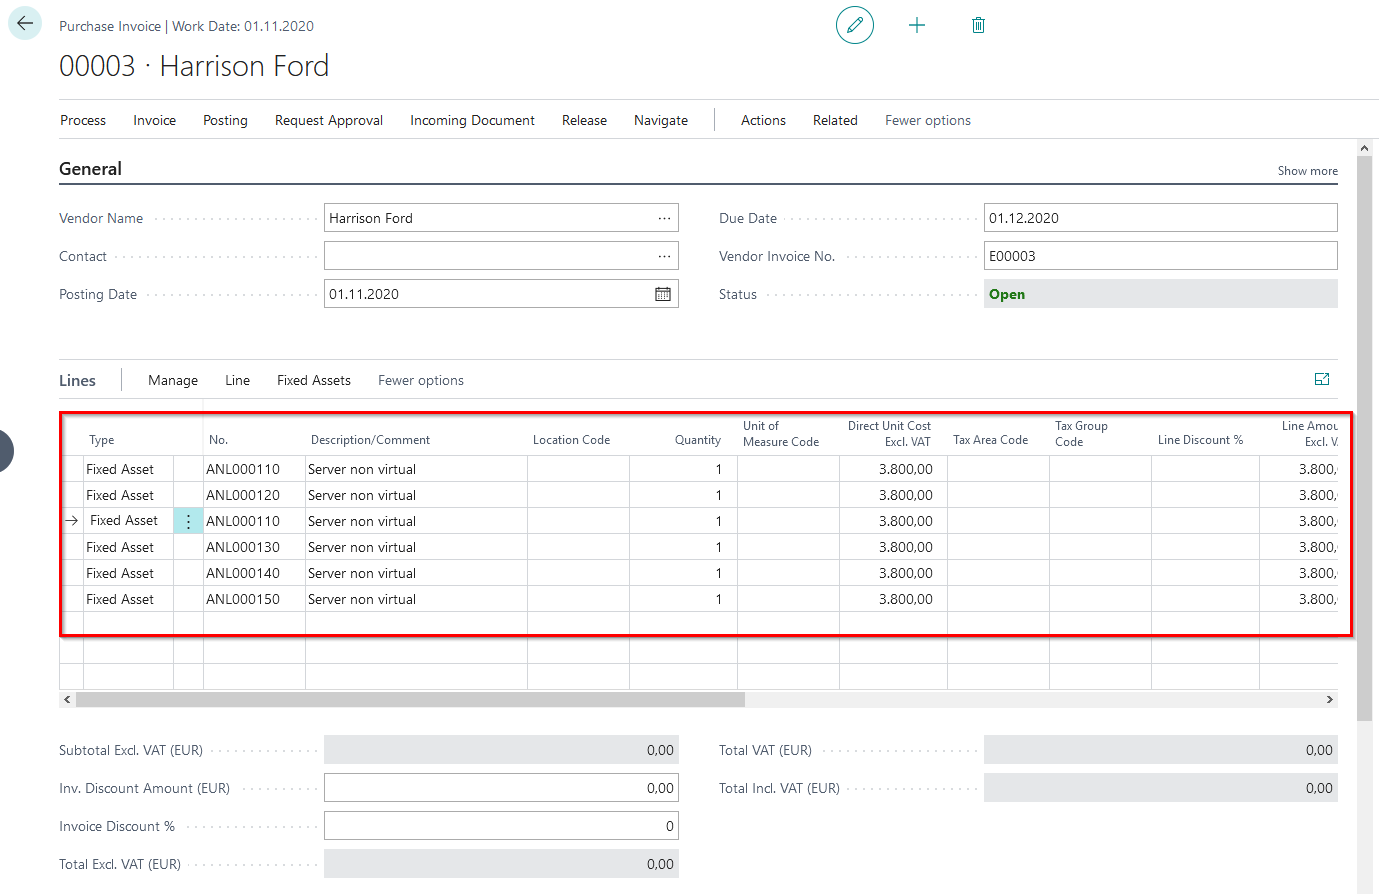
After posting the invoice the desired number of similar fixed assets has been created.
For further explanations about fixed asset templates and multiple assets from templates, please refer to the existing manual for Extended Fixed Asset.
5483210_02 Fixed Assets with quantities
If you start the "Fixed Assets with quantities" presentation from the OPP Build Demodata report, the Fixed Asset G/L Journals opens, where the depreciation entry for an inventory-managed asset is contained in the journal lines.
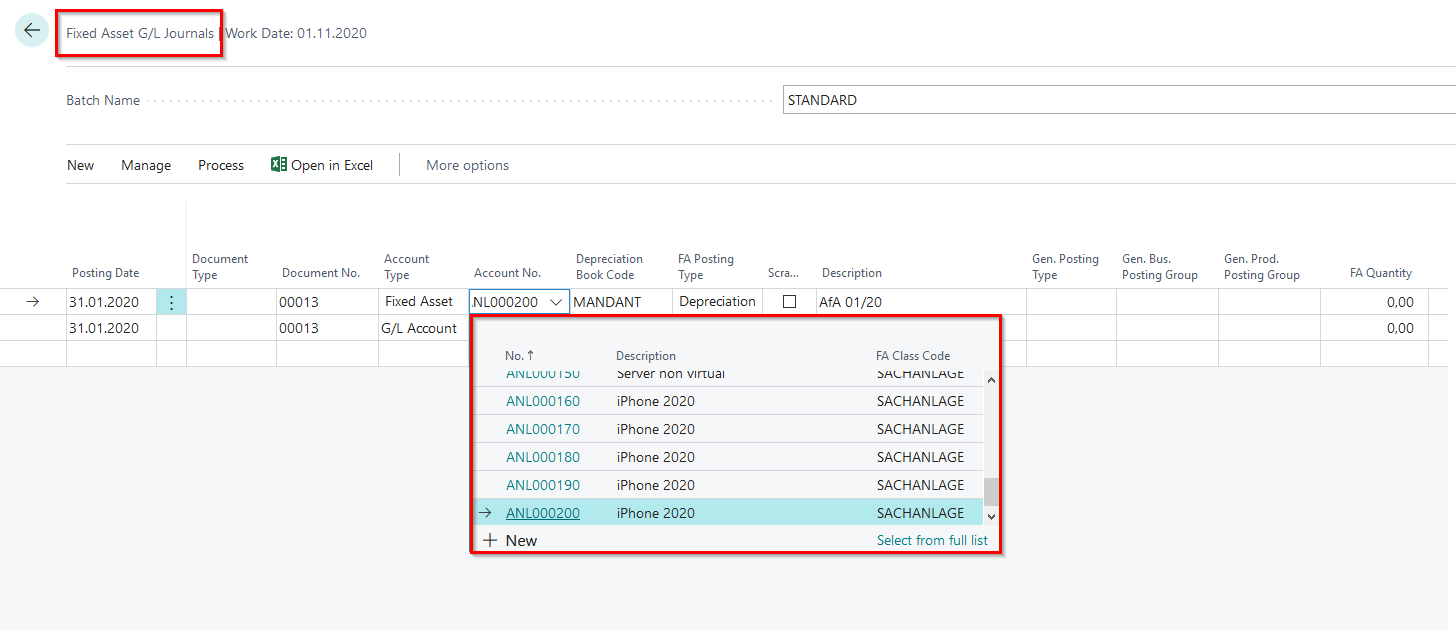
The setup regarding the inventory management of assets can be stored in the asset template and can be traced in the asset card of the created inventory-managed asset in the register OPplus.

After posting depreciation for the inventory-managed asset, you can navigate, for example, via the corresponding asset card to the corresponding asset entries, in order to understand or demonstrate the result of the depreciation process for an inventory-managed asset.

For further explanations on the subject of fixed assets with quantities or inventory-managed fixed assets, please refer to the existing manual on Extended Fixed Assets.
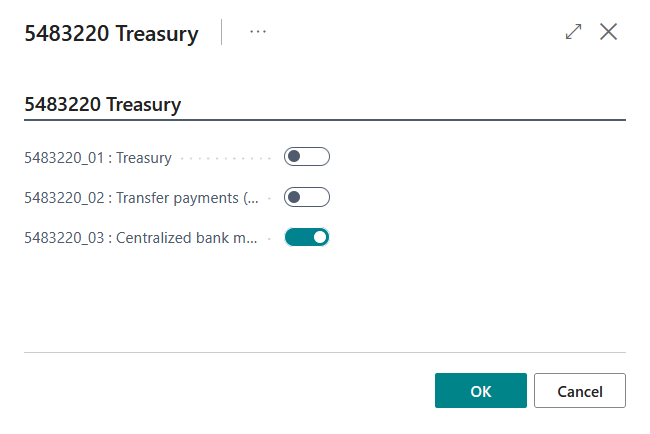
5483220 Treasury
OPplus Treasury offers customers with several companies cross-company views of all payment-relevant data. This includes banks and bank balances, vendors and customers with the respective open entries, open payment import journals and created payment proposals. G/L entries can also be included in the treasury. The central cross-company views of the accounts or their entries considerably facilitate controlling and always allow a group-wide statement on liquidity.
5483220_01 Treasury
This part of the Demo Tool allows you to present the OPplus Treasury module.
Six different companies are created within the framework of demo 5483220_01. In addition, postings as well as a group structure of the created companies are generated, which illustrate the function of the Treasury module.
Advice:
Since the creation of the treasury companies running in the background as well as the creation of the demo postings takes some time, we recommend that you plan an appropriate lead time for the preparation of the presentation.
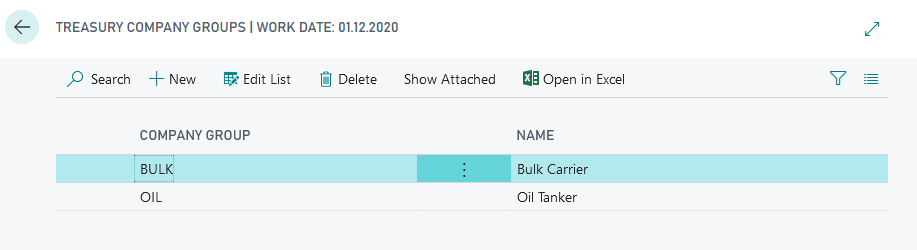
After successful creation of the demo data, go to the Treasury setup and show the companies participating in the Treasury. Via the menu "Company selection" you get an overview of the selected "Treasury companies".
The client selection can be done by specifying the company name and/or by choosing a suitable filter criteria within the companies to be selected.
Using the other setup fields, you determine which master and transaction data of the selected treasury companies should be included in the treasury views.
Via the menu item "Selection" / "Account Selection" it is possible to select the G/L accounts as well as the vendors, customers and bank accounts of the treasury companies - the master data- to be included in the treasury views.
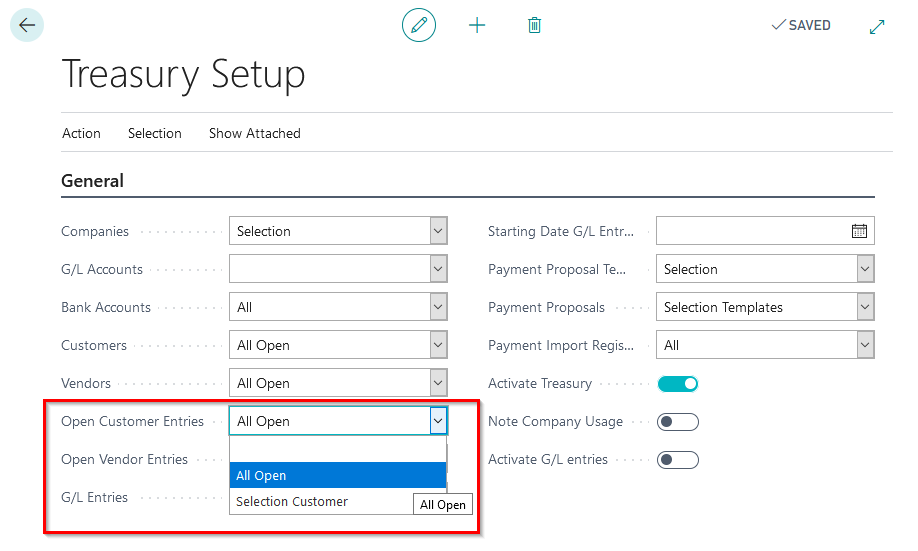
Based on the selected master data of the treasury companies, you can now determine how the transaction data (open customers and vendor entries and G/L entries) should be selected.
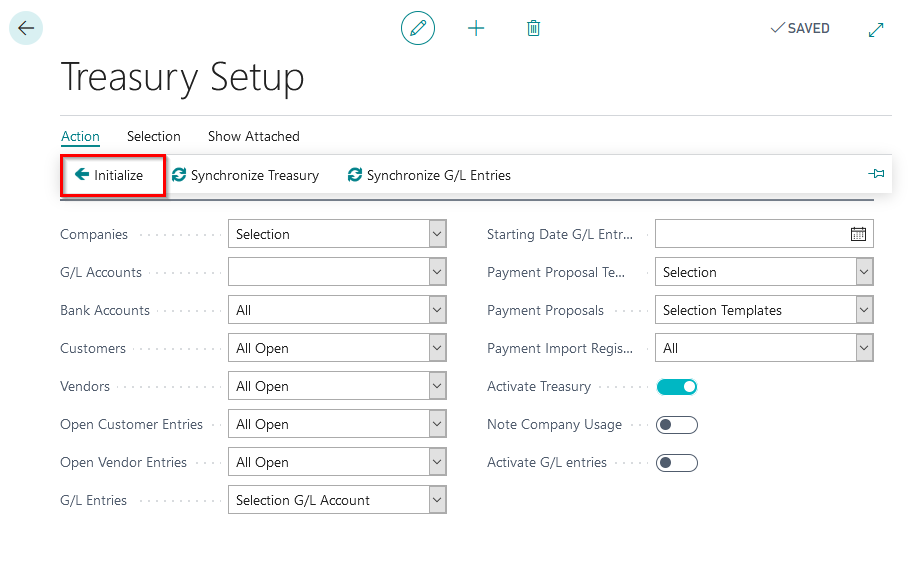
Initialization
After selecting the companies and master data participating in the treasury, you start an initialization run that initializes the selected companies for the treasury and transfers all historical data from the companies belonging to the treasury group to the global views. Any further transaction or change on the assigned accounts is automatically displayed in the Treasury views from that moment on.
Cross-company views
Click "Explore" to see the available treasury lists.
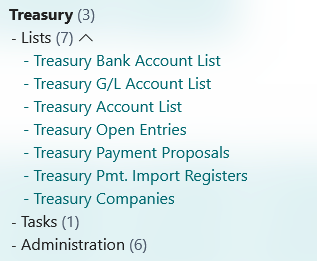
Each list provides a cross-company view of the selected master or transaction data of the treasury companies stored in the institution.
For example, show the cross-company view of the selected bank accounts including the corresponding balances. You can use the corresponding look up to branch directly to the corresponding entries in the origin company.

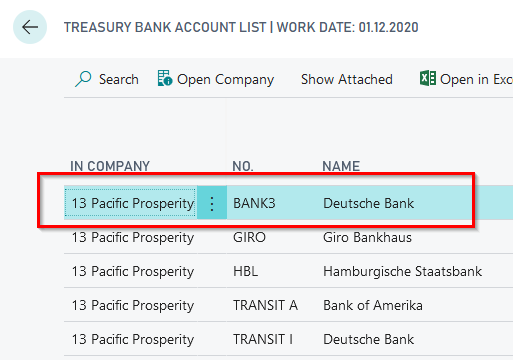
Further cross-company views of this type are available for the customers, vendors and G/L accounts of the treasury companies involved.
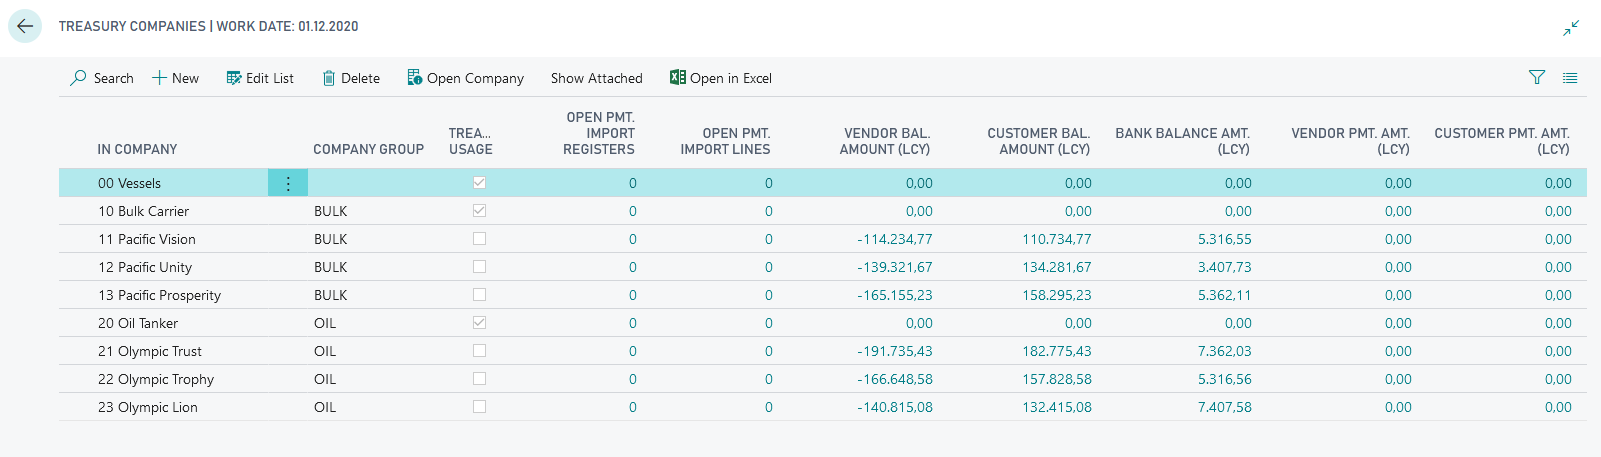
Select the item "Treasury Companies" from the Treasury lists via "Explore".
This gives you a complete overview of the cumulative balances of all customer and vendor accounts and the number of open payment import journals existing in the treasury network as well as the balances of existing payment proposals for all companies participating in the treasury.
Back in the Treasury setup you can show that by selecting "Note Treasury" it is possible to achieve that the available Treasury lists can only be viewed in the chosen companies.
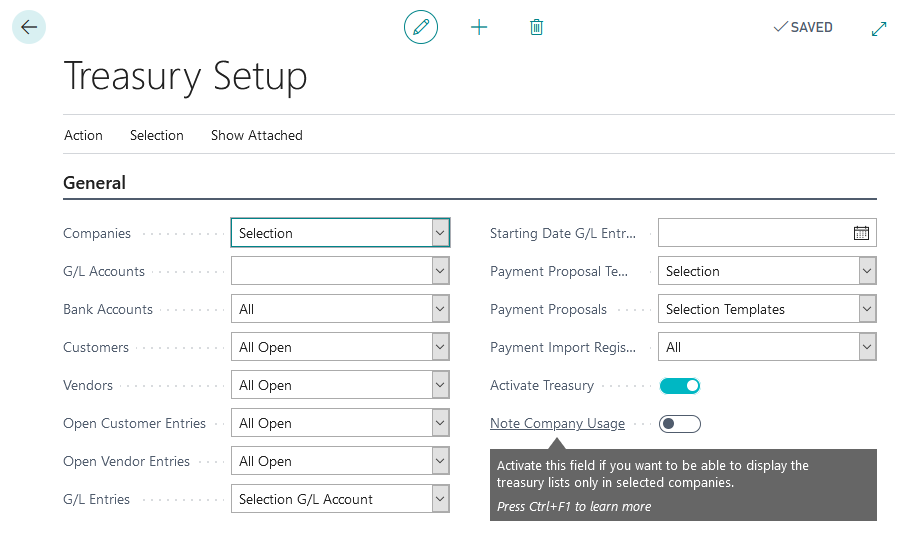
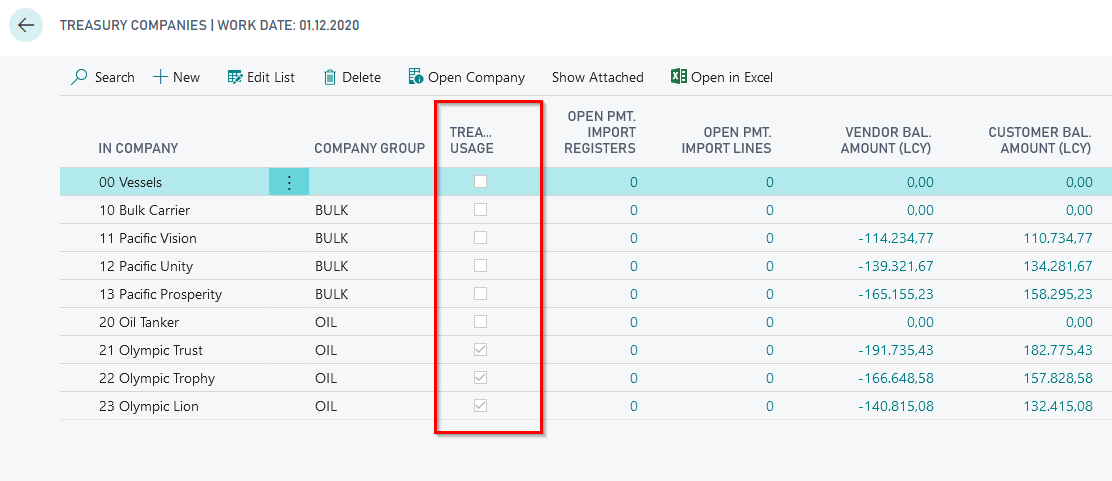
Show that for this functionality it is necessary to make a corresponding selection of the companies using Treasury in the "Treasury Companies" table. To do this, you must enter a value in the "Treasury usage" field for the company in question.
Company groups
With the company groups, an outline level was created in Treasury that makes it possible to combine several Treasury companies into one Treasury company group. Show the freely definable setup of the company groups.
Demonstrate the assignment of the selected treasury companies to company groups using the "Treasury Companies" table.
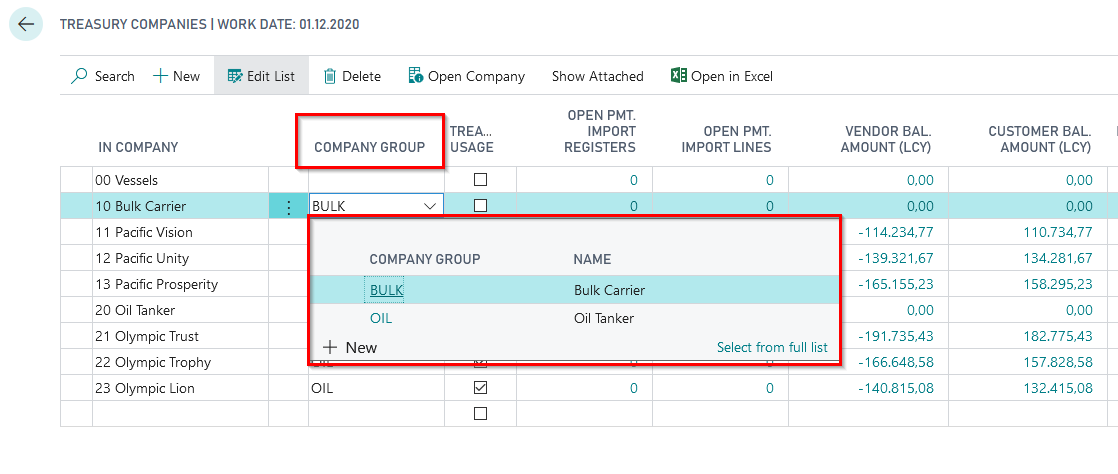
If there is a very large number of existing treasury companies, the grouping can be used to quickly narrow down the companies to be used for specific information.
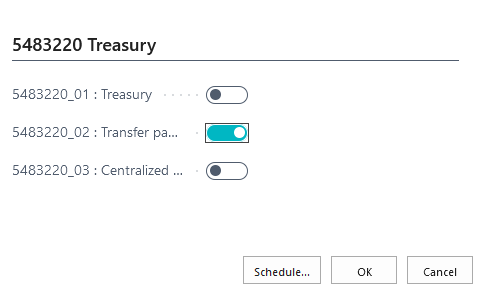
5483220_02 Transfer Payments (IC)
Demonstrate via the Demo Tool 5483220_02 how payments received in the wrong company can be transferred to the right company via intercompany postings.
Advice: Please note that you can only run the demo 5483220_02 after you have run 5483220_01 and the necessary treasury companies have been created. Then start the presentation from company 21 Olympic Trust.
Once the corresponding demo data has been generated, you will receive an extended cash receipt journal filled with three accounting records.
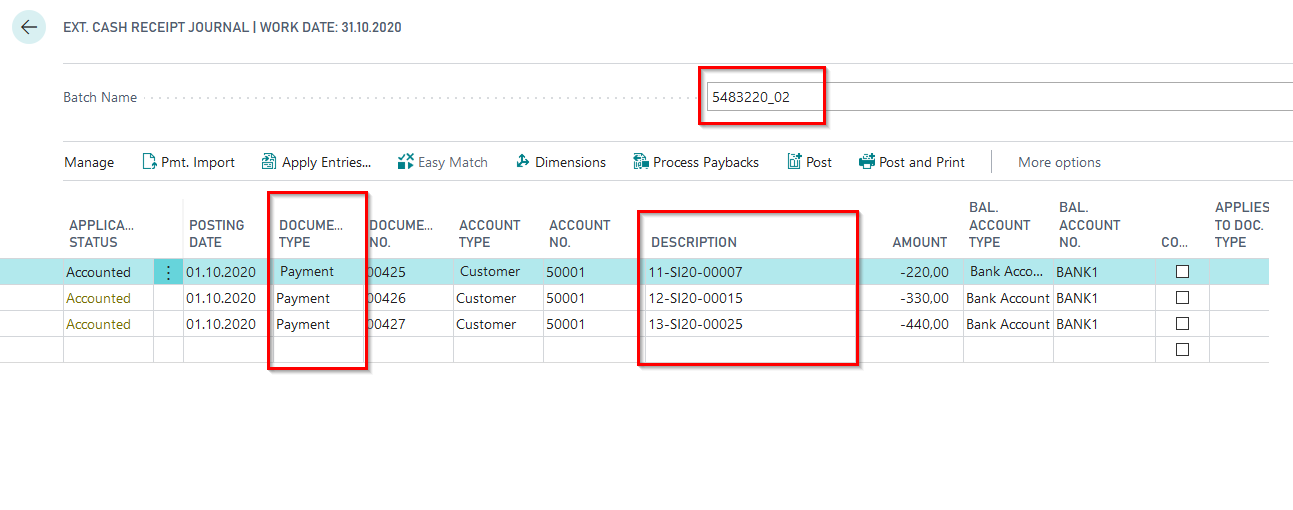
Using the posting description, show that the customers' payments belong to entries of other treasury companies (companies 11, 12 and 13).
Open the "Apply Entries" function via the menu bar and show that the open entries of customer 50001 of the current company 21 Olympic Trust are available for application, but the corresponding documents for the payments are not available.
In extended application, call up the "Treasury open entries" function via the menu option "Entries" to branch to the open customer entries of the selected treasury companies.
Show there the customer entries of the other treasury companies and the open entries that belong to the payments that are in the current company 21 in the extended cash receipt.
In the "In Company" column, select the treasury company matching the payment to access the open entries of the customer in the target company. Show that in the opened extended application, you can find the corresponding entries of the customer from the treasury company and select it for application.
After setting the application, you will receive the following split posting lines in the extended application of the origin company 21 Olympic Trust, which will lead to corresponding liabilities to the treasury companies after the posting...
The circle can be closed here by pointing out that the payment triggered by the payment proposal is read into the target company via the bank statement with the corresponding posting descriptions in the reasons for transfer, where it leads to automatic application of the open entry.
5483220_03 Central bank management
Demonstrate via the Demo Tool 5483220_02 how payments received in the wrong companies can be transferred to the right company via intercompany postings.
In Treasury, you can define one company as the main company (central company) for managing central bank accounts. This company manages some or all payment-relevant bank accounts of the companies belonging to this treasury circle (sub-companies). Thus, in addition to payments for own open entries, this main company also receives payments that actually serve to apply open entries in the respective sub-companies. The open items are posted in the sub-companies, but can be displayed from the main company and also used for application. To be able to close or apply the open entries in the sub-companies, Treasury offers a distribution function. This allows the payments received in the main company to be transferred to sub-accounts (clearing accounts) in the sub-company in order to be used for applicating open entries.
For detailed information, please refer to the OPplus Treasury manual.
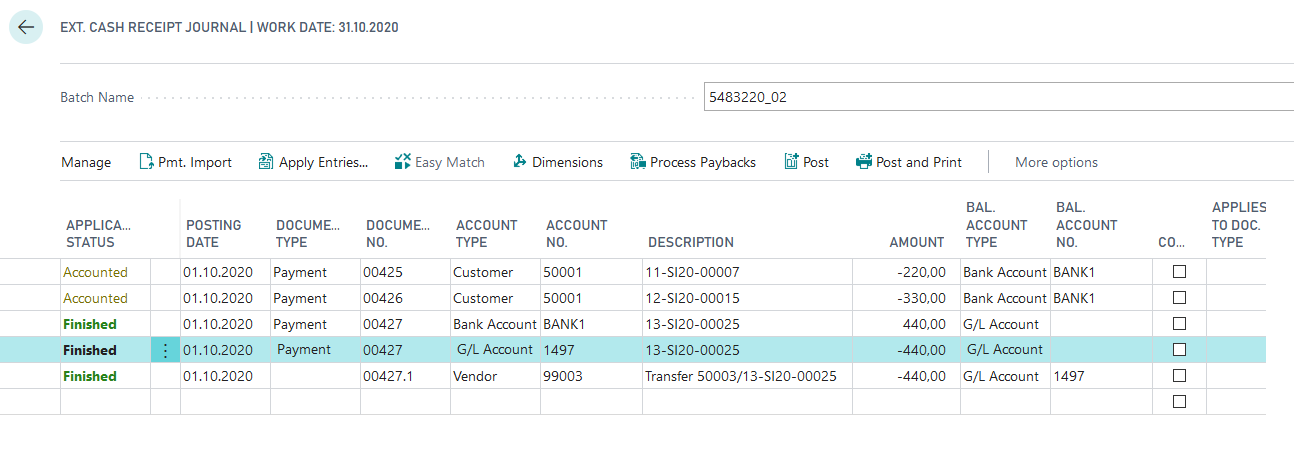
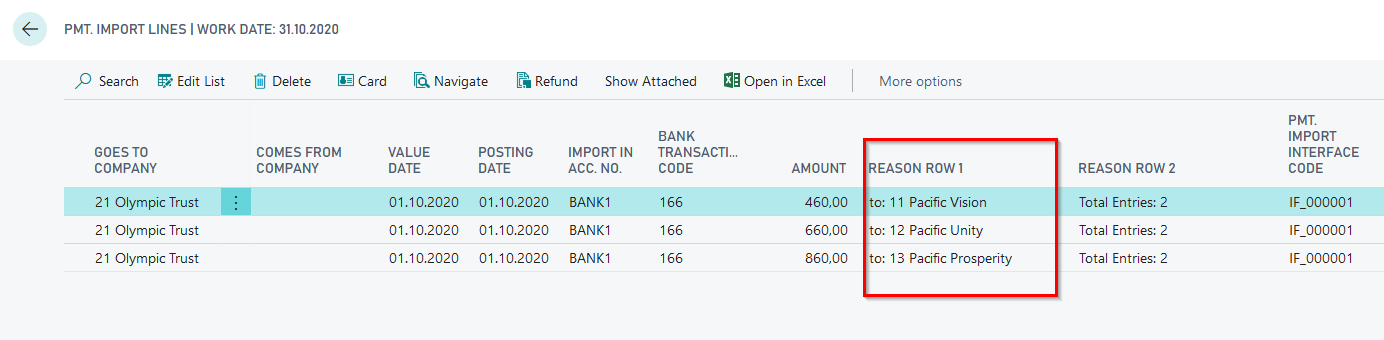
After creating the demodata, there is a cash receipt journal with 6 import lines available in the company 21. Included are each 2 payments for the companies 11, 12 and 13.
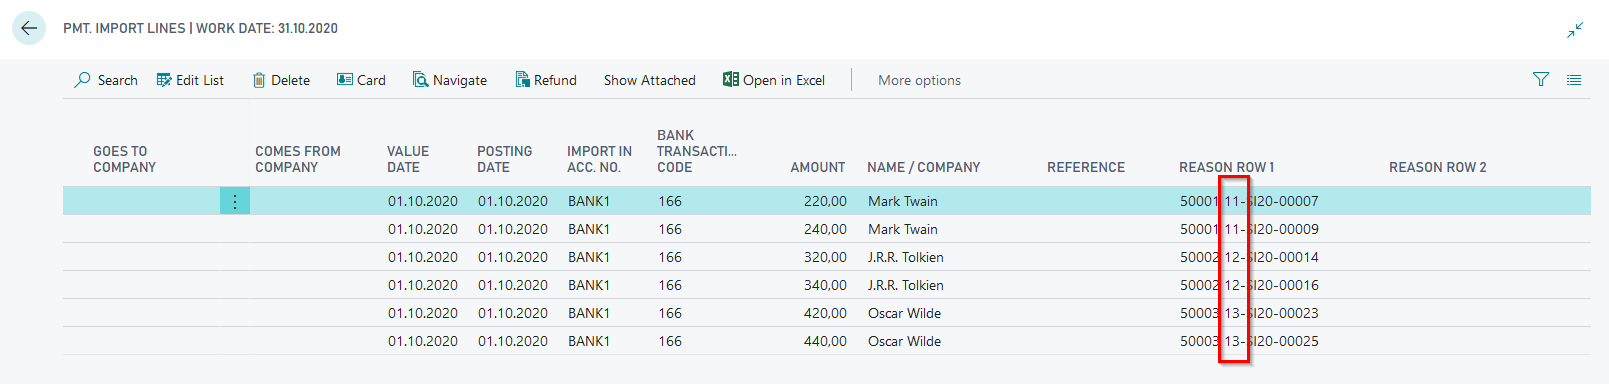
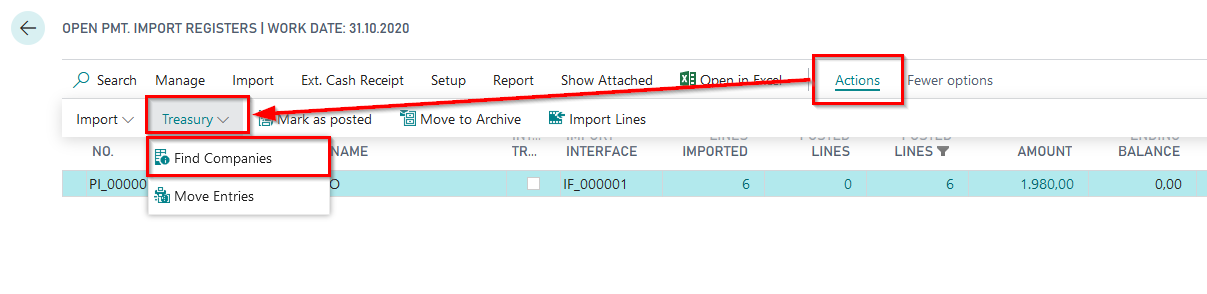
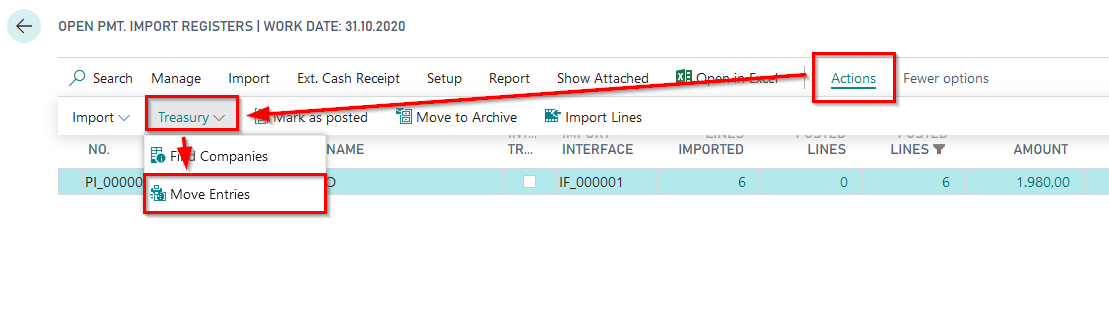
Using the function "Find companies" in the cash receipt journal, you can have the payments automatically assigned to the origin companies. This can also be done manually.
In the Pmt. Import Lines you can show the result in the column "Comes from Company".
Using the "Move Entries" function in the Pmt. Import Register, the payments per company are aggregated and distributed/ moved to the sub-companies as payment import registers.
The payment import line then look like following in the main company and can be transferred to the Ext. Cash Receipt Jounal then.
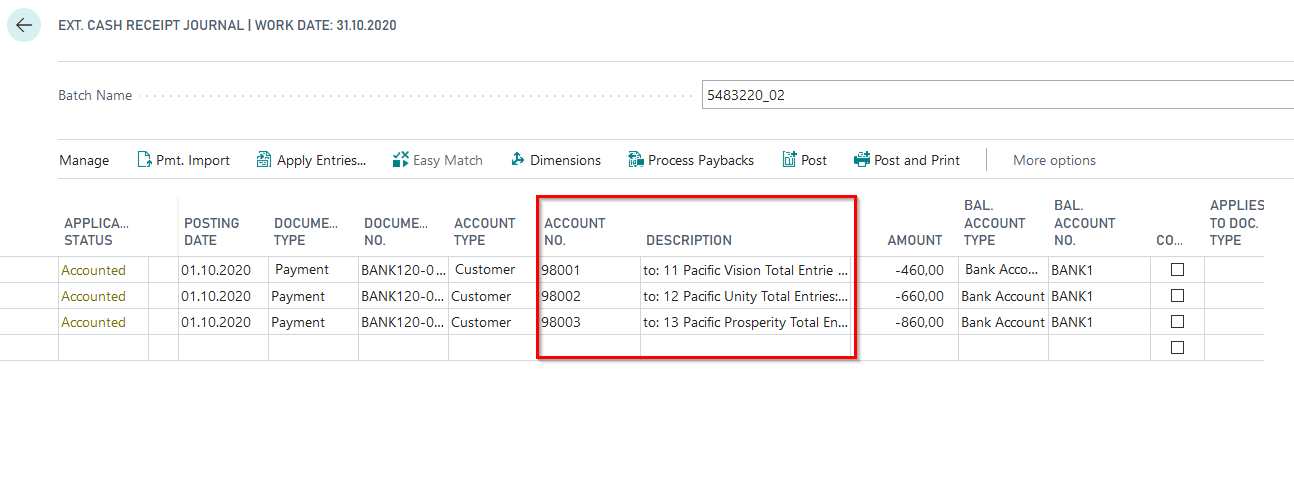
In the Ext. Cash Receipt Journal, payments are posted against customers who have previously been defined in the accounting rules and should be stored in the system as intercompany customers. The resulting receivables against the sub-companies can be transferred to them by intercompany posting using the standard of Business Central.
In the sub-companies, the created cash receipt journals can be further processed like regular import journals. When transferring the data to the Ext. Cash Receipt Journal, the open entries will be automatically applied on the basis of the reasons for transfer. In this case, however, the open entries are applied against the IC clearing account.
This means that the entire payment process is largely automated via a centralized bank account and all original receivables in the sub-companies have been closed.