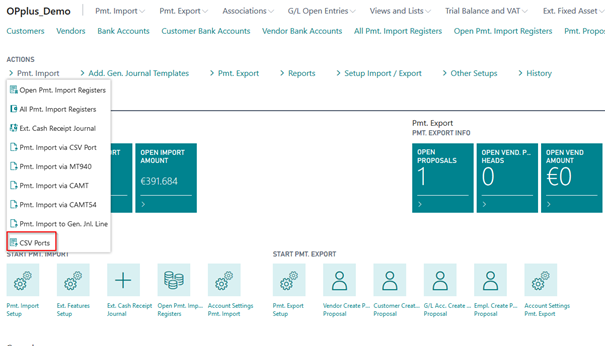
Working with CSV Ports
The interfaces to external text files in the .csv format are maintained in the CSV Port Card. When selecting the menu item, the CSV Port List window opens.
With OPplus, you already have access to the following predefined standard bank interfaces: MULTICASH, SFIRM-I and SFIRM-II, AVIS_OPP.
CSV Port functions in the Ribbon
New: Create a new CSV-Port. When naming the CSV port, make sure that round brackets are not used.
Manage
Edit: Opens the CSV Port card in edit mode.
View: Opens the CSV Port card in view mode.
Delete: Deletes the selected CSV port.
CSV-Port
Import / Export: Via this function, the import/export is processed according to the set direction.
Restore Standard Bank Interfaces: You use this function to create the predefined standard bank interfaces.
Export CSV-Ports: This function exports the master data of all CSV ports to a file.
Import CSV-Ports: This function imports the master data of CSV ports from a file.
Copy: When you select this function, the system creates an identical copy of the active CSV Ports with the addition (COPY). For example, if you copy the "MULTICASH" Port, the program creates a new CSV Port with the "MULTICASH (COPY)" code.
Registers
CSV Register: This allows you to view the logged actions of the selected CSV port if the imported data was not a bank import.
Note
Actions concerning CSV ports not equal to bank import/ advice will only be logged if the Update Logfile field on the Options tab of the CSV port card header is activated.
Pmt. Import Register: Here you can open the "Open Pmt. Import registers" page filtered to the selected CSV port.
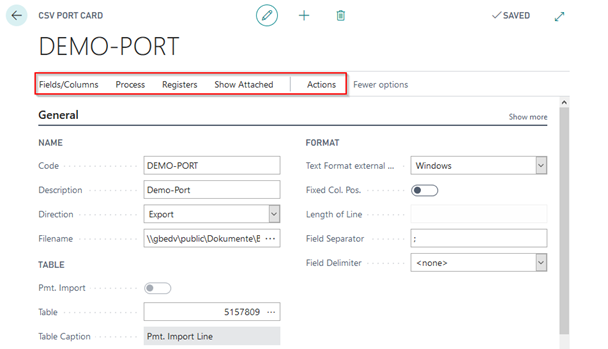
General Tab
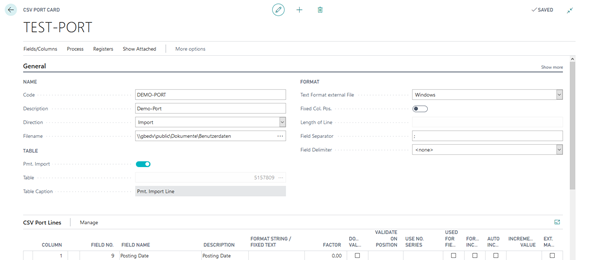
To create a new CSV port, click on the plus sign. Optionally this can also be done from the list.
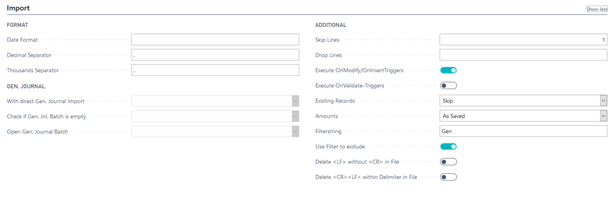
Import Tab
This tab is only visible if the “Import“ direction is selected.
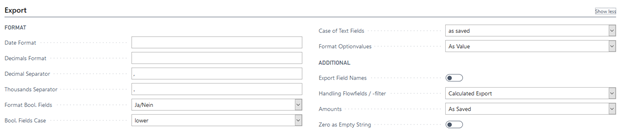
Export Tab
This tab is only visible if the “Export“ direction is selected.
Line Fields

Note
The figure does not contain all columns/fields
If required, the user can make further specifications for each line by selecting the Manage button → Edit Field menu item.

For more information, please refer to chapter CSV Port Card – Functions ribbon.
Format String / Fixtext Feature Enhancement
There are CSV files still to be calculated for use in BC, in which values are transferred. There are also cases in which several values from the file are to be put together in one column. Therefore you have the possibility to enter formulas in the CSV port line. In order to use formulas, the “Format String / Fixed Text” field has been enhanced and is to be used to enter the formula.
To use fields in a new column for calculation, the columns can be specified with the ‘#‘ character. For this, the “Used for Fieldlink” field must contain check mark. This causes the system to remember the value. These fields can pre-formatted (e.g. sign, factor) in the formula via the field settings.
The formulas are processed in order. Mathematical rules, such as ‘dash calculation before point calculation´ must be realized by using parentheses. Also, calculating with percentages is not implemented since the percent sign for “percent codes” are already used for variables (Today, Month Last ...).
Available calculations types
| Type | Sign |
|---|---|
| Addition | + |
| Subtraction | - |
| Division | / |
| Multiplication | * |
| Power | ^ |
Example: Calculation of Field Content
The file contains a gross amount and a net amount. From this you want to calculate "payment discount indicated":
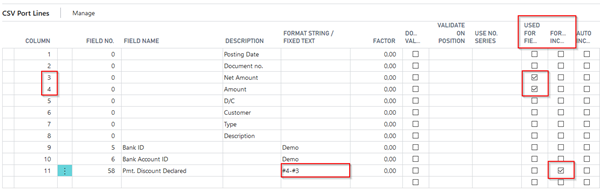
Activate the "Used for Fieldlink" field for columns 3 and 4. The values are needed later in the calculation. In the newly added column 12 activate the "Formula included" field. Thus, "payment discount indicated" is calculated with the formula #4-#3.
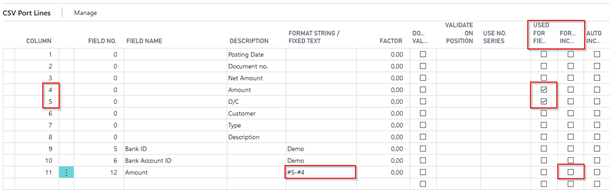
Example: Column Combination
Assign debit/credit indicator and gross amount for Amount field The file contains the debit/credit indicator in one column and the gross amount in another column. The combined amount should then be inserted in the newly added column 12.
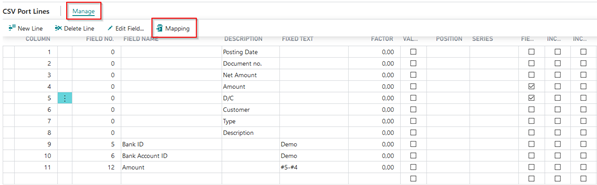
First you define a mapping for the d/c indicator in column 5. Thus a sign is passed instead of S and H. For more information, please refer to section Button Mapping.
Note the values in columns 4 and 5 by the check mark in the "Used for FieldLink". Because there is no calculation, do not activate the "Formula included" field in contrast to the calculation. With the entry #5#4 in "Format String / Fixed Text" field the sign (mapped value from column 5) is written with the amount (value from column 4) in the Amount field.
Button Mapping
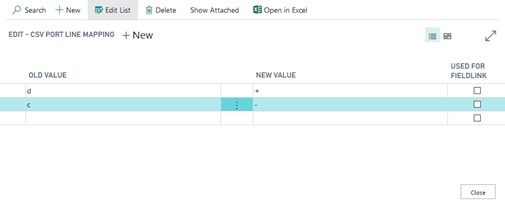
In the CSV port, it is possible to perform mapping in order to map the existing values of the source file (old values) to the new values during the import. This can be used, for example, to change a debit/credit indicator to + / - so that an amount can be imported correctly:
CSV Port Card - Functions Ribbon
By clicking the CSV port code you open the CSV port card. This ribbon contains the functionalities related to the opened CSV port.
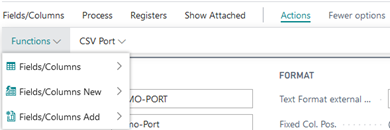
Fields/Columns
The menu options of the “Fields/Columns“ submenu can be used to rebuild the definition of the fields/columns for the CSV port.
Rebuild From File: Testing the file and creating a line for each column found.
Rebuild From Table: Inserting a line for each field of the selected table.
Rebuild User Defined: Creating 5, 10, or 20 columns using the default settings.
A search function is available in the CSV Post field selection.

Process
The Operation submenu contains functions for importing / exporting the specified file.
Import / Export: This function is used to perform the import/export according to the set direction.
Preview: For import only. The preview is very helpful when defining a port with fixed field positions. For now, we will use the default 8626 "Migration Records" window to display the preview.
Please note that this window always displays the fields in the order of the table definition is displayed. They are not displayed in the order you defined for the CSV port.
Please also note that the "Invalid" column is irrelevant in this context. The "Migration" button has no function - at worst it can cause a runtime error without consequences.
Registers
In the register submenu you will find logs / registers about the performed imports / exports.
CSV Log File: By using this function, you can show the actions logged for the CSV port if the imported data does not represent a bank import.
Note
Actions of the CSV port (unequal bank import/remittance advice) are only logged if the Update LogFile field on the Options tab of the CSV Port Card window is activated.
Pmt. Import Register: This opens the „Open Pmt. Import Registers“ page filtered to the selected CSV port.
Actions
Functions: In the Functions menu you find functionalities for editing the fields / columns of the CSV port.
Fields/Columns:
- All active -> Placing the “Process only” field for all lines to NO
- Mark all columns processing only -> Placing the “Process only“ field or all lines to YES.
- Validate All Columns -> Placing the “Don’t validate“ field for all lines to NO.
- Validate No Column -> Placing the “Don’t validate“ field for all lines to YES.
- Col. Nos. 1,2,3… -> Numbering the “Column“ field starting with 1. The shown sorting will remain.
- Col. Nos. 10,20,30… -> Numbering the “Column“ field starting with 10. The shown sorting will remain.
Fields/Columns New:
The menu options of the “Fields/Columns New“ submenu can be used to rebuild the definition of the fields/columns for the CSV port.
- Rebuild From File -> Testing the file and creating a line for each column found.
- Rebuild From Table -> Inserting a line for each field of the selected table.
- Rebuild User Defined -> Creating 5, 10, or 20 columns using the default settings.
Fields/Columns Add:
The menu options of the “Fields/Columns Add“ submenu can be used to add additional fields/columns to existing definitions. The single menu options correspond to the menu options of the “Fields/Columns New” submenu.
- From Table
- Append From Table
- Append User Defined Columns
CSV Port: The CSV Port submenu contains functions for copying and exporting the CSV Port.
COPY: If you select this function, the system will be copied an identical copy of the active CSV Port with the addition (COPY). For example, if you copy the „Multicash“ Port, the system will create a new port with the code „Multicash (COPY)“.
Export CSV Port...: This function exports the CSV Port master data to a file.
CSV Port Line
By clicking the Manage/Edit Field menu you can open the card of a CSV Port line.

There is a setting option for the import that the field must contain a value. If there is no value in the corresponding field in the file to be imported, the import is aborted with an error message.
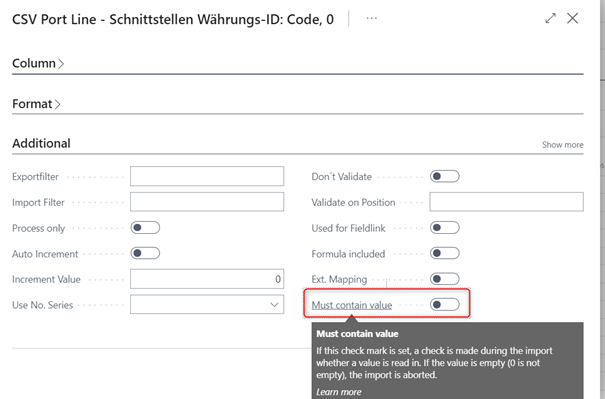
Ext. Mapping
Due to the fact that mapping of CSV Port columns was only applied to the current field, it has been requested to introduce a supplement which enables to control other fields by using “If .. Then ..“ configurations.
For this, the new “Ext. Mapping“ field has been introduced in the CSV Port line.
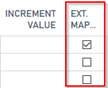
By activating the “Ext. Mapping“ field, the user is able to specify the mapping conditions. If the “Ext. Mapping“ field is deactivated, the former mapping logic “old value-new value“ applies.