OPplus Trial Balance and VAT
The functionalities of the Trial Balance and VAT (Extended Analysis) module can be found in the navigation areas "My Business Central" - "OPplus 365" in the group Trial Balance and VAT.
The Trial Balance and VAT (Extended Analysis) module provides you with the following main functionalities:
Balance:
- Setup of G/L account groups for the assignment of G/L accounts to chart of accounts schedule lines
Asset or liability item per line with so-called "tipping accounts" (example: bank accounts)
Correct display (/images/COPP/en-us/liabilities) of debit-side vendors and credit-side customers
Printing of an accounting proof for lines with set up account totals
Plausibility check based on the chart of accounts
Setup of flexible column layout, e.g. to print the names or numbers of the monthly columns
In addition, total-balance lists are available for G/L accounts, debitors and creditors in DATEV layout. These balance lists include the possibility to filter the account printout (only accounts with movement, with balance > 0; balance < 0 or balance <> 0) and an option for Excel output.
Sales VAT - you can print a summarized Sales VAT advance notification for appropriately marked companies in your database and create the associated XML file for transmission via Elster. In addition, you have the possibility to generate a VAT entries accounting proof at any time.
Purchase VAT deductible on document entrance date - the problem of purchase VAT deduction according to § 15 (1) No. 1 UStG has been solved (purchase VAT deduction only after the service has been rendered and the physical invoice is available). The module provides a functionality for the temporally correct mapping of VAT entries (keyword: purchase VAT deductible in the next month).
Purchase VAT in sales and Sales VAT in purchasing - this area is about having the ability to make an purchase VAT entry in a sales invoice for a purchase item, such as pledge, or a sales VAT entry in a purchase invoice.
Note
This manual describes the contents of the OPplus version 17.1700.0.1.
Module setup
Before you can work with the module, you must define certain values in the Trial Balance and VAT Setup.
You can find a description of the fields of the individual tabs of the module setup in the respective sections.
Tip
To use the extended account schemes, you must install the extension "OPplus 365 Trial Balance and VAT DACH".
G/L Account Group 1 - 4 Captions - on the Trial Balance and VAT Setup page, in the General section, there are four fields for different G/L Account groups. If you leave these fields empty, only "Account Group 1...4" will be displayed as a headline in the extended G/L Account Overview.
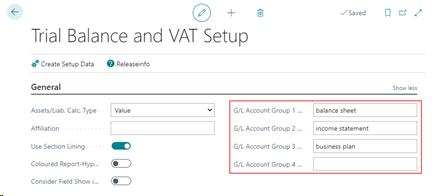 All account groups set up in the following can be assigned to one of the account group captions created here. For more details, see the G/L Account Groups section below.
If you perform the setup as shown above, you will get the following view in the Extended G/L Accounts:
All account groups set up in the following can be assigned to one of the account group captions created here. For more details, see the G/L Account Groups section below.
If you perform the setup as shown above, you will get the following view in the Extended G/L Accounts:
Purch. VAT Next Month Tab - for a description of the Purch. VAT Next Month tab of the module setup, see the [Purchase VAT deduction on document entrance date (Purch. VAT Next Month)](#purchase-vat-deduction-on-document-entrance-date-(purch.-vat-next-month )) section.
ELSTER Tab - for a description of this tab see the Sales VAT section.
G/L Account Groups
Account groups are used to combine G/L accounts into groups that can be displayed and evaluated under one row in the extended account schedules. The account schedules can be created on the base of these account groups. This has the advantage that an account schedule only has to be created and maintained once. If the user now creates a new G/L account in the chart of accounts, this G/L account only has to be supplied with the appropriate account groups and the account schedules no longer have to be adapted with regard to the new account.
You have the possibility to create as many and freely definable account groups as you wish.
In addition, the "Ext. Totaling Type" column provides another level for merging several created account groups to the stored account group captions. In the extended G/L chart of accounts, in the G/L accounts and in the rows of an extended chart of accounts, the account schedule line grouping thus serves as a filter for the possible assignment of the created account groups. See also the Assignment of the G/L Account Group to the Account Schedule section.
The account groups can also be defined directly at the G/L accounts - in the OPplus G/L account card. You can define a maximum of four account groups per G/L account according to the account group captions. See also the chapter G/L Account Card → OPplus button .
A processing or use of this deposited information takes place in the setup of the extended account schedules via the columns "Ext. Totaling Type" and "Extended Totaling". In the following you will find an example for the use of account groups.
Example use G/L Account Groups
For example, to create a balance, a P&L, and a business analysis, you create account groups that correspond to certain balance, a P&L, and a business analysis-items.
The assignment of your G/L accounts to the created G/L account groups is done either in the extended G/L chart of accounts or, as already described above, directly at your G/L accounts via the OPplus G/L chart. By defining G/L account group captions, the correct assignment of the account groups is facilitated.
By means of a defined chart of accounts line item grouping, you achieve that only the assigned account groups are available for selection per defined account group caption. This way you can prevent a wrong assignment of G/L accounts to the account groups.
Within the extended chart of accounts to be set up, the assignment of the set up account groups is then carried out via the "Ext. Totaling Type" and "Ext. Totaling" columns.

Result in the Account Schedule Overview

Assignment of the G/L Account Group to the Account Schedule
As mentioned above, an option can be set in the account group itself to allow easier mapping for the account schedule lines (Account Schedule Line Grouping). This will then be valid as a match for the "Ext. Totaling Type" field in the account schedule. If a matching group is found, the account groups will be pre-filtered accordingly in the lookup of the "Ext. Totaling" column. If no group assignments have been entered anywhere, then the pre-filtering is omitted and the view is opened over all existing account groups. The same applies to the assignment of account groups via the extended G/L accounts.
If, for example, after the setup, the Ext. Totaling Type "G/L Account Group 2" is selected, the view will only show the results of G/L account group 2. The filter can be removed manually at any time.
If no matching record is found, the view is opened unfiltered.
Account Schedule Assignment to the G/L Account
As an alternative to the G/L account groups, you can also maintain an account schedule in the conventional way and assign the G/L accounts directly to the account schedule lines. To simplify maintenance here, you have the option of assigning an account schedule and the desired line to the G/L account. If you then want to use an account schedule for evaluations, you can update the account schedule and the G/L accounts are automatically included in the account schedule.
Warning
You can only assign one account schedule line to an account. I.e. if you are dealing with tipping accounts (like bank account), you have to add this account manually in the liabilities area if you have assigned the asset line to the Account.
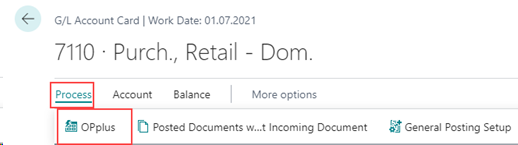
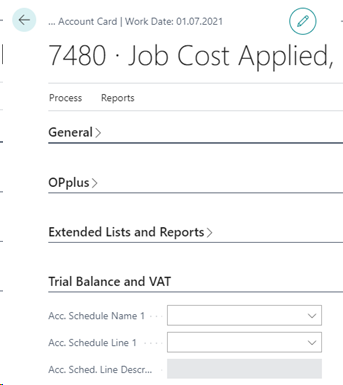
G/L Account Card OPplus button
The G/L account contains an "OPplus" button in the ribbon. There you can find, among other things, the corresponding facilities for the extended analysis or the extended account schedules in the "Trial Balance and VAT" tab.
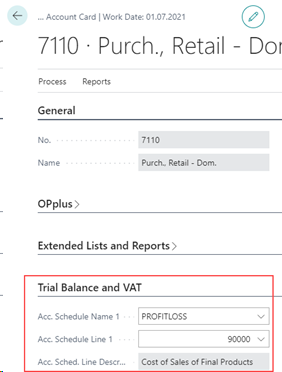
Account Schedule Name 1 to 3
In this tab there is a possibility to assign the selected account to already existing account schedule names and created account schedule lines. The assignment of a G/L account can be done for a maximum of 3 existing account schedule names and account schedule lines:
You have two possibilities to maintain the fields concerning the account schedules: You maintain the values in the G/L account and "import" the assignment into the Totaling field of the respective account schedule => See Refresh Direction Sched. Name - > Curr. Sched.
You maintain the Totaling field in the chart of accounts and update the fields in the G/L accounts from the chart of accounts => See Refresh Direction Curr. Sched. -> Sched. Name.
Account Group 1 to 4
Explanations of these fields can be found in the chapter G/L Account Groups and in the chapter G/L Account Groups 1-4 Captions.
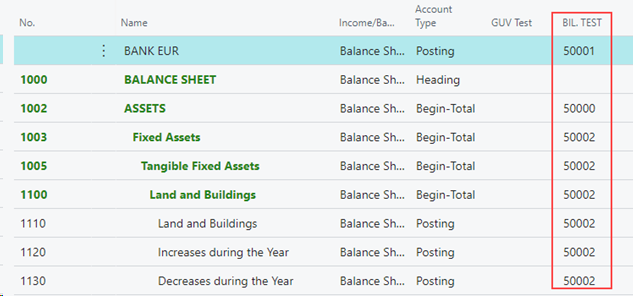
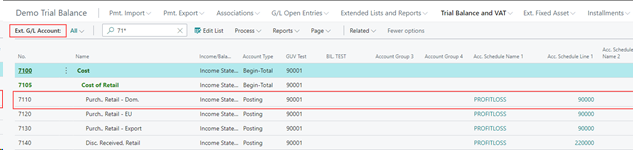
Extended G/L Accounts
The overview of extended G/L accounts allows you to quickly overview the values of the Trial Balance and VAT tab of the OPplus G/L account card and to check if an entry is missing in an account:
In order to make changes to the advanced analysis fields in this overview, you must first put them into edit mode (ribbon/edit list).
Extended Account Schedule Refresh
You can update the entries described above on the Trial Balance and VAT tab of the G/L accounts within an extended account achedule using the "Refresh" Menu Item.

Refresh Direction Sched. Name -> Curr. Schedule
This function fills the Totaling field of a row number in the extended chart of accounts from the corresponding entries of the OPplus G/L account cards.
Warning
If this function is called and there are no entries in the G/L accounts yet, the entries in the Totaling field will be deleted. Therefore it makes sense to first provide the G/L accounts with the corresponding information on the account schedule (see Refresh Direction Act. Schedule -> Schedule Name)
Refresh Direction Curr. Sched. -> Sched.-Name
In this case, first the Totaling field is maintained in the account schedule. Then, using the Refresh function, this data is transferred to the corresponding fields of the G/L accounts.
Warning
The system does not check whether data already exists in the corresponding fields of the G/L accounts. Existing values are overwritten without warning, if necessary.
Delete Account Schedule | remove G/L Account assignment
If an account schedule is deleted as a whole, an assignment on a G/L account will be removed as well, if set up accordingly.
Setup exists in the G/L account:
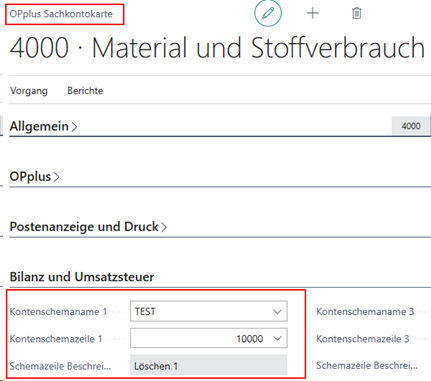
Delete "Test" account schedule:

Setup is subsequently no longer present in the G/L account:
Trail Balance
The Trail Balance and VAT (Extended Analysis) module includes enhancements to the account schedules and the totals and balances lists in the area of balance statement creation compared to the Business Central standard.
In this chapter, only the differences to the standard BC chart of accounts and the standard totals and balances lists are presented.
Ext. Account Schedule
schedule and the account schedule rows, which are accessed via the menu item "Edit Account Schedule".
The Account Schedules have been extended in the list of Extended Account Schedules by the field "Asset/Liab. Calc. Type", the field content of which has already been explained in the chapter Trial Balance and VAT → Setup.
If you explicitly make an entry in the "Asset/Liab. Calc. Type" field in an extended account schedule, this overrides the entry in the setup of the Trial Balance and VAT (Extended Analysis) module.
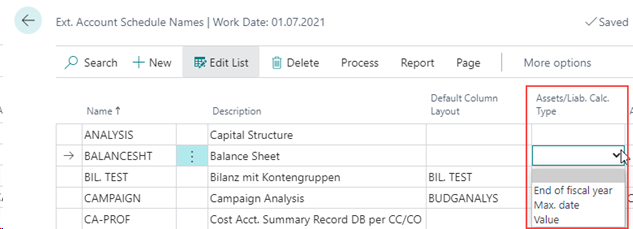
If no separate entry is made in this field within the account schedule names, the setting from the definition of the basic setup of the module applies.
All other fields of the list view of the account schedules correspond to the Business Central standard and are not explained separately here.
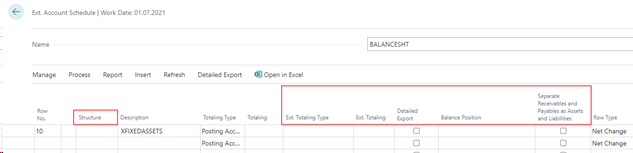
Account Schedule Line
In the following, only the variances to the standard fields/functionalities in the account schedule line are explained here. This refers to the following fields in the extended accounts schedule line:
Structure, Ext. Totaling Type, Ext. Totaling, Show, Detailed Export, Balance Position, Separate Recievables and Payables as Assets and Liabilities.
Tip
To easily set the "Detailed Export" value, you have the "Set" and "Remove" options.
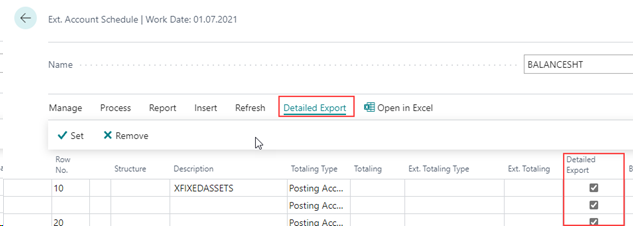
This function has the background that it is sometimes easier to change a value in some lines than to have to set the value manually in all lines.
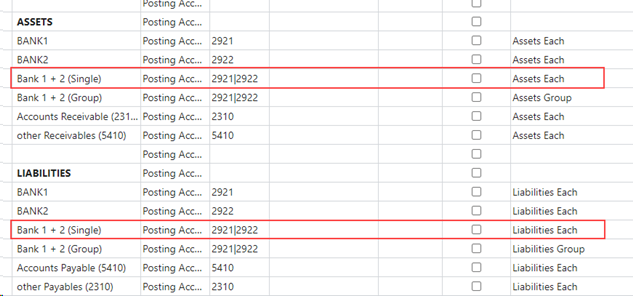
Examples of the creation of tipping accounts
Example 1:
Example of setting up individual G/L accounts (2921 and 2922) as tipping accounts:

Example 2:
Example of setting up several G/L accounts (2921 and 2922) as a toggle account. The accounts are not balanced here, but the balances of the accounts are output each in Assets or Liabilities:
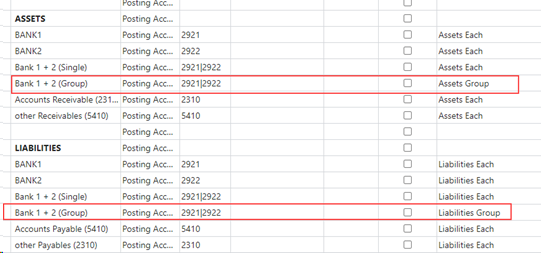
Example 3:
Example of setting up several G/L accounts (assets-liabilities group) as a tipping account. In the following setup, accounts 2921 and 2922 are balanced, then the total balance is shown on the assets side (if the total balance is a debit balance) or on the liabilities side (if the total balance is a credit balance):
Example 4:
Example of setting up accounts receivable as well as accounts payable collective accounts, if there are debitors with credit balance (Accounts Receivable) and/or creditors with debit balance (Accounts Payable).

Note
When you set up the tipping accounts for displaying customers with credit balances and vendors with debit balances, the correct amounts are displayed in each case in the fields of the associated account schedule overview and the corresponding reports under other liabilities or other receivables. Branching to the displayed values via a look up in the account schedule overview, however, leads to the balances of the respective collective accounts for technical reasons.
In the case of a posted exchange rate settlement within the transaction period, the settlement amounts are determined from the detailed customer or vendor entries in order to make a clear assignment to the subledger account.
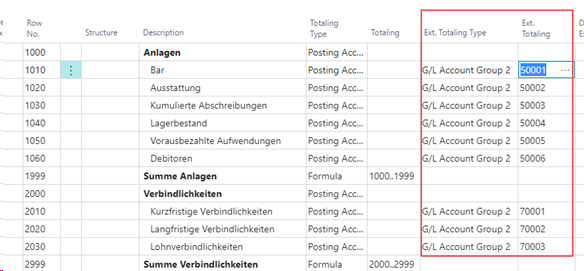
Example 5:
Example of setting up rows with account groups. All G/L accounts that are assigned to the corresponding account group will then be totaled in these lines.
Detailed Export
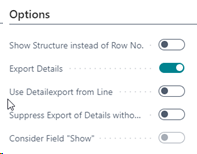
The "Detailed Export" field in the account schedule line is used to specify whether a line should be used for the detail export to Excel.
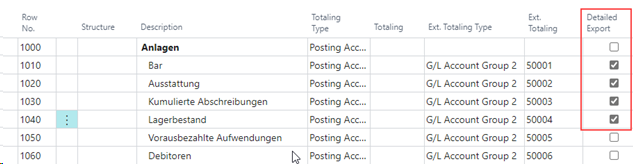
However, this field is only taken into account when exporting to Excel if the "Use Detail Export from Line" checkbox is set in the "Options" of the executed export function within the account schedule overview. The field is only active if the detail export is also set to Yes.
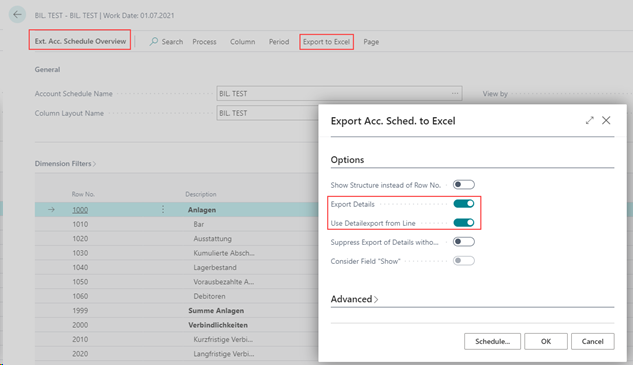
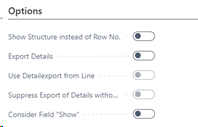
Export Details: If this field is activated, you can have only the correspondingly marked account schema rows exported with the details in the account schedule overview within the Excel export via the option "Use Detailexport from Line".
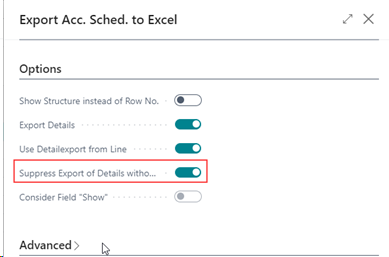
Consider detail export row: If this option is set, the account statement will only be executed for the accounts schedule lines for which the "Detailed Export" indicator is set.
In addition, there is the option here (as in the account schedule printout) to suppress the zero balances during the detailed export. This gives you the option of not transferring blank lines to the Excel table during the detailed export.
Furthermore, at this point you have the opportunity to consider the field "Consider Field "Show" from the account scheme. This is useful, for example, if the Excel file to be created is not based on a pivot table with a fixed structure, but is to be used 1:1. Otherwise, the "Consider Field "Show" field will only have an effect in the report.
Show Structure instead of Row Number
This option offers you the possibility, within the scope of the Excel export of an extended account schedule, to output the outline of the "Structure" column stored in the account schedule instead of the set up row numbers of the account schedule.
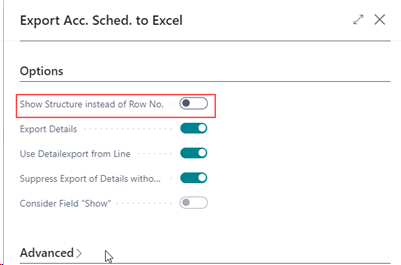
The possible options and their effects in Excel export are shown below.
There should be no detail export, the row numbers are exported. (Default behavior).
There should be a detail export for all lines, the row numbers are exported (default behavior).
The detail export should be done only for the marked lines, the outline of the stored structure will be output (OPplus functionality).

The detail export is to be performed for all lines. If there are rows where no column contains a value, they will be hidden.

The detail export should be performed only for the rows marked in the account schedule (OPplus functionality). If there are lines where no column has a value, they will be hidden.
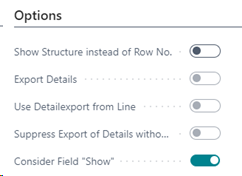
The field "Show" from the account schedule is to be taken into account. The Excel export now behaves like the standard report and takes the "Show" field into account for export. A combination with the detailed export is not possible.
Setup Column Layouts
For the setup of the column layouts %-codes can be entered as placeholders. The available percentage codes can be viewed via the AssistEdit. A window opens with the 16 different placeholders.
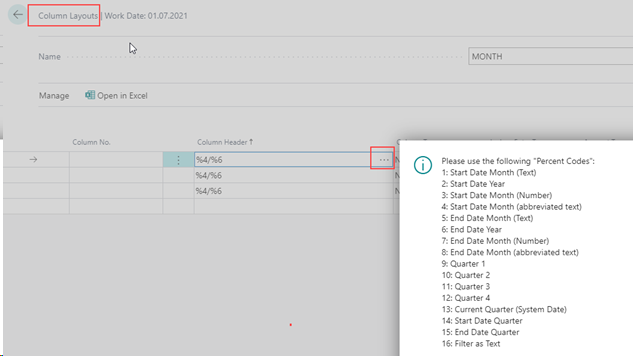
The placeholders are "translated" as follows (date filter e.g. = 01.01.21..31.12.21):
- Start Date Month (Text): January
- Start Date Year: 2021
- Start Date Month (Number): 01
- Start Date Month (abbreviated text): Jan
- End Date Month (Text): December
- End Date Year: 2021
- End Date Month (Number): 12
- End Date Month (abbreviated text): Dec
- Quarter 1: January - March
- Quarter 2: April - June
- Quarter 3: July- September
- Quarter 4: October – December
- Current Quarter (System Date) -> Related to the current date or system date
- Start Date Quarter
- End Date Quarter
- Filter as Text: Date filter as text
This function is included in the overview as well as in the OPplus extended account schedule reports.
Printing the extended account schedule includes additional options:
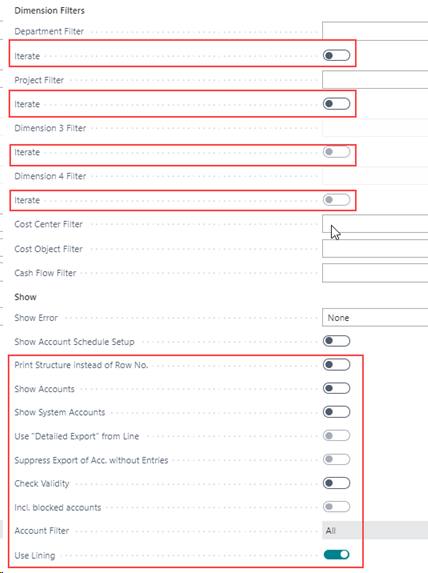
Iterate::
If, for example, the option iterate is activated in the "Department filter" field, the corresponding account schedule will be printed automatically for all departments individually, in which case, of course, the respective department will be set as the dimension filter.
Note
The iteration can only be activated for one dimension at a time. If a filter is entered, the iteration is only performed for the dimensions in the filter.
Print Structure instead of Row No.:
This option offers you, within the printout of an extended account schedule, the possibility to output the structure of the "Structure" column stored in the chart of accounts instead of the set up heading numbers of the account schedule.
Show Accounts:
If you select the show accounts, the underlying accounts will be printed separately underneath when a totals line is printed.
Show System Accounts:
If you select the show system accounts, the entries on the collective accounts are displayed grouped according to the respective origin account (personal or bank account) in individual lines. This function only has an effect if the account schedule is set up to separate according to active and passive!
Use Detailed Export from Line:
If the "Use Detailed Export from Line" option is set, the account statement will be executed only for the account schedule lines that have the "Detailed Export" checkbox set.
Suppress Export of Acc. Without Entries:
Depending on the setting of the "Suppress Export of Acco. with Entries" field, accounts without balance or movement will also be printed (setting = No) or they will not be printed (setting = Yes).
Check Validity:
You can use the "Check Validity" option to check whether you have entered all non-blocked accounts of the chart of accounts in the account schedule or whether you have entered accounts twice or more than once. If you also want to take locked accounts into account, you must also activate the "Incl. blocked accounts" option.
Please note that you always have to enter the "tipping accounts" twice: once on the assets side and once on the liabilities side.
Incl. blocked accounts:
If this option is active, blocked G/L accounts are also taken into account during the plausibility check with regard to an allocation.
Account Filter:
Here you can choose between the options "All", "Income Statement" and "Balance sheet" with regard to the plausibility check. Thus, either all, only income statement accounts or only balance sheet accounts are printed in the check.
Using Lining:
If this field is checked, every second line will be grayed out. The field is preset from the setup of the Trial Balance and VAT module.
In addition to the extended account schedule, several OPplus reports are available in the "Trial Balance" section of the Trial Balance and VAT (Extended Analysis) module to support you in your year-end closing activities.
Ext. G/L Total-Balance
Via the OPplus menu item Trial Balance and VAT you have the possibility to print the OPplus list for G/L Total-Balance. After selecting the report the following request page appears:
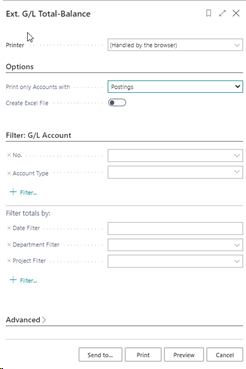
Ext. G/L Total-Balance - Options Tab
| Option | Description |
|---|---|
| Print only Accounts with | Balance > 0 all accounts that show a value > 0 in the "Accumulated balance" report column will be printed. Balance < 0 all accounts that show a value < 0 in the "Accumulated balance" report column will be printed. Balance <> 0 all accounts that show a value <> 0 in any column will be printed. Postings all accounts that show a movement are printed. The option is preset with "Postings" |
| Create Excel File | Under this option, the report is additionally exported to Excel and is available for download. |
G/L Account Tab
On this tab you can filter which G/L accounts should be considered. Additionally you have to enter a date filter here.
Tip
If you want to output the report to Excel but do not want to print it, you must at least call it up via the page view or preview.
The report created contains the following columns of values:
| Option | Description |
|---|---|
| Starting Balance | Opening balance sheet value related to the fiscal year of the selected date filter. |
| Period Debit | Sum of the debit amounts of the period of the selected date filter. |
| Period Credit | Sum of the credit amounts of the period of the selected date filter. |
| Period Balance | This column shows the balance of the period without the balance carried forward (balance of the columns Period Debit Amount and Period Credit Amount). |
| Year Debit | Sum of the debit amounts from the beginning of the fiscal year of the selected date filter to the maximum date of the selected date filter. |
| Year Credit | Sum of credit amounts from the beginning of the fiscal year of the selected date filter to the maximum date of the selected date filter. |
| Cumul. Balance | This column shows the balance from the beginning of the year to the maximum date of the selected date filter, including the Balance carried forward column. |
Ext. Customer Total-Balance
Ext. Customer Total-Balance - Options Tab
| Option | Description |
|---|---|
| Adjust Exch. Rate Differences | Check this field if you want the report to take exchange rate differences into account. If you check the field, debit and credit amounts will be adjusted for realized gains and losses due to exchange rate differences. If the field is not checked, exchange rate differences due to realized gains and losses will be disregarded, making it difficult to reconcile with the corresponding receivable accounts. |
| Print only Accounts with | Balance > 0 all accounts that show a value > 0 in the "Accumulated balance" report column will be printed. Balance < 0 all accounts that show a value < 0 in the "Accumulated balance" report column will be printed. Balance <> 0 all accounts that show a value <> 0 in any column will be printed. Postings all accounts that show a movement are printed. The option is preset with "Postings" |
| Create Excel File | Under this option, the report is additionally exported to Excel and is available for download. |
Customer Tab
On this tab you can filter which debtors should be considered. Additionally you have to enter a date filter here.
Tip
If you want to output the report to Excel but do not want to print it, you must at least call it up via the page view or preview.
The Ext. Customer Total-Balance report contains the following value columns:
| Option | Description |
|---|---|
| Starting Balance | Opening balance sheet value related to the fiscal year of the selected date filter. |
| Period Debit | Sum of the debit amounts of the period of the selected date filter. |
| Period Credit | Sum of the credit amounts of the period of the selected date filter. |
| Period Balance | This column shows the balance of the period without the balance carried forward (balance of the columns Period Debit Amount and Period Credit Amount). |
| Year Debit | Sum of the debit amounts from the beginning of the fiscal year of the selected date filter to the maximum date of the selected date filter. |
| Year Credit | Sum of credit amounts from the beginning of the fiscal year of the selected date filter to the maximum date of the selected date filter. |
| Cumul. Balance | This column shows the balance from the beginning of the year to the maximum date of the selected date filter, including the Balance carried forward column. |
Ext. Vendor Total-Balance
Ext. Vendor Total-Balance - Options Tab
| Option | Description |
|---|---|
| Adjust Exch. Rate Differences | Check this field if you want the report to take exchange rate differences into account. If you check the field, debit and credit amounts will be adjusted for realized gains and losses due to exchange rate differences. If the field is not checked, exchange rate differences due to realized gains and losses will be disregarded, making it difficult to reconcile with the corresponding receivable accounts. |
| Print only Accounts with | Balance > 0 all accounts that show a value > 0 in the "Accumulated balance" report column will be printed. Balance < 0 all accounts that show a value < 0 in the "Accumulated balance" report column will be printed. Balance <> 0 all accounts that show a value <> 0 in any column will be printed. Postings all accounts that show a movement are printed. The option is preset with "Postings" |
| Create Excel File | Under this option, the report is additionally exported to Excel and is available for download. |
Vendor Tab
On this tab you can filter which vendors should be considered. Additionally you have to enter a date filter here.
Tip
If you want to output the report to Excel but do not want to print it, you must at least call it up via the page view or preview.
The Ext. Vendor Total-Balance report contains the following value columns:
| Option | Description |
|---|---|
| Starting Balance | Opening balance sheet value related to the fiscal year of the selected date filter. |
| Period Debit | Sum of the debit amounts of the period of the selected date filter. |
| Period Credit | Sum of the credit amounts of the period of the selected date filter. |
| Period Balance | This column shows the balance of the period without the balance carried forward (balance of the columns Period Debit Amount and Period Credit Amount). |
| Year Debit | Sum of the debit amounts from the beginning of the fiscal year of the selected date filter to the maximum date of the selected date filter. |
| Year Credit | Sum of credit amounts from the beginning of the fiscal year of the selected date filter to the maximum date of the selected date filter. |
| Cumul. Balance | This column shows the balance from the beginning of the year to the maximum date of the selected date filter, including the Balance carried forward column. |
Ext. Account Schedule 11 Columns respectively 15 Columns
Different from the printout of the standard account schedule, the OPplus module Trial Balance and VAT (Extended Analysis) offers via the reports Ext. Accounts Schedule 11 Columns and Ext. Accounts Schedule 15 Columns the possibility to print one-page charts of accounts with 11 or 15 columns (without page break).
Tip
If the amounts exceed the maximum column width, the amounts are cut off from right to left in the same way as in the standard. In this context, please also note that the reports are aligned to the DIN A4 format and the display of values with 11 or 15 columns is correspondingly limited.
The options for requesting the reports to be printed are analogous to printing: "Ext. Account Schedule ".
Sales VAT
With this functionality of the OPplus module Trial Balance and VAT (Extended Analysis) you can print a summarized advance VAT return for accordingly marked clients in your database (affiliation group), as well as create the XML file for the Elster transfer.
This functionality is only available in Germany and is therefore not described further.
VAT Entries Accounting Proof
The VAT module provides you with another functionality that can be used not only in the context of a affiliation but also in any other client, the VAT Entries Accounting Proof.
The related report transfers to this form, among other things, the G/L account number with the account name to which the related tax base of a VAT item is posted.
For each VAT entry, you will see the row numbers of the VAT statement to which the value of the entry will be added when the Sales VAT Advance Notification is prepared. In addition, you will see a line for each client with the total for the VAT entries (Entry Type = Total VAT). This value allows a quick view of the calculated value of a payment debit/credit per client related to the VAT entries displayed.
The individual fields of the form are described below.
When the form is called for the first time, it is empty:

The menu button "Refresh Table" opens the following report options:
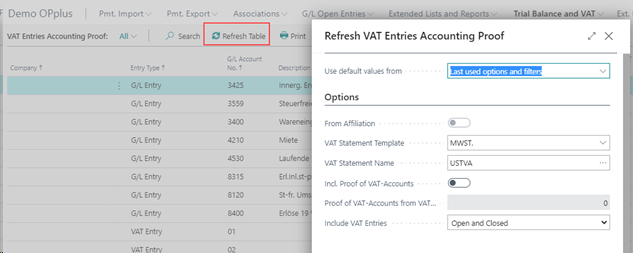
When the report is started, the option values are preset accordingly.
Refresh Table - Options Tab
From Affiliation: If you call the update in a client of an established affiliation, the system automatically defaults this field with the YES option, so that the update takes into account items from all clients of the affiliation.
Tip
If you want to perform the update only for the current client, set the option to NO.
VAT Statement Template / VAT Statement Name: Through these two fields you define which VAT statement is valid for the transfer of the row no. for this update. In the "VAT Statement Name" field you select the VAT statement you want to use. The template name is automatically drawn when it is called up.
Incl. Proof of VAT-Accounts: Use this option to activate the validation on tax G/L accounts, which is described in more detail in the „Validation of the tax G/L accounts“ chapter.
Proof of VAT-Accounts from VAT Statement Line No.: If the tax G/L account validation is activated, enter here the corresponding line number of the VAT statement from which the validation is to start. In other words, the line number from which the tax G/L accounts are created in the VAT statement.
Include VAT Entries: You now have the option here to filter the VAT entries according to the setting "Open and Closed", "Open" or "Closed".
Refresh Table - Company Tab
On this tab you can filter which clients are to be considered during the update. If no filter is entered here, only the current client will be taken into account, provided that the option "From Affiliation" is not set for a affiliated client.
Refresh Table - G/L Entry Tab
This tab lets you filter which G/L entries are to be taken into account when refreshing the VAT Entries Accounting Proof. For example, you have the possibility of setting a filter on the Posting Date field. Other filter criteria may be added. However, you can also run the report without a date filter. Please keep in mind, however, that depending on the number of your G/L entries, this can lead to extremely long runtimes when refreshing.
The Refresh Table function is now used to enter the information for the corresponding entries. ATTENTION: each update removes the previous data from the page!
Using the Print menu button, the report can be printed and / or output to Excel. Using the Send to... option, different formats of the data output can be selected. Furthermore, it is possible to first create a preview of the report.
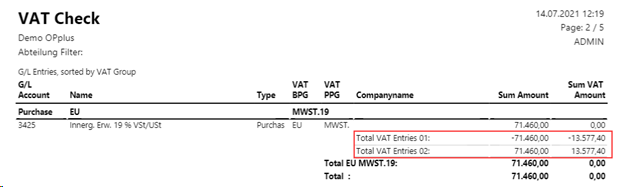
Example of the side view:
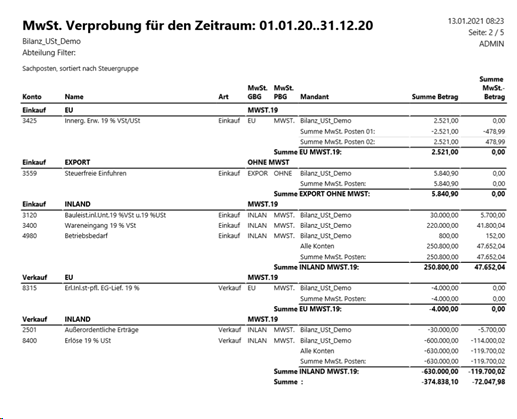
Note
Special feature for Reverse Charge VAT: if the VAT Entries Accounting Proof includes VAT with the VAT gen. posting group "EU" (VAT calculation type "Reverse Charge VAT"), VAT entries with G/L account number "01" and "02" are entered. One value is negative and the other positive. In the printout, this results in the sum VAT amount = 0. In order to provide a better overview here, the two lines are displayed separately once positive and once negative.

Validation of the VAT G/L accounts
Optionally, it is also possible to display the tax G/L account validation set up in the VAT statement, in the VAT Entries Accounting Proof.
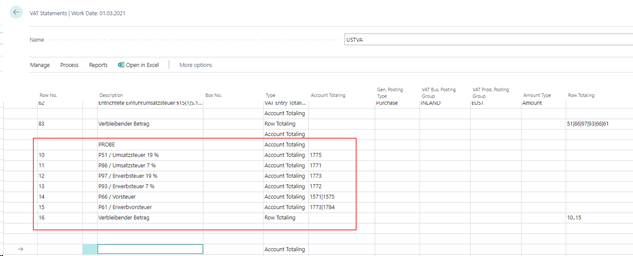
Validation of the tax G/L accounts in the VAT statement:
Hereby we enable an easier reconciliation of the VAT accounts, as all relevant values are available in one clear list and the view of several different lists can be omitted.
However, there are also limitations and indications that must be considered:
- In the case of an affiliation, a uniform set-up (chart of accounts, VAT posting setup and VAT statement schedule) should be in place for all clients.
- The filters on the G/L entries specified when updating the table should be chosen wisely: Only the fields that are the same for all G/L entries of a document should be used (posting date, document number).
Filtering on posting setup criteria is not useful for tax G/L account validation, for example, since no posting setup information is posted in the tax G/L entry.
Procedure:
The options "Incl. Proof of VAT-Accounts" and "Proof of VAT-Accounts from VAT Statement Line No." have been added to the report for refreshing in the VAT Entries Accounting Proof.
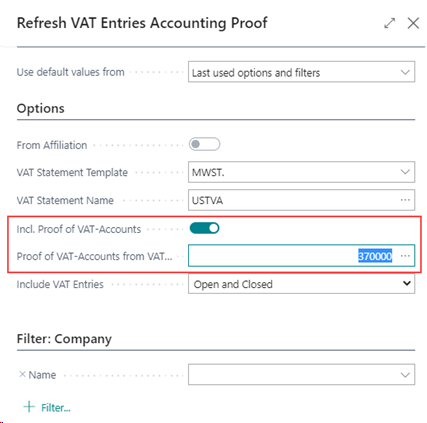
If the "Incl. Proof of VAT-Accounts" checkbox is selected, all VAT G/L accounts stored in the VAT Posting Setup (from all clients in the case of an affiliation) will also be processed. Therefore, the above mentioned note regarding the filtering when updating the VAT Entries Accounting Proof is important, as otherwise tax postings could be excluded from the refresh.
The entries on the G/L accounts set up are grouped by G/L account / client / VAT posting setup under the entry type "G/L accounts VAT" in the VAT Entries Accounting Proof:

The second option mentioned, "Proof of VAT-Accounts from VAT Statement Line No.", is used to add the row number from the underlying VAT statement. The lookup selects the first line of the VAT account validation to be performed from the VAT statement. Only lines of the "Totaling Type" that have been set up are considered.
G/L Entries Accounting Proof
The Trial Balance and VAT (Extended Analysis) module provides you with another functionality, the G/L Entries Accounting Proof, which can be used not only within an affiliation, but also in any other client. The corresponding report cumulatively transfers the G/L entries to this page. The cumulative values displayed for a G/L account (depending on the selection in the report) include the beginning balance, amount, debit amount and credit amount. The individual fields of the page are described below.
The first time you open the G/L Entries Accounting Proof page, it is empty:

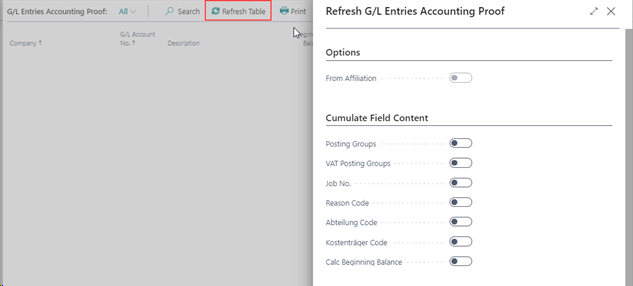
The menu button "Refresh Table" opens the following report options:

Refresh G/L Entries Accounting Proof - Options Tab
From Affiliation: If you call the update in a client of an established affiliation, the system automatically defaults this field with the YES option, so that the update takes into account items from all clients of the affiliation.
Note
If you want to perform the update only for the current client, set the option to NO.
Cumulate Field Content:
Posting Groups: This option refers to the fields Gen. Posting Type, Gen. Posting Group and Prod. Posting Group. If this checkmark is set, the posted values will be entered cumulatively according to your posting groups.
VAT Posting Groups: This option refers to the fields Gen. Posting Type, VAT Gen. Posting Group and VAT Prod. Posting Group. If this checkmark is set, the posted values will be entered cumulatively according to your posting groups.
Job No.: This option refers to the Job No. field. If this checkmark is set, the posted values will be entered cumulatively according to your job number.
Reason Code: This option refers to the Reason code field. If this checkmark is set, the posted values will be entered cumulatively according to your reason code.
Department Code: This option refers to the field "Global Dimension Code 1", which is named as "Department" in most companies. If this checkmark is set, the posted values will be entered cumulatively according to your Global Dimension Code 1
Project Code: This option refers to the field "Global Dimension Code 2", which is called "Project" in most companies. If this checkmark is set, the posted values will be entered cumulatively according to your Global Dimension Code 2.
Calc Beginning Balance: This option refers to the "Beginning Balance" column, which will be calculated if the option is selected accordingly. The beginning balance refers to the selected period of the update.
Note
If you set more than one of the options to YES, the posted G/L entries will be entered cumulatively after combining all the related fields as described above.
Refresh G/L Entries Accounting Proof - Company Tab
On this tab you can filter which companies are to be considered during the refresh. If no filter is entered here, only the current company will be considered.
Refresh G/L Entries Accounting Proof - G/L Entry Tab
On this tab you can filter which entries should be taken into account. For example, you can set a filter on the Posting Date field, but you can also run the report without a date filter. In this case, however, please keep in mind that, depending on the number of your G/L entries, this may result in extremely long report run times. When selecting the "Calc Beginning Balance" option described below, it is necessary to specify a filter for the posting date.
When you confirm the Refresh Table function with OK, the information will be entered into the G/L Entries Accounting Proof based on the options set. ATTENTION: With every refresh the existing data will be removed from the page!
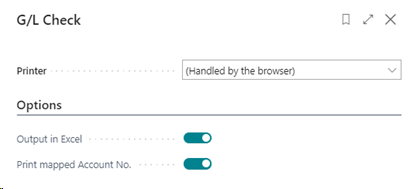
Using the Print menu button, the report can be printed and / or exported to Excel:
Example of the preview:

Via the account numbers shown for the respective G/L accounts, you can access the respective G/L account cards within the generated report.
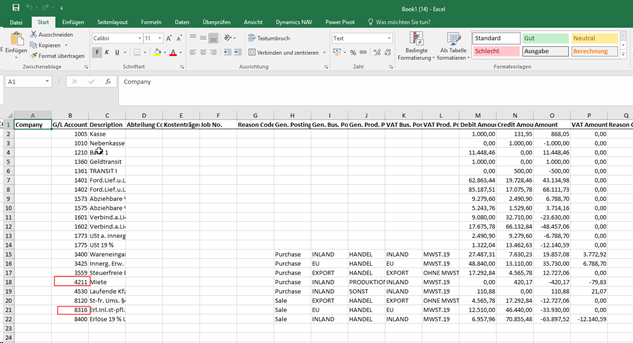
Example of Excel output:
From the menu on the G/L Entries Accounting Proof page, you can access the "Show Mapping" function. In the window that opens, you have the option to edit the Mapped Account Number field. This field is taken into account, for example, during the Excel export and is used in preparation for the e-balance. Here it can happen that deviating account numbers must exist in the target system. In the printout, the corresponding current account number is displayed for the individual entries of an account.
Before you can set up an mapping for the currently created G/L entries accounting proof, you must call up the "Create Mapping" function via the corresponding menu button. This creates the assignment table for the G/L accounts listed in the G/L entries accounting proof.
Then call up the "Show Mapping" function via the menu. In the "G/L Account Mapping" table that then opens, you can now assign the G/L accounts of the current G/L Entries Accounting Proof to an alternative account number via the "Mapped Account Number" column.
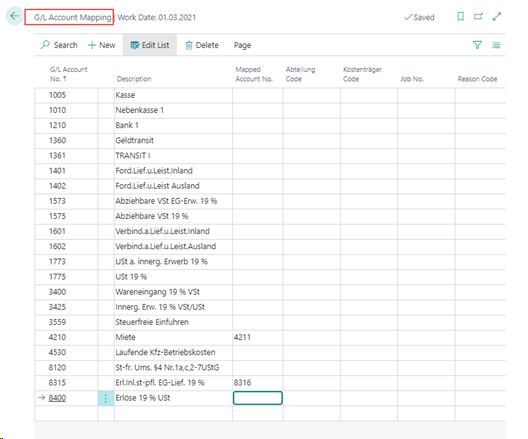
Using the Print / Excelexport function, you will receive the setup in the appropriate file format for further processing.
Purchase VAT deduction on Document Entrance Date (Purch. VAT Next Month)
With this functionality you get the possibility to perform the temporally correct input tax allocation for special cases according to § 15 (1) No. 1 UStG (input tax deduction only after the service has been performed and the physical invoice is available).
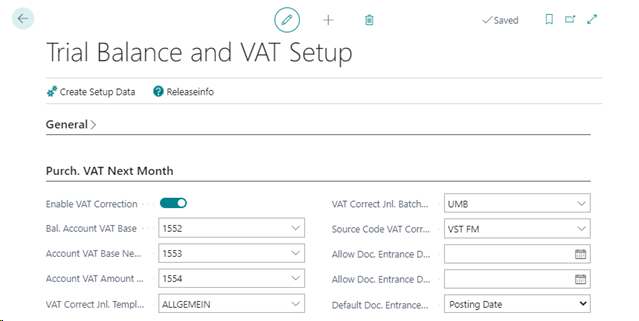
Purch. VAT Next Month Tab in the Trial Balance and VAT Setup
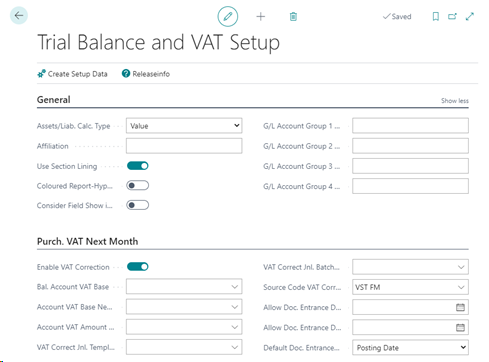
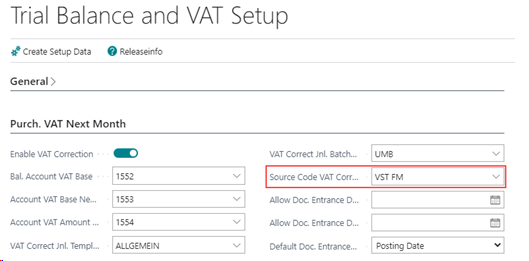
In the Trial Balance and VAT setup you activate the functionality "Enable VAT Correction" and define the three G/L accounts to be set up, on which the necessary transfer postings for the input tax deduction in the subsequent month are to be made (BMG = base amount) as well as the source code, which will then be transferred to these postings or entries.
The individual fields of the Purch. VAT Next Month tab of the Trial Balance and VAT setup are explained below:
| Option | Description |
|---|---|
| Enable VAT Correction | If you check this box, the document entrance date will be preassigned with the posting date in the purchasing documents invoice and credit memo. This functionality also exists in all purchase journals. Here, the general journal template must contain the type "Purchase". You can change the value before posting, but as long as this option is active, it is mandatory to enter a document entrance date for posting. |
| Bal. Account VAT Base | Here you define the G/L account to which the gross amount of the transfer postings will be posted. On the original posting date a posting is made (origin invoice as credit amount, origin credit note as debit amount), on the document entrance date the corresponding offsetting entry is made. |
| Account VAT Base Next Month | Here you define the G/L account to which the net amount will be posted on the original posting date. (VAT base next month) |
| Account VAT Base Last Month | Here you define the G/L account to which the net amount will be posted on the document entrance date. (VAT base origin last month) |
| VAT Correct Jnl. Template Name | This field is used as a default for the general journal template name in the "Correct VAT Entries" report to be run - but it can be changed there manually. |
| VAT Correct Jnl. Batch Name | This field is used as a default for the general journal batch name in the "Correct VAT Entries" report to be run - but it can be changed there manually. |
| Source Code VAT Correction | In this field you define the source code to be entered by the system in the postings/entries in the repostings regarding the input tax for the next month. We recommend the creation of a separate source code, e.g. VST FOLGE |
| Allow Doc. Entrance Date From | If a plausibility check is also to be performed on the document entrance date, the permitted, earliest document entrance date can be entered here. |
| Allow Doc. Entrance Date To | If a plausibility check is also to be performed on the document entrance date, the latest permitted document entrance date can be entered here. |
| Default Doc. Entrance Date | Here you can choose between the options "Posting date", "None" and " Document date". If you select the Posting date option, the document entrance date will be preset 1:1 with the posting date when creating a document/journal line. If you select the Document date option, the document entrance date will be preset 1:1 with the document date when a document/journal line is created. If you select the None option, the field will remain empty and the user will always have to fill the field manually; otherwise, an error message will be triggered when posting. |
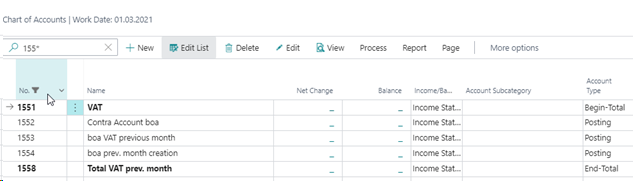
The total of the three G/L accounts is used for the balance sheet presentation of the receivable from the tax office from the "VAT Correction Next Month" with corresponding time delimitation. During the year, it is possible to work with corresponding sum filters in the chart of accounts.
Setup example:
Setting up the G/L accounts for the balance sheet presentation of the receivable from VAT Correction Next Month:
Activation of the functionality and deposit of the G/L accounts in the setup, as well as entry of an source code (the source code VST FM) was recreated manually:
For this purpose, enter the date of receipt of the document in your company in the OPplus field "Document Entrance Date" when posting the invoice. When posting a purchase credit memo accordingly also in the field "Document Entrance Date".
The document entrance date is stored in the following tables:
- G/L Entries
- Vendor Ledger Entries
- VAT Entries
In addition, you assign the VAT prod. posting group valid for the next month to the VAT prod. posting groups concerned in the posting. A detailed description of the "VAT Prod. Posting Groups Next Month" will be provided later on.
The Correct VAT Entries report, available in the OPplus Trial Balance and VAT area, will then generate entries for the VAT entries that have a document entrance date higher than the last one of the month of the related posting date, in order to allocate the input VAT to the correct period and to show the related receivable from the tax office.
The G/L accounts to be used in this process are defined in the module setup.
In this way, VAT entries are created on the date of entrance of the document, which can then be included in the correct period in the Sales VAT Advance Notification.
All master data to be created, which are necessary as a prerequisite for this functionality, as well as the description of the steps to be performed for the transfer posting to the subsequent period, can be found on the following pages.
Income Date VAT Post. Grp
For each created tax rate (=VAT product posting group) that can be affected by the described input tax problem in your company, you have to create another VAT product posting group, which will then be valid for the next month.
Example for input tax 19% deductible in the next month:
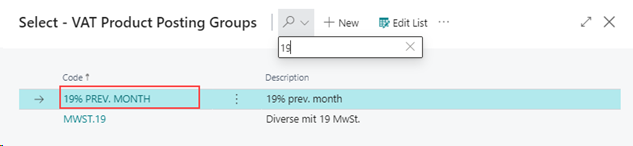
Now enter for the concerned combinations of the VAT posting setup in the additional OPplus field "Income Date VAT Post. Grp. (= "Income Date VAT Product Posting Group Next Month") the VAT product posting group that is to appear in the entry for the following month. In addition, add the new combinations to the VAT posting setup.
Example for input tax 19% deductible in the next month:

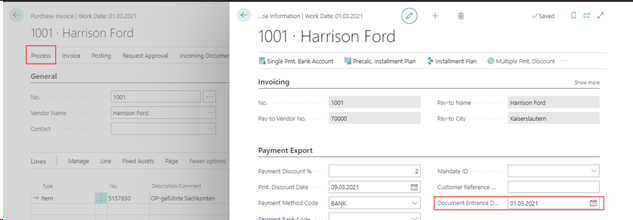
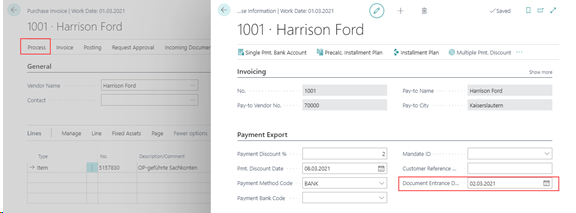
Entering the Document Entrance Date when posting an Invoice/Credit Memo
In order for the input tax to be reposted to the correct month, it is mandatory to fill in the document entrance date field when posting the related document.
You reach the Document Entrance Date field via the purchase document and the menu item Process/OPplus. The OPplus Purchase Information window opens. In the Payment Export tab you can enter the corresponding document entrance date.
After posting the purchase invoice, the VAT statement (preview) will initially show the input tax amount on the original posting date of the posted invoice.
Correct VAT Entries
Before the Sales VAT Advance Notification is created, the amounts of the "Purch. VAT Next Month" must be reposted. This is done through the Repost Correct VAT Entries report
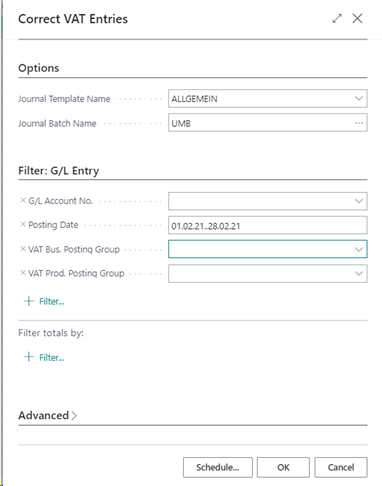
Correct VAT Entries - G/L Entry Tab
On this tab you can filter which G/L entries are to be taken into account. It is mandatory that you enter a date filter for the Posting date field here.
Correct VAT Entries - Options Tab
On this tab you enter the general journal to which the transfers are to be sent.
When you confirm the selection with OK, the system will search the VAT entries within the set date filter for those entries where the document entrance date is in a following month with respect to the selected entry date and will send the necessary transfers to the selected ledger sheet.

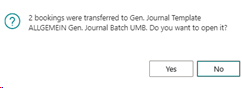
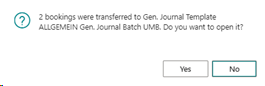
Security query for Correct VAT Entries
If the functionality for Correct VAT Entries has already been executed without posting the created journal lines, the lines will be placed in the journal again. It will be checked and asked previously if the existing lines should be deleted.
First, the following query appears:
After confirmation you will get the following selection:
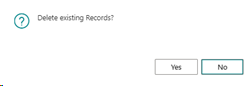
If you confirm this, the records will be deleted accordingly; if you select "No" here, you will receive the next query:
You can now view the journal if necessary and edit it manually. Should you select "No" in the second step, the new records will be created additionally.
Example Postings
When you run the Correct VAT Entries report, the system creates entries based on the G/L accounts defined in relation to relevant existing VAT entries. Two postings are created for each relevant entry:
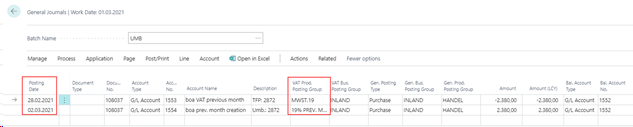

The first posting is performed:
- at the original posting date (here: 02/28/2021)
- with the original document number (this allows later to view all related entries via Navigate)
- with the original VAT information (here: Purchasing - DOMESTIC - VAT.19)
- on the G/L account "base VAT correction next month" (here: 1553) with origin invoice in credit with the net amount, with origin credit note correspondingly in debit with the net amount
- On the purchase VAT account defined in the VAT posting setup, the tax amount is posted to the credit side for the invoice origin, and to the debit side for the credit memo origin.
- and on the G/L account "balance account base" (here: 1552) with the gross amount at origin invoice in debit / at origin credit note in credit
- with a predefined posting text/description that includes the corresponding G/L entry number.
- The sum of the two accounts "balance account base" (1552) and "base VAT correction next month" (1553) results in the receivable in the amount of the tax.
The second posting is performed:
- on the invoice entrance date / credit memo entrance date (here: 03/02/2021)
- with the original document number (this allows later to view all related entries via Navigate)
- with the VAT information for the following month (here: Purchasing - DOMESTIC - VAT 19 NEXT MONTH)
- on the G/L account "base VAT correction origin previous month" (here: 1554) with the net amount at origin invoice in debit / at origin credit note in credit
- on the purchase VAT account defined in the VAT posting setup, the tax amount is posted to the debit side for the invoice origin, and to the credit side for the credit note origin.
- on the G/L account "balance account base" (here: 1552) with the gross amount at origin invoice in credit / at origin credit note correspondingly in debit
- with a predefined posting text/description that includes the corresponding G/L entry number.
- From the sum of the two accounts "banace account base" (1552) and "base VAT correction origin Previous month" (1554), the receivable in the amount of the tax amount from the first entry is now dissolved again.
Warning
It is imperative to note that the posting text/description is not changed and/or supplemented under any circumstances! In order to identify entries that have already been reposted, the system requires the corresponding G/L entry number in a specific format in the description. This will be correctly transferred to the Description field of the general journal line by the "Correct VAT Entries" report.
Purchase VAT in Sales / Sales VAT in Purchase module
With this function it is possible within the Trial Balance and VAT module (Extended Analysis) to address G/L accounts in sales documents (order, invoice, credit memo) that are coded as purchase accounts in such a way that this results in a purchase VAT posting. A practical example for this area of application would be the processing of deposits when I receive a deposit item from my customer in addition to the sale.
Similarly, it is possible to address G/L accounts that are coded as sales accounts in purchasing documents (purchase order, invoice, credit memo) in such a way that this results in a sales VAT posting.
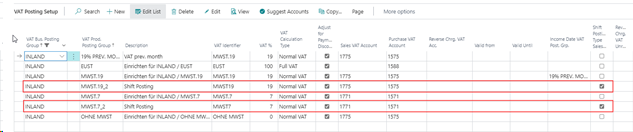
These accounting operations are possible both in the document creation and in the journal lines. For this purpose, the VAT posting setup table has been extended with the new field "Shift Posting Type Sales/Purch".
For all entries with a VAT posting setup marked accordingly, the posting type Sales/Purchase is automatically turned during the entry. It is therefore necessary to create new VAT posting setup combinations for the corresponding transactions.
In the sales document (analogously this also applies to purchasing documents) it is now possible to access a G/L account coded with posting type Purchase.
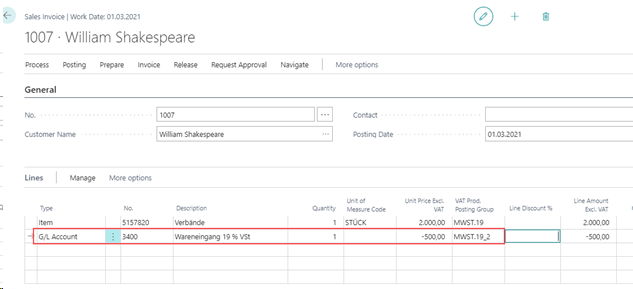
In the sales line, it is only necessary to change the VAT product posting group after selecting it, so that a VAT posting setup combination is selected, in which the new "Shift Posting Type Sales/Purch" indicator is set.
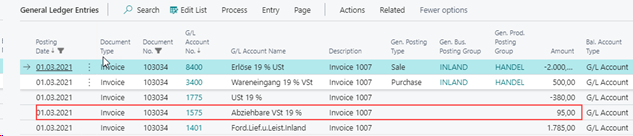
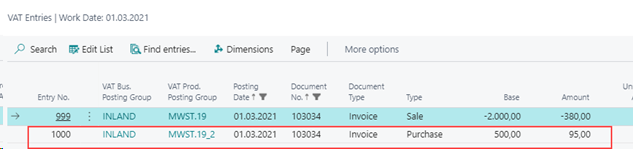
Separate tax entries are generated from an invoice entered in this way:
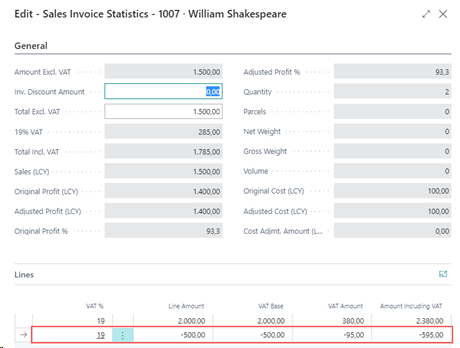
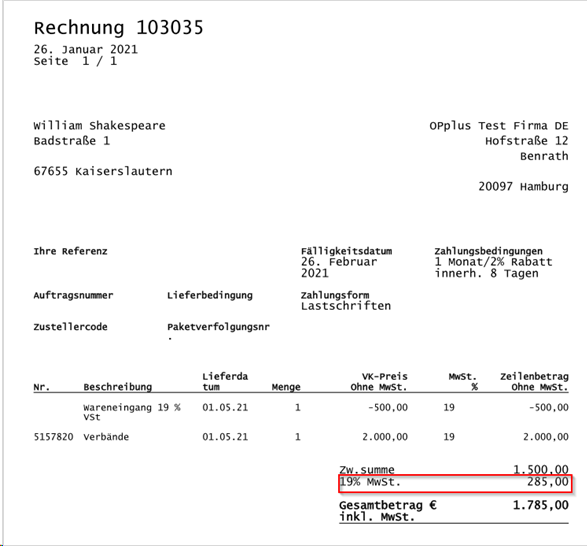
These are considered in the total VAT amount when drafting the invoice and when printing the posted invoice:
The G/L or VAT entries posted with a VAT posting setup combination in which the "Shift Posting Type Sales/Purch" indicator was set, are posted with the posting type " shifted", i.e. sales documents with posting type Purchasing or purchase documents with posting type Sales. Thus, in a sales document, a G/L account can be selected with the posting type Purchasing set up, and even though this is a sales document in this example, an purchase VAT entry will still be created (VAT In Sales) rather than a positive VAT entry.