Setting up a CSV Port for the bank import
intro
Analyzing Statement File
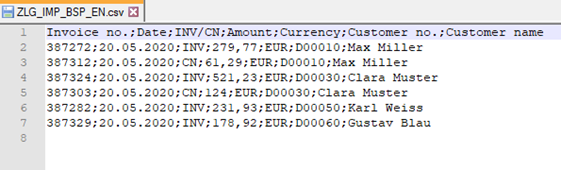
Open a sample of the external statement file by using an editor or a spreadsheet. Get an overview to see which field delimiters and character sets is used and if any superfluous headers and footers are included. For this example, we assume that you have a CSV file in the ANSI character set with semicolons used as field delimiters. The first line shows the column headings whereas the last line includes the balance. Between these two lines, the amounts of an accounts are listed which is unknown to your bank import up to now.
It is recommended to use a copy of the statement file during setup since the system normally does not allow access to a CSV file which is already opened by showing an error message. This may also happen during regular operation if the file has been opened elsewhere for any reason.
Warning
We recommended to use a copy of the statement file during setup since the system normally does not allow access to a CSV file which is already opened by showing an error message. This may also happen during regular operation if the file has been opened elsewhere for any reason.
Creating CSV Port
- OPplus 365 → Pmt. Import → CSV Ports →New
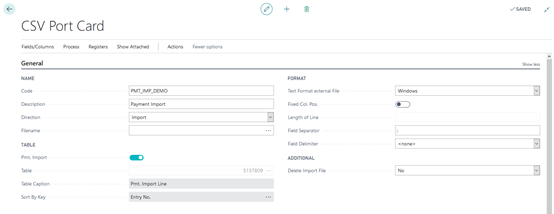
- Enter a code and a description.
- Specify the path and the name of the statement file.
- Activate the “Pmt. Import” field. The Direction, Table, and Sort By Key fields will be automatically filled with the required values.
- Specify the Text Format external File field (by selecting the “Windows” option), the Separator field (by entering a semicolon) and the Delimiter field (by entering a “ (double)).
Note
To be able to use the functionalities of the output / storage paths in the file import, file export and CSV ports in an On Prem installation, an extra extension must be installed. This is the extension "OPplus On Prem Extension".
In a Saas installation the paths are not available.
Creating CSV Port Lines
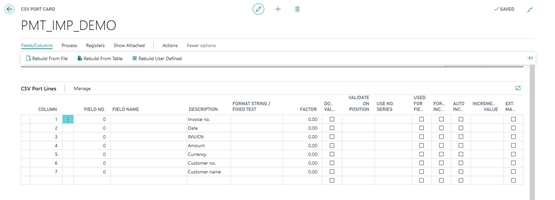
Now you must create a CSV Port line for each column of the statement file. Using the function Fields/Columns -> Rebuild from file, you can conveniently create the lines here while retaining the sort order specified in the file. For more information, please refer to chapter CSV Port Card – Functions ribbon.
If the process is performed successfully, the system will create a CSV Port line for each column of the statement file by filling in the Position and Description fields. The position number sequence is generously spaced which allows the user to enter additional fields subsequently. The values in the Description field originate from the first line of statement file. In this example, you will find the statement file's column headings listed one after another.
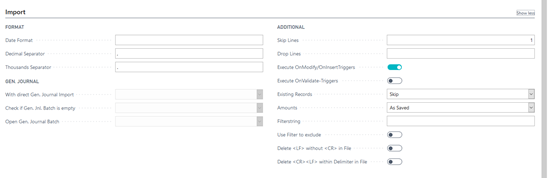
After creating the CSV port lines, on the Import tab, specify that the first line is to be skipped during import. This line contains the column headings and could cause errors during import. In our example, we do not have to cut off lines, because all lines should be imported.
Assign Lines and Columns
In the following, you will have to assign the corresponding fields of the Pmt. Import Line table to the columns you want to inherit. For this, click the lookup button in the Field No. The CSV Port field selection of the Pmt. Import Line (5157809) is opened. Click the field you want to consider and then confirm and close the window by clicking the OK button. The CSV Port Field Selection window is closed. Alternatively, you can enter the field number manually if you know it. Now you can see the number and the name of the field (in the Description field) in the CSV Port line.
Proceed the same way as described for the remaining lines.
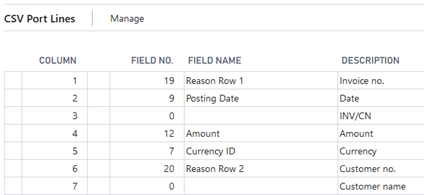
It is not necessary to expressively mark any columns you want to skip with Suppress = Yes. As long as no field has been assigned to a line/column, it will be ignored during import. In this example these are columns 3 and 7.
Warning
However, it is required to keep the exact column sorting of the statement file in the CSV Port lines.
Note
It makes sense to import information used for account assignment and allocation into the Purpose fields of the Pmt. Import Line. In our example, this is column 1 (invoice number) and column 6 (customer number).
Warning
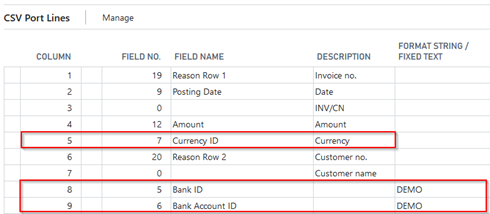
Please check if the Bank-ID (bank identification number), Bank Account-ID (bank account) and Currency-ID (currency code) fields which are mandatory for the bank import have been assigned. If not, you must manually adjust the content of these fields and then add the missing fields.
If the file does not include any bank account data, e. g. for payment advices, define a description for the bank account and bank ID. The Pmt. Import Interface is created with these values. In our example the currency is contained in the file. For Bank ID and Bank Account ID, however, new lines (columns 8 and 9) must be added.
Creation of the Pmt. Import Interface
Now start the import via Process -> Import/Export. A new interface is created and the following message appears:
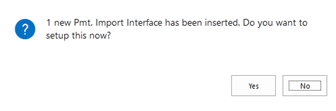
Click on Yes and the pmt. import interfaces list is opened:
Setting Up the Pmt. Import Interface
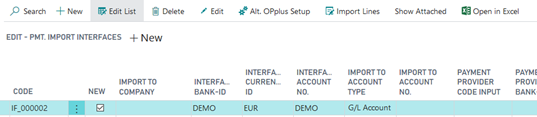
If the payment import interface list did not open, open it manually. A new interface was created with the values specified in the CSV port.
Note
Note that an interface is created for each combination of bank ID, bank account ID and currency ID. If the file contains several currencies, an interface is created for each currency.
The new interface must now be set up for further processing. For more information, please read the Pmt. Import Interfaces chapter.
Checking the Import
You can see the import results in the payment import register. For more information, please read the Open Pmt. Import Registers chapter of this manual.
Note on “Direct CSV Port Import into a Gen. Journal“
If you want to import a file directly into a general journal by using a CSV port, you need to consider the following:
- Make sure that the “Bank Import” field is not activated so that the target table can be selected. If the field contains a check mark, the import table will be directly set to 5157809 “Pmt. Import Line”.
- To import the data into a journal, you need to select table 81 “Gen. Journal Line”.
- If the key fields (Jnl. Template Name, Journal Batch Name, Line Number) are not imported via the file, you need to append them below the field assignments.
To make sure that the line number is incremented and entered automatically, you can use the “Auto Increment” and “Increment Value” fields to specify the intervals