Open Entry Application during Pmt. Import
Accounting
The process of filling in account number is performed in four steps which have to be performed as long as no account numbers have been assigned.
1. Step: Accounting Rules:
If an account number has been assigned in the accounting rules, this account number will be used. The assignment based on the accounting rules can be very useful. For example, it is possible to perform pre-accounting for the respective account if the text "Debit Interest" shall appear in the purpose.
If in addition to a catchword a "catchword 2" is used in the accounting rules table, both catch words must be found in the bank document in order to trigger accounting.
The settings for each bank account can be done separately. Also the pre-accounting can be filled with the global dimensions 1 and 2 (which are normally department and project) as well as with the shortcut dimensions and posting groups.
Example: The bank debits the amount of EUR 25.00 for debit interest 10/2014 and only indicates "debit interest" in the purpose. You want to post it on the G/L account no. 2110 by using the text "Interest Cost 10/2014".

For more information on the accounting rules, please refer to chapter Pmt. Import → Setup → Accounting Rules (Accounting Rules).
2. Step: Bank Account:
If it is no cash payment, the user can identify based on the bank account to which customer or vendor it refers if this bank account is available in your system.
Tip
Your system can learn! If you assign a posting line to a customer or vendor, the corresponding bank account will be automatically copied into the ”Imported Bank Accounts” table. For further information, refer to chapter “Imported Bank Accounts“.
If you do not want to save imported bank accounts for specific customers/vendors, you can define this for each master data separately in the Account Setting Pmt. Import table.
This might be the case e. g. for customers which pay a number of different customers who do not belong to the same association.
Another example is a municipality which pays for a diverse number of public organizations.
3. Step: Document No.:
The document number is specified in the purpose. To ensure that the assignment of account numbers works correctly by using information specified in the purpose, the Valid Sign in Document, Length Customer No. and Length Vendor No. fields in the Pmt. Import Setup must be filled.
The Pmt. Import to Gen. Jnl. Line batch proceeds as follows: Here all characters of the bank document which are included in the "Valid Signs in Document" field will be substituted by spaces. You should enter here all letter and numbers which could either appear in your document numbers or in your account number. Normally, these are the numbers 0 to 9.
In this case, you would enter the following into the "Valid Signs in Document" field: “0123456789“
Letters should only be entered here if they are a fixed and significant part of the document number, e.g. the document number is 4711D4850. In this case the D should be entered in the valid characters. You should not enter the IN as a valid character if, for example, there is an IN before the numbers, such as IN47114850 because the customer specifies the IN or perhaps does not specify it. In this case, it makes more sense to enter the IN as a prefix in the Account Hint Texts table:

The IN is placed in front of the digits during analysis and leads to the correct result.
Now specific terms remain in the purpose which only consists of the specified characters. All these terms which include the maximum number of characters as specified in the Length Customer No. field (or in the Length Vendor No. field) will be checked if they represent valid account numbers in the respective open entries.
The identification of accounts via the document number you must maintain the following fields
- Analyze Customer Doc. No.
- Analyze Vendor Doc. No.
- Analyze Customer Ext. Doc. No.
- Analyze Vendor Ext. Doc. No.
as well as
- Min. Length Customer Doc. No.
- Max. Length Customer Doc No.
- Min. Length Customer Ext. Doc. No.
- Max. Length Customer Ext. Doc. No.
- Min. Length Vendor Doc. No.
- Max. Length Vendor Doc. No.
- Min. Length Vendor Ext. Doc. No.
- Max. Length Vendor Ext. Doc. No.
in the Pmt. Import Setup.
All analyze fields which have been activated will be analyzed. According to the application's presetting, the system will search the Document No. field for customer entries and the Ext. Document No. for vendor entries.
If you specify the field lengths, only the “terms“ of document texts will be analyzed which meet the specified length. These fields are not filled by default. Therefore you should only fill in these fields if your document numbers always have a specific length!
4. Step: Customer No.:
If this analysis does not lead to a valid document number, these “terms“ are checked in the fourth step to see if there is a customer or vendor whose document number corresponds to the “term“ searched for.
5. Step: Sales Orders, Purchase Orders, Sales Shipments and Reminders:
If there is still no account assignment, the purpose is compared with the order, purchase order, delivery and reminder numbers. If an account assignment based on the reminder number has taken place, the documents listed in the reminder are used for automatic application during application determination.
Note
If you use the Gen. Ledger Open Entries module, these open entries will be considered for automatic application during the import into Gen. Journals.
Warning
For performance reasons, an automatic application via the amount only takes place if there are not more than 500 open entries on the respective G/L account. This restriction does not apply to the application via other application criteria.
Open Entry Application during Pmt. Import to Ext. Cash Receipt Journal
In order to apply open entries it is required that the “Account No. “ field is filled in the pre-accounting. The system will only try to apply open entries if the system finds an account number by using one of the four steps described in chapter Pre-accounting during Pmt. Import to Ext. Cash Receipt Journal. For this, the contents of the following fields in the Pmt. Import Setup play an important role: Cust./Vend. Document No. Offset and Cust./Vend. Ext. Document No. Offset.
The application of open entries is performed in several steps:
1. Step: Balance Method:
The balance of the account corresponds to the payment. In this case, all open entries on the account will be closed by using this payment.
2. Step: Document Method:
All open entries of the found account will be checked according to the following procedure: Does the purpose include the document with the document number starting with the “Poole Position Document No.” field?
Any found entries will be marked.
If the system finds one entry only, the payment amount will be compared with the invoice amount (considering the payment discount tolerances) and marked for application (if applicable).
If the system has found several entries, the total of all invoice amounts (minus the allowed payment discount amounts) must correspond to the payment amount. If so, the corresponding invoices will be marked for application.
Example:
Your document numbers are IN02 012 017, R02 012 018, G02-034 251. However, the customer often indicates the following the statement: “IN-No. 12017.12018. /. 34251“. The system would find these documents if you set the "Pool Position Document No." field contains the value 5 since your document numbers are only significant from the fifth position.
The higher the value, the less precise evaluations can be and the higher the probability of wrong assignments. The lower the value, the more it is required that the statement information precisely corresponds to the actual document number. This results in fewer entries being allocated. These explanations apply analogously to the field "Ext. document number". Note: The search only works with customer accounts if the field "Analyze Customer Ext. Doc. No." is activated in the Pmt. Import Setup.
3. Step: Amount Method:
If during the Pmt. Import to Ext. Cash Receipt Journal no open entry is found due to the document number, the system will search for the open amount. If the system finds exactly one open entry which corresponds to the payment amount, the application will be assigned. However, it is required that accounting of the import line has already been performed by using other procedures. Therefore the system will only search amounts within an account which has already been assigned.
‘Payback‘ feature (= Return Debit Notes)
The ’Payback' (Return Debit Notes) feature allows you to quickly process return debit notes of balanced customer entries.
The banks in Germany use a specific transaction code for return debit notes (currently 109) which can also be found in electronic statements.
The ’Payback' feature
- reverses application by marking the original payment (a process which reopens the invoice and the original payment).
- sets the application of the return debit note to the original payment and links the return debit note to the payment posting.
- creates a second line in the Gen. Journal for the fees indicated in the Purpose field, already accounted using the accounting rule for the BC Code 109 and the fee amount as amount.
In the accounting rule, you can select whether to post the second line (= fee amount) to an expense account or to the corresponding customer so that the return debit note can be found there as a receivable (= open entry).
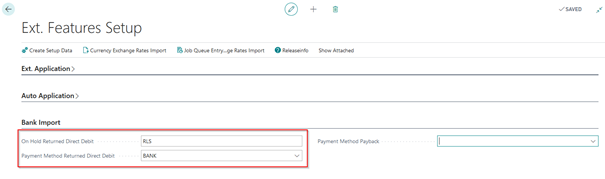
The consequence is that the original invoice is open again to be considered during the next payment proposal. If you do not agree with this, you can set the open entries to "On Hold" in the Pmt. Import Setup. Alternatively, you can give the original entries a different payment method:
The following settings and menus are relevant for this feature:
- Setup of the respective BC Code Accounting Rule (in the card)
- Activation of the “Payback“ field in the Option tab
- Line tab: “Abbreviations Charges” field‚ Option tab: ”Field Separator” field, “Decimal Separator” field
- Account assignment of the 2nd line (either G/L account for charges of returned direct debits or customer account type)
- Ext. Cash Rcpt. Journal Line: “Payback” (is filled automatically by the account assignment rule) and “Reopen-to ID” fields (should normally also be assigned automatically)
- Ext. Cash Rcpt. Journal Line – Function button “Process Paybacks“ menu (this function must be executed before the journal is posted)
A second line will not be created for return debit notes if the account type of the second line is G/L Account and if no account number has been specified. So the line is only created if a G/L account number (if applicable for fees) is specified.
If the Customer or Vendor account type is selected and no account number is specified, the account number of the previous line will be used.
If you know the abbreviation used for the fees from the purpose, enter it into the accounting rule (per line). Furthermore, you have the option of specifying the orderer in the posting description via a text variable.
Example:
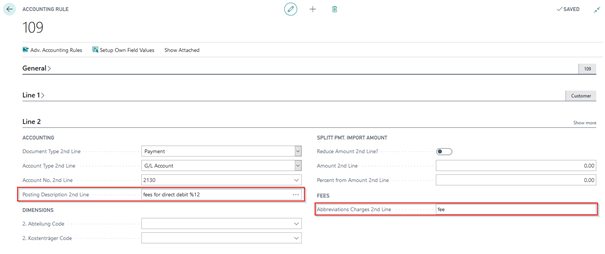
If a journal line receives an account assignment on the basis of this accounting rule, it is marked as "Payback" (return debit note) in the extended general journal line. The 2nd line is filled with the fee amount found in the purpose.
Example:

Return Debit Notes with additional Fees for Internal Processing
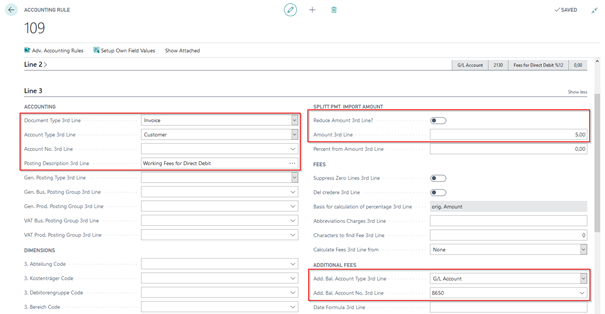
To post an internal processing fee to the customer, it is also possible to define an additional charge line for return debit postings using the account accounting rules and BC Code accounting rules.
On Line 3 tab, in the Add. Bal. Account Type 3rd Line and Add. Bal. Account No. 3rd Line, enter the desired account to which you want to post the fees.
The "Reduce Amount 3rd Line?" field must be deactivated because it is an additional fee. In the "Posting Description 3rd Line" field, you can enter the required posting description. You can change the document type to invoice.
The resulting posting looks as follows in the Ext. Cash Receipt Journal:

Note
Please note that no invoice document is created, only a corresponding posting to the customer.
Further Processing in the Ext. Cash Receipt Journal Line:
In the “Payback” line, place the cursor into the “Reopen-to ID” field and click the AssistButton to open the “Reopen Payback Entries” window. This window contains the payback entries and the applied invoices for the related customer:
In the “Reopen Payback Entries“ window, place the “Reopen-to ID“ for the respective entry by using “Set Applies-to ID“:
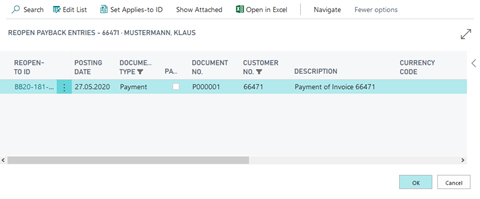
When you close the window by clicking the OK button (= ENTER), the “Reopen-to ID “ field will be filled in the journal line:
If the ”Reopen-to ID” field is filled, select the “Process Paybacks” menu item from the Function button:
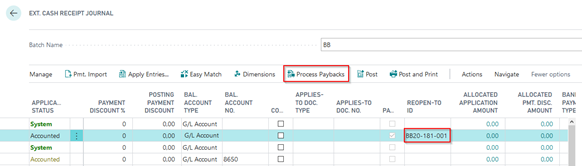
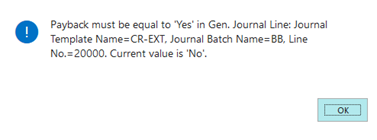
By using the “Process Paybacks” function, the posted applications of the payment entries are reversed via the “Reopen-to ID” and the “Applies-to ID” is set to the reopened original payment. You now need to perform posting. It is not possible to post the payment entries if the return debit entries have not been processed. Otherwise, following message appears:
SEPA Payback Enhancement
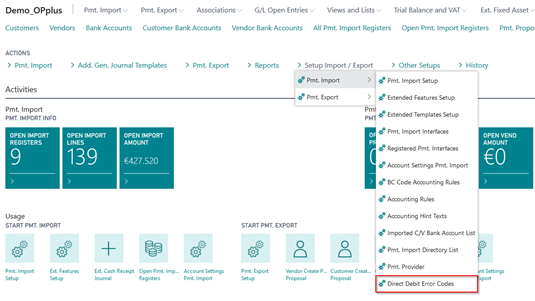
If you receive a return debit note, you may want to perform further activities as a result. To contact the respective customers, for example, there is the Direct Debit Error Codes table. To fill this table, you must activate the respective error codes with the "Create Follow Up" indicator. This is done automatically when you carry out the Pmt. Import Setup. They are predefined by the bank and can be adjusted if necessary. Via Import/Export Setup -> Pmt. Import -> Direct Debit Error Codes, you will find an overview of the common reasons for a SEPA payback.
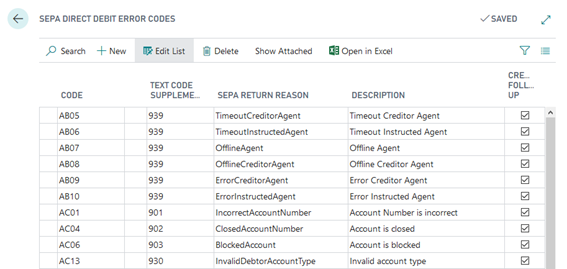
| Option | Description |
|---|---|
| Code | This field shows the code for the error code provided by the bank. |
| Text Code Supplement | The value of the text code supplement corresponds to the value which is provided in the file. This field is used for assignment during bank import. |
| Import to Account No. | Here you can enter, if required, a specific bank for which you want to use the code. If you leave this field empty, this code will be applicable for all banks. |
| SEPA Return Reason | This field contains the return reason specified by the bank. This field is only an information field. |
| Description | This field contains the German translation and/or the description of the return reason. This field is also only an information field. |
| Create Follow Up | If this field contains a check mark, it indicates to follow up the return reason. This means that in case of a SEPA payback, the system creates a record indicating that the user’s intervention is required. For more information, please refer to chapter SEPA Paybacks. |
SEPA Follow Ups
To open the SEPA Follow Ups window, click Pmt. Import -> DD Follow Ups.

| Option | Description |
|---|---|
| Entry No. | This field shows the entry number. |
| Account Type | The account type is specified here. |
| Account No. | This field shows the master data number, for example, the customer number that was used for the posting. |
| Posting Date | This field shows the posting date of the respective posting. |
| Document No. | The content of this field corresponds to the document number of the posting. |
| Pmt. Import Entry No. | This field shows the entry number of the payment import. Here you can see which import line corresponds to the payback. |
| Mandate ID | This field displays the Mandate ID used. |
| SEPA Error Code | This field shows the error code which was assigned via the text code supplement during import. |
| SEPA Error Description | This field shows the “Description” field of the SEPA error code. |
| Done By | Here you can enter your user ID if you have processed the SEPA payback. |
| Note | Here you can specify, if applicable, a little note, for example, to indicate the activity performed (e.g. blocking mandate). |
| Done at | This field is populated automatically if you enter your user ID in the “Done By” field. |
This table will be populated if you post a bank import record which is marked as a returned direct debit in the journal. This does not happen if the payback information is processed. It takes place during posting. Furthermore, only one record is created in this table, if the corresponding SEPA error code has an activated “Create Follow Up” field.
This list is intended to simplify processing paybacks and allows you to accurately classify which customers/mandates are affected by a returned direct debit and for what reason they have not been accepted by the bank.
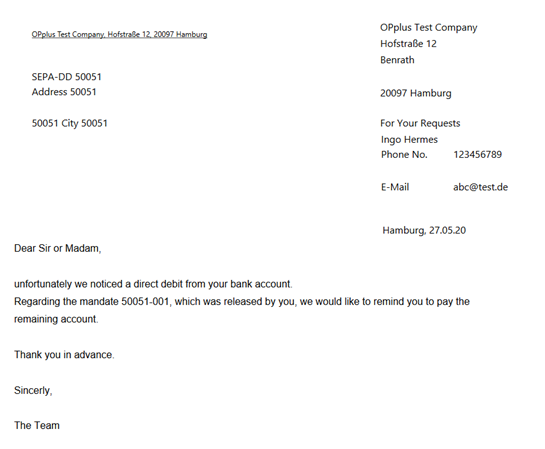
To inform a customer how to proceed after the returned direct debit, you can start a report using the windows mentioned above.

In the report, you can select a contact person and specify to set the printed record to “Mark as Done“.
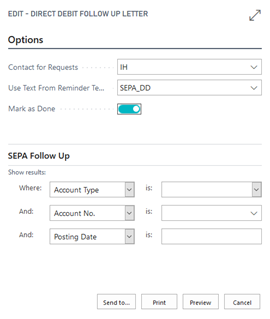
The report text is copied from the reminder method (as it is the case for e. g. balance acknowledgements). However, this is specified directly on the report’s Options tab and not in the person account:
In the reminder texts, you can specify corresponding % codes which are solved during runtime. The following options are available:
| Option | Description |
|---|---|
| %1 | Posting Date |
| %2 | Document No. |
| %3 | Amount |
| %4 | Mandate Reference |
| %5 | Name Bank Account |
| %6 | IBAN Bank Account |
| %7 | BIC Bank Account |
| %8 | SEPA Error Code |
| %9 | Error Code Description |
| %10 | Note |
| %11 | Account No. |
| %12 | Our Account No. |