Working with templates
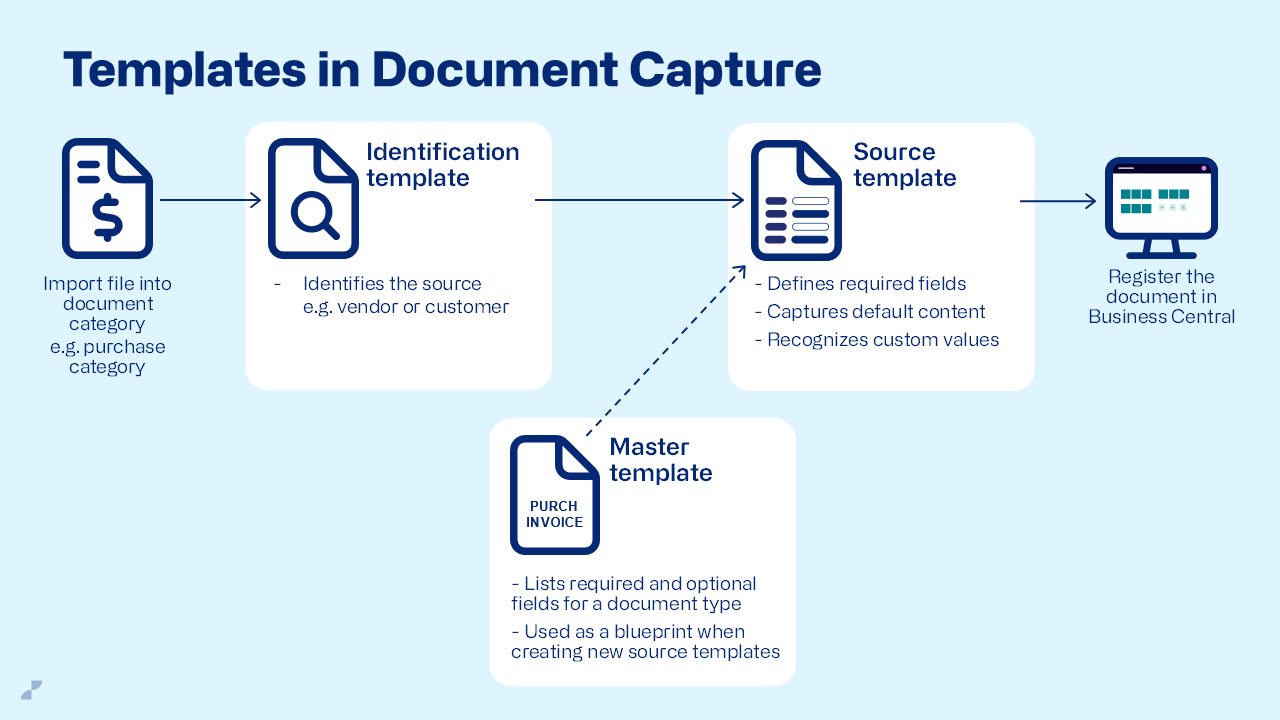
For Continia Document Capture to capture the fields of imported documents, each document must be linked to a document template. A document template is essentially a collection of rules and configurations that determine how documents should be captured and processed. There are three types of templates in Document Capture, two of which are document templates:
| Template type | Description |
|---|---|
| Identification templates | Identification templates are templates that identify the sources of imported documents. Whenever a document is imported, the identification template of the relevant document category searches for a matching record in the source table (e.g.: a vendor) and, if successful, links the identified record to the document. Each document category can only have a single identification template assigned. |
| Master templates | Master templates are the base document templates on which source templates (e.g.: vendor templates) are built. Each document category can have multiple master templates assigned. If so, Document Capture will ask you to choose which one you want to copy for use as a source template. |
| Source templates | Source templates are document templates that are each tied to a certain source (e.g.: a vendor). Document Capture uses source templates to capture, validate, and register documents. |
This article focuses on the two types of document templates – master and source templates – using vendors and the PURCHASE document category as an illustrative basis. For more information on identification templates, see Understanding identification templates.
Customizing templates
Master templates aren't linked to any vendors, but they're used as a basis for the creation of vendor templates. When a document is imported from a vendor with no associated template (typically when you receive a document from a vendor for the first time), Document Capture automatically creates a template for the vendor during field recognition by copying one of the master templates assigned to the PURCHASE category. The copied master template then becomes a source template that's associated specifically with this vendor – a vendor template.
However, you can customize the template if the default fields don't meet your needs. If you choose to customize the vendor template, for example by adding or removing fields, your changes only apply to this particular template and this particular vendor. For more information, see Managing template fields and Setting up new template fields.
You may also want to edit the master template. For example, if there are fields that should be captured in all or most of your documents, it's a good idea to add these fields to the master template, so that you don't have to add them manually to each individual vendor template. For details on how to edit the master template, see To configure master templates below.
Note
If you don't have any master templates, import the configuration files via the Set Up Document Capture assisted guide (online) or from the installation package.
To configure master templates
To configure master templates:
- Search (
 ) for and select Document Categories.
 - To open the purchase document category, select the PURCHASE line (not the PURCHASE code itself) and click Edit on the action bar.
- On the Templates FastTab, in the list of templates, select the master template for PDF files (PURCHASE-GB) and click Edit to open the template card.
- On the General FastTab, you can edit some of the basic template settings – such as what date format to use when capturing dates in documents, if this template should be the default vendor template, and whether it should capture document lines.
- On the Purchase Documents FastTab, you can edit a range of settings related to the registration, approval, and matching of documents.
- On the Fields FastTab, you can customize the individual template fields and their availability:
- To edit the properties of a field, or to move, copy, or delete it, see To customize master template fields.
- To create a template field, see To manually create a master template field.
- On the Codeunits FastTab, you can specify what codeunits to run at certain stages in the process in order to carry out certain actions.
For most of the changes you make to the master template, a dialog box asks if you want to update all related templates accordingly. If you click Yes, all vendor templates based on the master template in the PURCHASE category inherit the changes you've made.
Note
Unlike changes made in other sections of the master template, any changes that you make to the master template fields in the Fields section (step 6 of the guide above) are not pushed to the vendor templates that have already been created based on the master template. Vendor templates created after these field changes inherit them automatically.
To copy and create master templates
During the overall setup of Document Capture, a number of default master templates are created for several document categories – including the PURCHASE category. You can also create a master template by copying an existing one.
To copy and create master templates:
Search (
) for and select Document Categories.To open the purchase document category, select the PURCHASE line (not the PURCHASE code itself) and click Edit on the action bar.
On the Templates FastTab, in the list of templates, select the master template for PDF files (PURCHASE-GB) and click Copy... to open the Copy Template page.
Edit the default settings if necessary, then click OK > OK to create a master template copy and add it to the list of templates.
Note
For master templates, it's recommended that you disable Automatic Numbering and enter a name for the new template under New Template No., as automatic numbering provides the new template with a number that makes it difficult to identify.
To edit the copied master template, locate and select it in the list. Then, click Edit and follow the guide above.
To copy vendor templates
The process of copying vendor templates is similar to that of copying master templates, except for the naming of the new templates (referred to as numbering in the user interface).
To copy vendor templates:
- Search () for and select Document Categories.
- To open the purchase document category, select the PURCHASE line (not the PURCHASE code itself) and click Edit on the action bar.
- On the Templates FastTab, in the list of templates, select the template you want to copy and click Copy to open the Copy Template page.
- Edit the default settings if necessary, then click OK > OK to create a template copy and add it to the list of templates.
- If you chose to enable Automatic Numbering on the Copy Template page, the new template is provided with a number instead of an actual name (the next consecutive number in the list of templates). However, you can rename it by locating it in the list and entering a new name in the No. column.
Note
If you attempt to create a template related to a vendor that already exists in a different company, Document Capture checks if you want to copy it instead. This only works if the vendor names match exactly, though the casing may differ – such as Cronus and cronus.
Tip
To see the list of templates associated with a vendor, use the Document Templates action from the list of vendors or the Vendor Card. To reveal this action, which is hidden by default:
- Search () for and select Vendors.
- On the list of vendors, click Settings (
 ) > Personalize in the top-right corner.
 - On the action bar, expand the action group Related.
- Hover the cursor over Vendors > Document Templates, then click Show to make the action available.