Extended Financial Reports demo
The start a demo scenario for the Extended Financial Reports module:
- Select the search icon, enter Continia Demo Scenarios, and select the related link.
- For the Extended Financial Reports module, the following demo scenarios are available:
- Shifting Accounts
- Affiliation
- Account Groups
- Extended Lists and Reports: Customer open entries
Select the scenario, and on the action bar, select Run Scenario.
Shifting accounts
The Use Shifting Accounts demo scenario allows you to present an account schema in which the presentation of shifting accounts has been converted within the framework of a balance sheet generation. A corresponding account schema called shifting accounts opens after the report is executed.
To demonstrate the Extended Financial Reports module:
Select the
 icon, enter Continia Demo Scenarios, and select the related link.
Select Trial Balance and VAT: Shifting Accounts, and on the action bar, select Run Scenario.
The demo scenario enables you to:
View the setup of a specific financial report for shifting accounts.
Create entries for shifting accounts.
Select a financial report to view the effect of shifting accounts.
To view the setup of a report for shifting accounts:
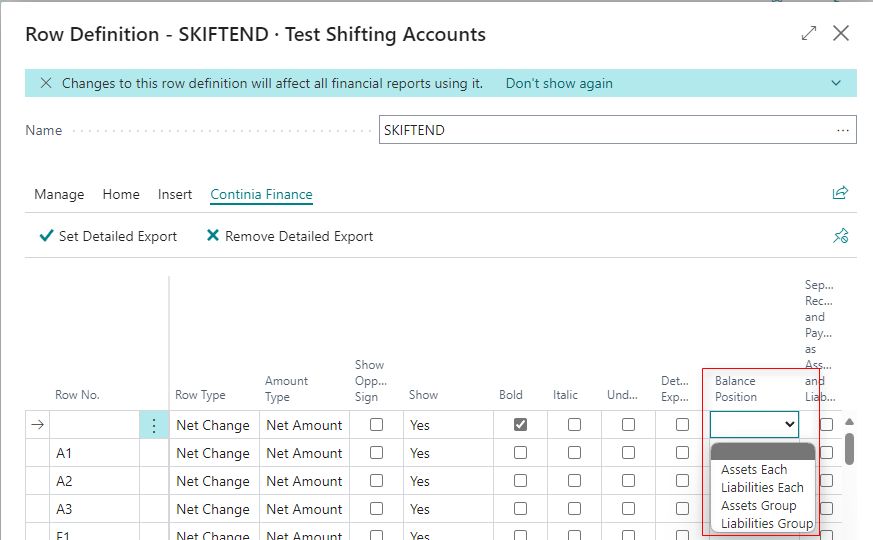
On the Shifting Accounts page, select Setup.
The created account scheme for demonstration purposes is structured as follows:
- Standard - in the row numbers under the description "Standard", the account scheme is set up in such a way that the existing entries of the accounts indicated in the Totaling section can be shown in the matrix as in the BC standard.
- Assets and Liabilities - the setup with the specifications of the extended account scheme is shown in the column "Balance Position". Here you can show the differences in the display of the values for a selected date range in the matrix. Display the differences between standard and shifting account functionality in the matrix or the corresponding report and show the disclosure of customer vendors and vendor customers based on the analysis of the sub-ledger accounts.
You can now explain the settings in the Balance Sheet columns.
 To use this field, an asset/liability calculation type must be defined in the setup of the Extended Financial Reports module or in the account scheme name. The calculation type set up for the demo purposes is Value.
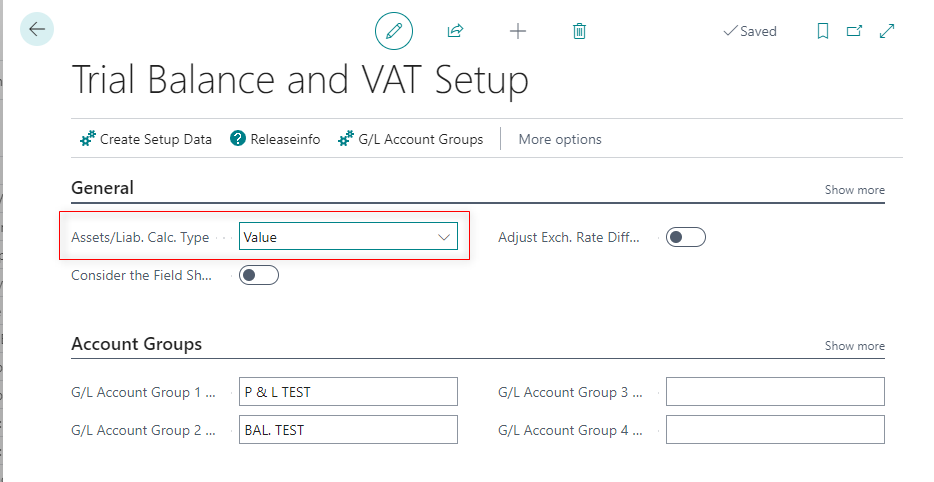
The Balance Position field enables you to display shifting accounts and shifting account groups. The calculation is performed for the accounts entered in the Totaling field (Posting accounts). The following options are available, which you can explain using the existing setup during your presentation and whose effects can be demonstrated on the existing account scheme:
- Empty - calculated values will always be shown here
- Assets each/Liability each - the system calculates the value related to the selected date filter per entered sum in the Totaling field. That value determines whether it will be displayed under Assets or Liabilities.
- Assets group/Liabilities group - the entered sum in the Totaling field determines whether the value related to the selected date filter is shown under Assets or Liabilities Group.
Explain that when setting up the account scheme, for each row with the Balance Position Assets separately, there must also be another account scheme row with the Balance Position Liabilities separately, which will request the same values. This ensures that the requested data is evaluated correctly.
Explain how in the Separate Receivables and Payables as Assets and Liabilities column you can specify whether the collective accounts are to be separated according to assets and liabilities (for example, for vendors with customer accounts). If you select the checkbox, the collective accounts' balances are not analyzed, but the customer or vendor accounts behind them are analyzed individually. This field can only be filled if there is an entry in the Balance sheet entry field.
Affiliation
To demonstrate affiliation, the demo scenario creates suitable postings for presentation purposes (Ledger entries and VAT entries) in two different companies and brings them together in a report in an affiliation.
To demonstrate the Extended Financial Reports module:
Select the
icon, enter Continia Demo Scenarios, and select the related link.Select Trial Balance and VAT: Affiliation, and on the action bar, select Run Scenario.
The demo scenario enables you to:
- Create two affiliated companies for the demo environment.
- View VAT postings in affiliated companies.
- Select G/L Accounts to view all postings in affiliated companies.
The Extended Financial Reports module also provides the functionality to create a VAT entry accounting proof. The purpose of this is to present the consolidation of VAT entries and tax bases from the individual companies belonging to the "BC_NAV" affiliation. In addition, this report can also be used for any other company that does not belong to a tax group.
The VAT entries accounting proof report transfers, among other things, the G/L account number to which the corresponding tax base of a VAT entry is posted.
Show that for a VAT entry, the heading of the corresponding VAT statement is displayed, in which the entry is included by value. In addition, a line is generated for each company with the total of the VAT entries (entry type = total VAT).
At this point, you can show that this value allows you to have a quick look at the calculated value of a payable load/credit per company, related to the displayed VAT entries.
Call up the report via the menu in the Continia Finance Role Center: Trial Balance and VAT/VAT Entries Accounting Proof. The menu item "Refresh Table" opens the report options to be selected.
| Register | Field | Explanation |
|---|---|---|
| Option | From Affiliation | This field automatically includes a check mark if you open the Refresh VAT Entries Accounting Proof report for an affiliation company. This way, it is guaranteed that the entries of all affiliation companies are considered in the report. If you want to refresh the report only for the current company, you must deactivate the From Affiliation check box. |
| Option | VAT Statement Template/VAT Statement Name | Here you can specify the VAT statement to be used to transfer the row number when running the Refresh VAT Entries Accounting Proof report. In the VAT Statement Name field, you can select the desired VAT statement. The template name is copied automatically and cannot be modified. |
| Option | Incl. Proof of VAT-Accounts | The VAT accounts will be listed. The prerequisite is that these are set up in the VAT statement. |
| Option | Proof of VAT-Accounts from VAT Statement Line No. | If the VAT G/L account validation is activated, the corresponding line number of the VAT accounting from which the validation is to start is entered here. |
| Option | Include VAT Entries | Possibility to filter the entries according to the setup open and closed. |
| Company | Filter which companies should be considered while refreshing. If no filter is set, only the current company is considered. See the description for the From Affiliation field. | |
| G/L Entry | Filter which G/L entries should be considered. It is possible to set a filter on the posting date, but the report also runs without any date filters. |
When the Refresh Table function is used, the previous data is deleted and new entries are entered.
The purpose of the VAT Entry Accounting Proof is to consolidate the necessary G/L and VAT entries of companies assigned to a VAT group. These entries are used to create a summarized advance VAT return (UVA) for the controlling body, which is the company responsible for submitting the UVA to the tax office. Please note that setting up a separate VAT statement Affiliation and a corresponding VAT statement name is not part of this demo tool. However, you can find detailed instructions on how to do this in the demo of the Extended Financial Reports module.
Account Groups
For presentation purposes, the demo tool creates account groups based on the categories and G/L account subcategories defined in the G/L accounts, as well as two corresponding account schemas, where you can demonstrate the functionality of the account groups.
Account groups are used to group G/L accounts into categories, which are then displayed under a single heading in the extended account schemes. This grouping can be achieved by referring to the desired account group in the Continia Finance column Extended totaling. For instance, G/L accounts can be assigned to specific HGB balance sheet items that have been previously defined as an account group. This eliminates the need to store each G/L account in the totaling field of a section of the account scheme.
The initial account schemes that will appear are the Balance Sheet Test and P&L Test. These are structured according to the G/L account categories and subcategories available in the BC Standard for all country versions. It's important to note that they do not correspond to the usual HGB (German) classifications. During the demo mode, it's possible to manually enter the transactions that lead to the account group amounts shown in the account schemes. However, without selecting demo mode, these entries are automatically made in the background once the presentation is started. This allows the corresponding summarized amounts to be shown directly in the opening account scheme, such as through the matrix.
Extended Lists and Reports
The demo data for the Extended Lists and Reports module facilitates showcasing features such as Output in Excel and Output in Excel Balance Ending Date of the report Customer - Open Entries.
The start a demo scenario for Extended Lists and Reports:
Select the search icon, enter Continia Demo Scenarios, and select the related link.
For the Extended Lists and Reports module, there is one demo scenario available:
- Extended Lists and Reports: Customer open entries
Select the scenario, and on the action bar, select Run Scenario.
Select Post for the system to create a General Journal that includes entries. For example, for the customer 50000 - William Shakespeare, 4 invoices are created. The posting date and the document date is the 31.12. of the previous year (starting from work date):
- Invoice 0002: 1.000,00
- Invoice 0003: 500,00
- Invoice 0004: 250,00
- Invoice 0005: 125,00
Additional 3 payments:
Payment 0006: 750,00: Posting-/Document Date 1st day of the penultimate month starting from the work date. Partial application invoice 0002.
Payment 0007: 250,00: Posting-/Document Date 1st day of the last month starting from the work date Application remaining amount invoice 0002.
Payment 0008: 250,00: Posting-/Document Date 1st day of the last month starting from the work date. Partial application invoice 0003.
Explain the postings and post the journal afterward.
Select List to show how to output in Excel.

Select Print or Preview to run the report.
Repeat the call-up of the report and type in the payment dates in Output in Excel Balance Ending Date. Now show the differences of the remaining amoun