Setting up mandates
SEPA DD Setup
In order to be able to make direct debit collections from your business partners under the SEPA scheme, you need authorization from the debtor, a so-called SEPA direct debit mandate. This is also submitted to the customer's bank, it is specific to the account and serves as authorization for the payout.
Please open the SEPA DD Setup and select the Mandate tab.
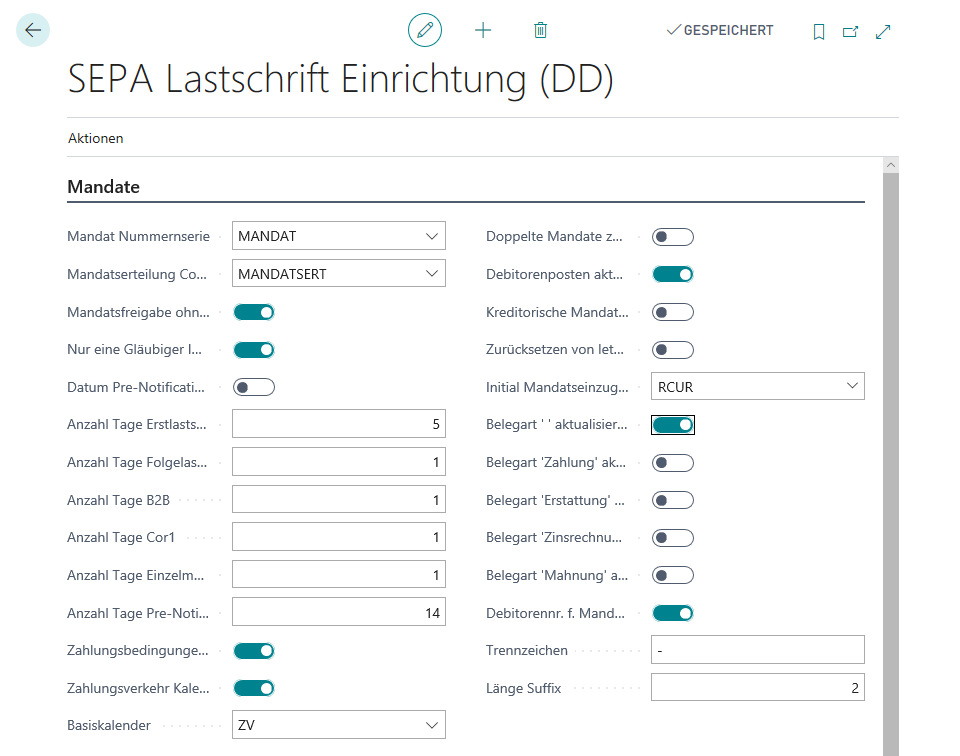
In the Mandate No. Series field, enter the number series to be used when generating the mandate.
Note
In deviation from Annex 3 DK of the SEPA Rulebook, the length of the mandate number is limited to 20 characters in order to enable an automated assignment of mandate numbers.
Via the Mandate issuance code you select from the Mandate issuance overview a text to be used in the standard case for your mandate issuance letter.
Use the switch Allow Mandate Release without Print if you want to check whether the field Outgoing document date of mandate issue is filled in the mandate when releasing it. This way you can also release mandates for which no mandate issue letter has been generated from DYNAMO | Cash Management.
If you set No the Only use one Creditor ID switch, you can store different Creditor IDs in your bank accounts. If you select the Yes option, only the unique ID stored in the Creditor ID field in this setup will be used.
If you want to fill the OPre-Notification Date is Document Date in the Customer Ledger Entries for the calculation of the collection date with the Document Date of the entry instead of the Posting Date, set this field to Yes.
Note
The SEPA Rulebook defines the SEPA pre-notification as obligatory information of the direct debit collector to the customer. The SEPA pre-notification informs the debtor about the upcoming direct debit collection and thus gives the customer enough time in advance to ensure that his account is covered. The transmission method is not defined for the pre-notification. E-mail, letter, SMS, fax or even a telephone call are permissible.
The SEPA direct debit must reach the customer's bank a predefined number of days before the due date. In the fields Days Single Mandate you specify the number of days of this lead time. Please coordinate this with your house bank.
If you want the Due Date from the customer ledger entry to be used to calculate the collection date, set the Consider Payment Terms switch to Yes. If you set it to No, then the collection date will be calculated using the Days Pre-Notification field.
Then specify which calendar should be used to calculate deadlines. To do this, use the parameters Use Payment Calendar (if No, the default calendar of Business Central will be used) and Basic Calendar. The calendar for calculating the collection date is stored here, so that Sundays and public holidays can be taken into account accordingly in the calculation and your files are available to the banks on time.
Decide whether you want to Allow double Mandate. If you want to be able to use multiple mandates in parallel per customer and customer bank account, select the Yes option here. Otherwise you will get an error message as soon as you try to create another mandate for an already existing combination of customer, bank account and mandate type.
Important
Even if you have selected the Allow double Mandate option, the first valid mandate is written to the customer ledger entry by default during processing. You should therefore decide which process to be used to transfer the correct mandate number to the item. This may require a program adjustment in the Sales area.
In many cases, it makes sense to have the system check whether open invoices or credit memos exist for the associated customer when releasing mandates. The mandate number can then be entered in these documents, and the function for calculating the collection date is executed. To do this, set the Update Cust. Ledger Entry at Release Mandate switch to Yes.
If, for completeness purposes, you also have vendor mandates that you want to manage in Business Central, you can use Check Vendor Mandate to check their validity in the statement processing lines for the selected vendor.
If necessary, you can use the Allow reset of last Debit switch to reset the Next Debit is Last identifier stored in the mandate and reactivate a mandate with the Debit type = FNAL.
Via the Initial Mandate Debit type you define the default value for the Debit Type in new mandates. This is also used for the automated changeover from COR1 to CORE mandates.
By default, mandate numbers are written to open customer ledger entries of document types Invoice and Credit Memo. If you set one of the switches Update Document Type ... to Yes, entries with the corresponding document type will also be integrated into the procedure.
Tip
If you integrate further document types into the direct debit procedure, you should think about the integration of the pre-notifications into your process.
If you want to use Use Customer No. for Mandate, then set the switch with the same name to Yes.
In the case of customers with multiple mandates, you can still code them using the customer number by adding a sequential number as an appendix (suffix). Separate the suffix from the customer number using the Separator stored here and specify the Suffix Length.
See also
Setting up Mandate Delegation texts